Git tutorial for beginners - Part 2: Git repository, working tree and staging area
Understand Git repositories, the working tree and the staging area


Let’s continue our journey into the universe of Git.
This is the second article of the series:
- Part #1 — What is a DVCS: https://itnext.io/git-concepts-for-newcomers-part-1-what-is-a-dvcs-bc873076c424
- Part #2 — Working tree and staging area: https://itnext.io/git-concepts-for-newcomers-part-2-git-repository-working-tree-and-staging-area-a2e720bf3528
- Part #3 — Commits, log and amend: https://medium.com/@dSebastien/git-concepts-for-newcomers-part-3-commits-log-and-amend-6dcbb05370c
- Part #4 — Branches: https://medium.com/@dSebastien/git-concepts-for-newcomers-part-4-branches-52aee1da4385
In this post, I’m going to explain the major areas to be aware of when using Git. These are: the repository itself, the working tree and the index, also known as staging area.
Let’s get started!
Creating a Git repository
If you’ve followed the last article, then you might have created a repository already. If not, go ahead and create one now using the git init command:
git init
You can do this anywhere, but for simplicity’s sake, do it in within an empty folder.
Now that it’s done, if you list the files, you should notice the presence of a .git directory. This is where Git stores all of the repository data/metadata. We’ll explore the contents of that folder in a later post (tons of cool things to learn!). For now, just notice that it exists and keep in mind that it is the repository:
$ ls
total 20K
drwxr-xr-x 1 dsebastien 197121 0 May 17 19:04 .
drwxr-xr-x 1 dsebastien 197121 0 Apr 26 18:45 ..
drwxr-xr-x 1 dsebastien 197121 0 May 17 19:04 .git
At this point, if you execute the git status command, here’s what you should see:
$ git status
On branch master

No commits yet

nothing to commit
There are a few things to say about this:
- First, we’re on the default “master” branch. We’ll explore branches later on; forget about those for now
- Second, Git tells us that there haven’t been any commits so far, which makes sense since this is a brand new repository
- Finally, Git doesn’t see anything to commit. Again this is normal since we haven’t done anything so far
Note that if you're using a recent version of git, your default branch might be called main instead.
The git status command allows us to inspect our repository. It shows the status of the working tree, as well as the status of the index (also known as the staging area). These terms are important; I’ll explain each over the next sections.
Areas overview
As usual, one picture is worth a thousand words:
For the moment, ignore the arrows in the above diagram. Instead, focus on the columns/lanes.
Git makes the distinction between three distinct areas/concepts:
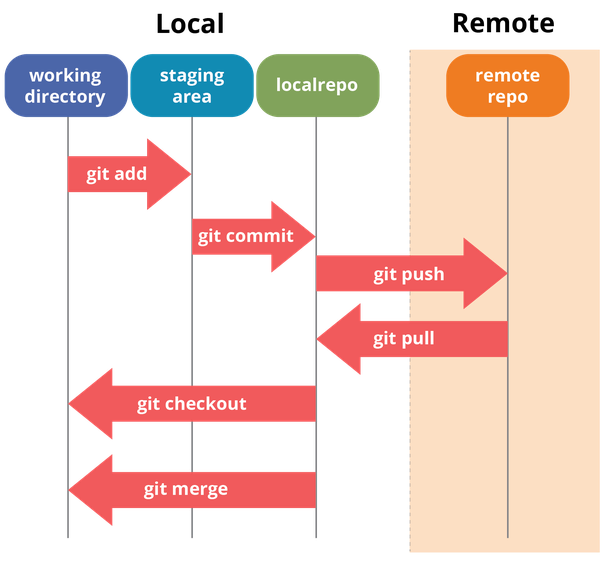
- The repository itself, which is stored within the
.gitdirectory, as discussed in the previous section - The working tree, which corresponds to the current state of files on your filesystem
- The staging area (also called the index), which is the area that you can use to prepare commits / temporarily save your work
In the schema above, there’s also a mention of a remote repository, but we’ll keep that for later ;-)
Let’s discover those areas, one at a time.
Git repository and the master branch
As I’ve said before, I won’t cover the details of the “.git” folder contents for now. Still, it’s important to understand that the Git repository which we’ve created earlier is actually stored within that “.git” folder. What’s outside of it is what is called the working tree; I’ll clarify that in the next section.
If you want to visualize the status of the Git repository at this point, then picture this as being the contents of the “.git” folder:
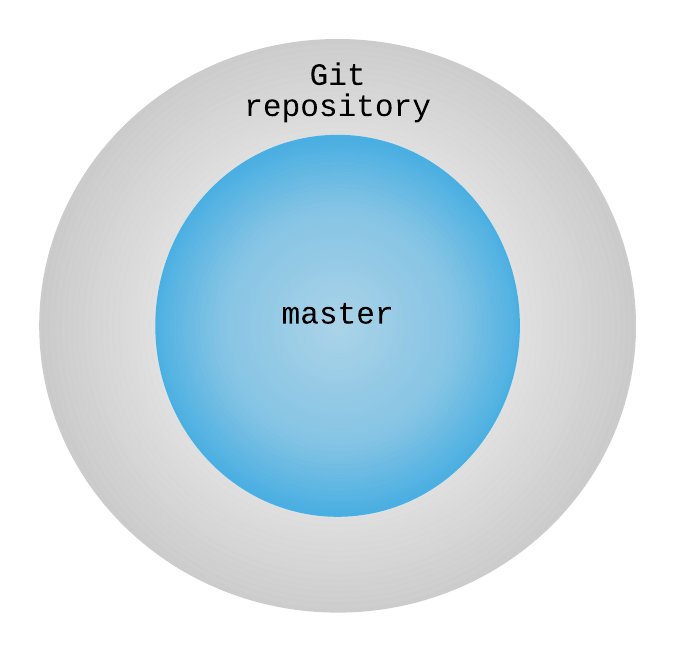
It’s an over-simplification, but it is still useful to create a first mental model of how Git organizes its contents.
At this point, as pointed out by the git status command, our repository is on the “master” branch (i.e., the default branch). I’ll show you later on that a git repository can indeed contain many branches, as well as many other cool things ;-)
Everything that we commit (i.e., save/persist) to our repository will be stored within the .git folder and will be “added” to the “master” branch, until we decide to switch to (i.e., checkout) a different one.
Without diving right now into what branches are, how they’re created, etc, let’s try an analogy: imagine that a branch is like a “book”. You can add pages to it (through commits), you can rewrite pages if you’d like (using amend), reorganize the pages (using rebase), or even mix that story with other ones (using merge, rebase). And of course, the pages of the book are numbered and follow each other in a specific order. I’ll teach you about those operations later.
Working tree
With git, a working tree (or working directory) is a directory tree on your filesystem, that is associated with a git repository. This may not sound super clear; let me explain.
The working tree is the first one that you see when you look at a folder containing a git repository. The working tree is what sits on your filesystem. It may contain exactly the same content as a branch in your repository, but it can also be completely different, depending on the changes that you make to it.
Let’s try another visualization:
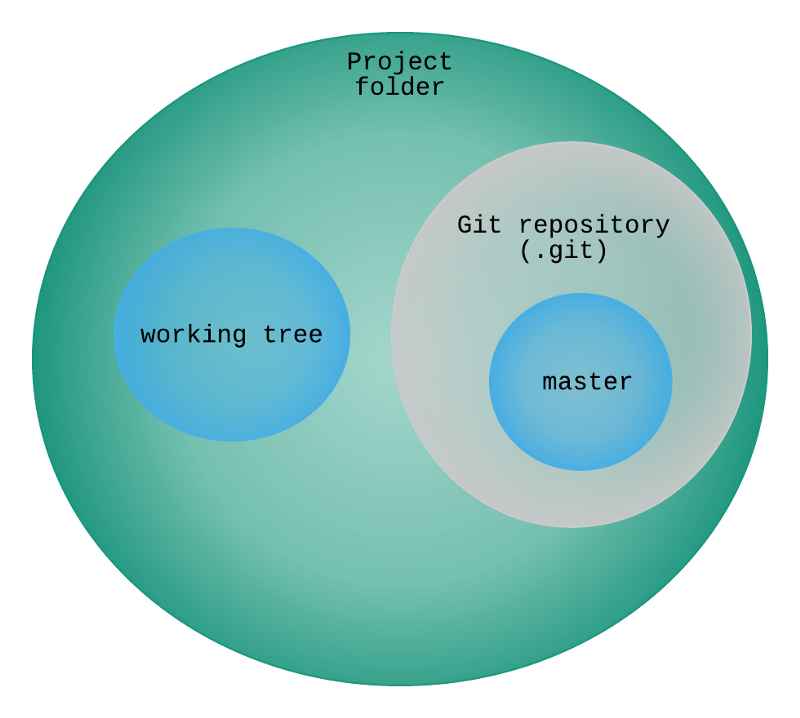
In the previous section, we saw a part of this logical diagram; namely the contents of the .git folder. As we saw, the “.git” folder is the whole repository, which contains all of the content: branches, tags, commits, etc (much of which that we still have to discover). Here, what we see is one level higher: the contents of the project folder or “workspace”, however you prefer to call it.
As soon as you create a git repository in a folder or clone an existing one, then that folder becomes a working tree. A working tree is composed of everything that is part of that folder and its sub-folders, apart from the top level “.git” folder. In practice, it is possible to have multiple working trees, but this is out of scope of this series.
In our example repository, the working folder is still empty at this point. Let’s add something to it. Go ahead and create a file with some text in it:
Now, execute the git status command once again:
As you can see, Git has noticed our new file. But at this point, it doesn’t care all that much about it. It just tells us “okay, I’ve noticed the presence of a file in the working tree, but I’ve not been told to track it”.
If you delete the “hello.txt” file now, then Git won’t mind. Also, unless you stage and commit the changes, these won’t get added to the Git repository, meaning that they could be lost.
As shown above, there is nothing to commit yet, even though we did create a file. The reason is simply that the file is still untracked.
To understand what this means, I need to tell you about the Git index.
If you want to go further, you can check out these links:
- https://medium.com/@lucasmaurer/git-gud-the-working-tree-staging-area-and-local-repo-a1f0f4822018
- https://medium.com/statuscode/saving-time-with-multiple-working-trees-in-git-cba4bf5419d3
Index (aka staging area)
A crucial notion to understand about git is its index, also called the staging area.
As we’ve seen in the last section, Git is aware of everything that happens inside of the working tree, but it only tracks the files that it is told to track.
The Git index is a staging area between your working tree and your Git repository. It allows you to precisely control what Git should track, what it should include when you decide to create a commit, etc.
With Git, commits (i.e., “save points”) are created based on what has been added to the index. At this point, you probably wonder how to add/remove things from the index. Let’s see how that works!
When adding/removing content to/from the index, we’re often talking about staging/unstaging changes.
To stage a file, you can use the git add command. Go ahead and use it to add the “hello.txt” file:
$ git add hello.txt
Once done, if you run git status again, here’s what you should see:
Now Git not only sees the “hello.txt” file, but it also tracks it. The git add command tells Git to add the file(s) and their contents to the index.
With that done, our “hello.txt” file is now part of the staging area. It is a sort of “save point”; it isn’t yet part of the Git repository, but Git has saved a snapshot of the contents.
Adding files to the index serves two purposes:
- Create a snapshot of the added files (i.e., sort of save point)
- Mark the changes to consider when creating a commit
As shown in the code listing above, Git tells us that we now have changes ready to be committed. Git considers whatever is part of the staging area to be the content that should be committed. I’ll explain commits in the next post of the series. For now, let’s keep our focus on the index.
As I’ve said, the “hello.txt” file has now been “saved” to the staging area. This means that, from now on, we can recover that version of the file.
Let’s try something. Go ahead and:
- Delete the “hello.txt” file (oops)
- Execute the following command to recover the file from the index:
git checkout -- hello.txt
As you can see, we could easily recover the deleted “hello.txt” file and put it back into the same state as staged version, thanks to the git checkout command. Isn’t that great?
In addition, now that Git tracks our file, it also keeps track of the changes that we make to it. Let’s see what this means.
Go ahead and modify the contents of the “hello.txt” file:
Now things are getting more interesting! Git has noticed that we’ve made changes to the file. It knows that there’s a difference between the version that we’ve “saved” in the index and the current version of the file in our working tree. At this point, the distinction between the working tree and the index should be clear.
In the index, we have saved the first version of the file containing only “Hello world” using the git add command. Now, the file in our working tree instead contains “I am a Git newcomer”, but that version of the file only exists within the working tree. The new contents haven’t been staged (i.e., added to the index) yet.
Using the git diff command, we can ask Git to tell us about the differences it sees between the state of the repository (which is still empty at this point, basically), the index and our working tree:
Git knows precisely what differs between the file in the index (i/hello.txt) and the working tree (w/hello.txt).
Tip #1: You can also see the diff for a specific file by adding the path/name at the end of the command.
The really cool thing about the Git index is that you can use it to assemble sets of changes that really only contains what you really want to commit at some point in time, even if there are currently more changes in your working tree. This is something that I do all the time.
The git add command is actually more powerful. If you execute it with the --patch or -p flag, you can decide to only add specific parts of the file to the index. You can thus be selective and only stage specific blocks or even specific lines. Again, this is a super cool feature of Git that I rely upon on a daily basis. There are countless occasions where I decide to fix a small issue while working on something, but those modifications have nothing to do with what I’m currently working on. Thanks to this granular support for adding so-called “hunks” and lines, I can create commits that only contain the relevant changes; nothing less, nothing more. Neat!
Tip #2: git add has a cool interactive mode
Tip #3: you can use git add -A to add everything at once to the staging area. Be careful with this though. Sometimes, you might add things that you don’t expect/want to the staging area and, ultimately, to your commits. I’ll explain about how to ignore files in a future article.
Of course, you can also remove things from the index; otherwise it would be a somewhat problematic :p.
In order to remove changes from the staging area, you can use the git rm command. Note that git rm can remove things from the index or from both the index and the working tree, depending on the options. If you only want to remove something from the working tree, then you can use the standard operating system commands.
Finally, the git mv command can be used to move/rename files.
You can learn more about the Git index here:
- http://shafiul.github.io/gitbook/7_the_git_index.html
- https://medium.com/hackernoon/understanding-git-index-4821a0765cf
Conclusion
In this second article, I’ve taught you about the most important areas to be aware of with Git: the working tree, the index (or staging area) and the repository itself.
In the next article, we’ll build upon this knowledge and we’ll discover how to actually save our work using commits. Stay tuned!
That's it for today! ✨