Git tutorial for beginners — Part 4: Branches
Let’s now learn about Git branches!


Let’s now learn about Git branches!
This is the fourth article of my Git concepts for beginner series. If you haven’t read the previous ones, then go read those first:
- Part #1 — What is a DVCS: https://itnext.io/git-concepts-for-newcomers-part-1-what-is-a-dvcs-bc873076c424
- Part #2 — Working tree and staging area: https://itnext.io/git-concepts-for-newcomers-part-2-git-repository-working-tree-and-staging-area-a2e720bf3528
- Part #3 — Commits, log and amend: https://medium.com/@dSebastien/git-concepts-for-newcomers-part-3-commits-log-and-amend-6dcbb05370c
- Part #4 — Branches: https://medium.com/@dSebastien/git-concepts-for-newcomers-part-4-branches-52aee1da4385
In this post, we’re going to explore Git branches, one of the fundamental concepts of Git and certainly the one that makes it one of the very best version control systems out there!
Branches are part of the core concepts that you’ll use on a daily basis, so it’s important to clearly understand what they are, how to manipulate them, but also to have a clear understanding of how they “work”.
Let’s get to it!
What are branches?
Anyone who likes science fiction should immediately fall in love with the concept of branches, since they’re just like alternate realities.
Whether we’re talking about Git, SVN or other version control systems (VCS), there is always a default branch or “starting point”. As I’ve mentioned in the second article of the series, for Git, that default branch is called “master” (but may be renamed if you also think that #blacklivesmatter). In the case of SVN, that branch is usually called the “trunk”.
When we create a brand new repository, we only have that master branch, or “main line” of code. We can add commits to it, rework those commits, etc, just like we saw in the previous article. But having a single branch is quite restrictive. What if you want to try out new ideas? Or work on something on the side for a while, before integrating it with the rest? Branches are the solution for these cases and many others.
Branches, sometimes also called trees are separate “versions” of the codebase that can evolve independently of each other, but that can also be “merged” back together to integrate the changes and create new realities; just like when characters from Sliders go to another dimension and wreck havok (or try not to and fail miserably). Each branch has its own history & commits.
The name of course refer to tree branches, which ramify:

The difference with actual trees is that branches in a version control system can “join” (or be merged with) other branches. Just like linux distributions:
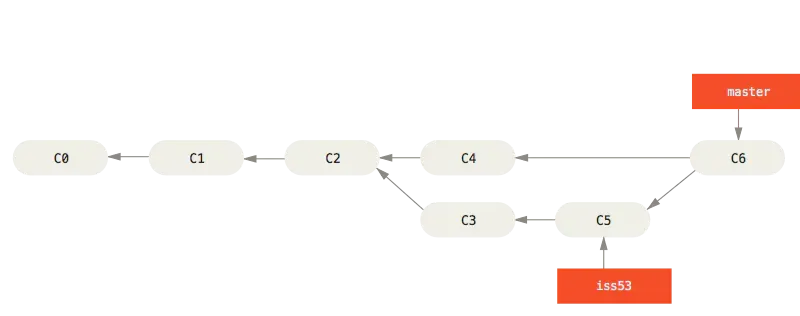
In the example above, taken from Git’s official documentation and read from left to right, we can see how branches can be created at some point and merged back later on. Let’s go through the example to better understand this.
First of all, three commits were created on the “master” branch: C0, C1 and C2. Then, a branch called “iss53” (or alternate reality, if you prefer) was created based on the state of the code in C2. In that iss53 branch, new commits C3 and C5 were then created. As you can see, the “iss53” branch label is attached to that last C5 commit. I’ll come back to this, but this represents what is called the tip of the branch.
The C4 commit that was added to the master branch right after C2 did not impact the “iss53” branch at all. It just didn’t happen in that separate reality.
Finally, C6, a special commit called a “merge commit” was added to the master branch, merging the changes made in the “iss53” branch with the master branch. The C6 commit is the tip of the master branch; also called the HEAD.
If this isn’t clear enough, let’s try an analogy. Imagine that each commit represents a page in a book. So you create your repository and start writing. You create C0 for the cover page, C1 for the first page and then C2 for the second page. At that point, you realize that you have two ideas for what comes next, so you create a new branch in which you create C3 (page 3) and C5 (page 4), with one version of the story.On the master branch, you create C4 (page 3), which is another version of the story. After all, you realize that those two stories can in fact be combined and that you don’t need to keep the two stories separate. At that point, you merge the “iss53” branch with the alternate story back into the “master” branch.
I won’t get into the details of “merging” for now, but the idea is quite simple: apply changes made on branch onto another; adapting whatever is needed in the process.
Note that branches don’t have to be merged together; they can keep existing for as long as you want; it doesn’t matter. Moreover, branches continue to exist even if they’re been merged into other ones already. So, you could keep two branches and merge one into the other (or vice versa) as many times as you want/need.
For instance, it’s not unusual to have branches corresponding to each environment that the application is deployed in (e.g., DEV, ACCEPTANCE, PRODUCTION) and to update those when needed. I’ll tell you more about so-called “branching models” in a later article.
Still, I generally prefer short-lived branches that I throw away once they have been merged into the mainline.
Benefits of branches
As we saw in the previous example, branches allow to work on different things in parallel or on alternate implementations. Branches are great because they allow us to experiment, to diverge from the mainline without impacting it, to work in isolation and to keep things clean.
Without branches, we would have to duplicate repositories and it would be unmanageable.
Another advantage of branches is that, if and when they get merged other ones, their history can be rewritten, which is awesome to keep a clean and readable git log. Rewriting the history with git is done using the git rebase command. We’ll learn about how to do this in a later article.
Finally, branches enables tons of collaborative workflows. For instance, you can work on a new feature in a dedicated branch and propose that for review. Once approved, you can merge those changes back in the main branch. Clean and simple!
Why git branches are great
Now that you know about branches, we can discuss a bit why Git branches are often referred to as the coolest feature of Git.
As I’ve mentioned, most version control systems support branches. But in some of those systems, creating a branch or switching from a branch to another can be slow and complicated. For instance, SVN is notoriously slow with branches. With Git, switching from one branch to another is incredibly fast (almost instantaneous). This is due to the way that Git handles branches. With Git, branches are “nothing more” than labeled pointers to specific commits; knowing that each commit points to its predecessor.
In addition, merging branches can also be hard with some systems. Again, with Git, it is really smooth (but not necessarily simple, depending on what you’re merging; imagine merging the sources of Linux with those of Windows.. :p).
So, when using Git, don’t hesitate to create branches. It’s really nothing like SVN in this regard.
With git, when you switch from a branch to another (we’ll learn how to do that soon), then your working tree (i.e., the actual files on your filesystem) will be changed immediately to match the contents of the new checked out branch.
Listing existing branches
Ok, enough about theory (for now). Let’s play with branches a bit!
Listing existing branches is easy. You can do it using the git branch command: https://git-scm.com/docs/git-branch
Go ahead and try the following:
- Create a new directory and go into it:
mkdir gitbranches && cd gitbranches(or using mkcd if you’ve followed my article about Bash aliases :p) - Initialize a new Git repository in it:
git init - List the existing branches:
git branch
At this point, you’ll think that I’m a liar because there’s no “master” branch at this point. But keep going:
- Create a text file:
touch cover.txt - Add the file to the staging area:
git add --all(orgit add -Aorgit add .) - Commit it:
git commit -m 'C0: book cover' - Now list the existing branches again:
git branch
At this point you should see this:
$ git branch
* master
So no, I did not lie, but the master branch is only “present” once there is at least one commit added to the repository.
Note that it’s possible to list branches of other repositories and do other fancy things with this command, but that’s more advanced (and not used that often).
Creating a branch
Creating a branch can also done using the git branch <name> command, or with git checkout -B <name> . I mostly use the second command as it also switches to that branch after creating it, which is generally more useful.
Let’s try it out. First of all, create a few additional commits to match our earlier example:
touch p1.txt && git add . && git commit -m 'C1: Page 1'
touch p2.txt && git add . && git commit -m 'C2: Page 2'
After doing this, the log of the repository should look as follows:
$ git log --oneline
f10ff21 (HEAD -> refs/heads/master) C2: Page 2
4426512 C1: Page 1
7dda3ce C0: Cover
Now, let’s create the new “iss53” branch (or whatever :p):
$ git branch iss53
Branch 'iss53' set up to track local branch 'master'.
If you now list the existing branches, you’ll see that our new branch has been created:
$ git branch
iss53
* master
We’ll see how to switch between branches in the next sections.
Branch tracking
It’s important to understand that our new “iss53” branch tracks the “master” branch.
At this point, it’s not “problematic” to ignore this, but as soon as you’ll want to push/pull changes (something that we still have to discover), this “tracking” notion will become fundamental.
When a branch is configured to track another one (whether in the same repository or in a distant one), then that branch is the default source/target for operations like git pull, git push, git status, etc.
Branch tracking can be configured, also via the git branch command, but we’ll look into this later on.
Switching between branches
To switch from a branch to another, you can use the git checkout command.
Go ahead and switch to the “iss53” branch:
git checkout iss53
To confirm, look at the output of git status:
$ git status
On branch iss53
Your branch is up to date with 'master'.

nothing to commit, working tree clean
As you can see, we’re indeed on the “iss53” branch now.
Moreover, if you check out the log, you’ll see that this branch has indeed exactly the same history as the “master” branch (at least for now):
git log
commit f10ff21189d6ed2ca5548163b55a9e7a3d11d692 (HEAD -> refs/heads/iss53, refs/heads/master)
Author: Seb <[email protected]>
Date:   Tue Jul 28 16:05:12 2020 +0200

C2: Page 2

commit 44265122220956cfc5603d4ed8c503d213d01e4f
Author: Seb <[email protected]>
Date:   Tue Jul 28 16:03:12 2020 +0200

C1: Page 1

commit 7dda3ce83e536f21429e49f1e148f4acdc3a4c45
Author: Seb <[email protected]>
Date:   Tue Jul 28 15:48:29 2020 +0200

C0: Cover
Note that switching between branches is sometimes not possible. That happens when your working directory is not clean. Later in the series, we’ll discuss about the “stash” feature of Git, which you can use to work around this issue.
HEAD & branch tip
In order to keep track of which branch is currently checked out, git stores the information in a file called “HEAD” and stores it within the “.git” folder of the repository.
Now that you’ve switched to the “iss53” branch, go ahead and take a look at the HEAD file:
$ cat ./.git/HEAD
ref: refs/heads/iss53
As you can see, the file simply contains a reference to the branch. You can learn a ton more about what the HEAD is over at StackOverflow.
Interestingly, the reference that the HEAD file points towars is stored in the .git/heads folder, which contains one file per branch:
$ ls ./.git/refs/heads
total 16K
drwxrwxr-x 2 sebastien sebastien 4,0K jui 28 16:07 .
drwxrwxr-x 4 sebastien sebastien 4,0K jui 28 15:45 ..
-rw-rw-r-- 1 sebastien sebastien   41 jui 28 16:07 iss53
-rw-rw-r-- 1 sebastien sebastien   41 jui 28 16:05 master
Let’s look at that “iss53” file:
$ cat ./.git/refs/heads/iss53
f10ff21189d6ed2ca5548163b55a9e7a3d11d692
Duh, what’s that? Well this is simply the (full) hash of the last commit on the “iss53” branch:
$ git log --oneline -n 1
f10ff21 (HEAD -> refs/heads/iss53, refs/heads/master) C2: Page 2
Does it start to make sense?
So to summarize:
- HEAD points to the currently checked out branch’s head reference file
- The branch’s head reference file points to the last commit on that branch
- Each commit points to its predecessor (i.e., parent)
Now you can more clearly understand how the git log command works; it “simply” follows the links from the HEAD to the first commit in the history.
By the way, if you look again at the history of the repository, you’ll see that “master” and “iss53” are currently indeed pointing to the same commit:
$ git log --oneline
f10ff21 (HEAD -> refs/heads/master, refs/heads/iss53) C2: Page 2
4426512 C1: Page 1
7dda3ce C0: Cover
Now, the (HEAD -> refs/heads/master, refs/heads/iss53) part should make more sense to you!
Later on in the series, this knowledge about HEAD and branch tips will become much more useful; especially for history rewriting operations.
Side note: When you create a commit, Git attaches metadata to it. A part of this metadata is about you, the author of the commit (and that depends on your Git configuration), another one is the message that you’ve set, and yet another one is 0-n links to other commits. The very first commit in a repository has no parent; normal commits have one and so-called merge commits have 2-n links. We’ll soon learn about how to merge branches onto one another.
Deleting a local branch
Of course, we can also delete branches. To delete one, you simply need to use the following command:
git branch -d <name>
Note that this is the safe version of the delete; it will prevent the delete if there are unmerged changes (i.e., changes that you’d lose by deleting the branch).
If you really know what you’re doing, you can also force the delete:
git branch -D <name>
The above is useful when you know that the branch can really go away (e.g., after it has been integrated somewhere else or if you have abandoned an idea).
Renaming a local branch
Finally, you can also rename the currently checked out branch using the following command:
git branch -m <name>
Conclusion
In this article, I’ve introduced you to branches. Together, we’ve seen what those are, why they’re cool and why Git branches are especially awesome.
Then, we’ve learned about how to create branches, how to switch between those as well as how to rename and delete them.
Along the way, I’ve explained about the HEAD git concept, which will prove useful later on, as well as the concepts of reference, branch tip and chaining between commits.
This knowledge is super useful both for beginners and more advanced Git users, so it’s well worth learning about. Although, be aware that there’s quite some more to learn about branches, but before we get to that, we’ll need to learn about how to interact with remote repositories!
In the next article of the series, we’ll look at how to merge branches.
That's it for today! ✨
Go Further


Want to go deeper?

About Sébastien
I'm Sébastien Dubois, and I'm on a mission to help knowledge workers escape information overload. After 20+ years in IT and seeing too many brilliant minds drowning in digital chaos, I've decided to help people build systems that actually work. Through the Knowii Community, my courses, products & services and my Website/Newsletter, I share practical and battle-tested systems.
I write about Knowledge Work, Personal Knowledge Management, Note-taking, Lifelong Learning, Personal Organization, Productivity, and more. I also craft lovely digital products and tools.
If you want to follow my work, then become a member and join our community.
Ready to get to the next level?
Looking for the right tools?
- 🚀 Obsidian Starter Kit — The best starting point for Obsidian
- 📖 PKM Library — 2,000+ curated tools & resources
- 📚 KM for Beginners — Learn to pick and use the right tools
- 🎯 Join Knowii — Community + ALL courses & tools
Found this valuable? Share it with someone who needs it.