NGRX Component-store deep dive - Part 2!
Part 2: Let's dive into the new Component-store library of NGRX!


In the first part, I’ve explained what the component-store module of NGRX is all about. If you didn’t read it yet, then I’d advise you to go ahead check it out right now: https://medium.com/javascript-in-plain-english/introducing-ngrx-component-store-part-1-67019dba0cb0
In this second part, I’ll first explain the API of component-store, then we’ll go through some examples together to discover how to use it. Finally, I’ll show you how I’ve built the simple demo.
NB: As there is no final release yet, take the code samples of this article with a grain of salt. The API probably won’t change all that much (if at all), but there may be slight differences.
Installation
Installing component-store is pretty easy since you can simply add it to your project next to RxJS; it doesn’t depend on any other module of NGRX.
At this time, the component-store library is in beta; you can add it to your project using:
npm install @ngrx/component-store
Once added, just install and you’re good to go.
As soon as the final version is released, just update your dependency :)
Key concepts of component-store
The following points are taken directly from the (draft) official docs:
- Local state can be initialized lazily
- Local state is typically tied to the life-cycle of a particular component and is cleaned up when that component is destroyed.
- Users of ComponentStore can update the state through
setStateorupdater, either imperatively or by providing an Observable. - Users of ComponentStore can read the state through
[select](https://ngrx.io/api/store/select)or a top-level[state](https://ngrx.io/api/store-devtools/StoreDevtools#state)$. Selectors are extremely performant. - Users of ComponentStore may start side-effects with
[effect](https://ngrx.io/api/effects/EffectNotification#effect), both sync and async, and feed the data both imperatively or reactively.
From this list, we can already recognize a few familiar terms: select, effect, setState. Good, we already feel in known territory ;-)
This isn’t crystal clear yet though. Let’s look at API more in detail to shed some light on what’s under the hood.
ComponentStore class
First of all, component-store provides a ComponentStore<T> base class that we can extend. Extending this base class is what allows us to create a specific component store type, which will hold a state tree with a specific shape T.
Imagine that we want to store the following information in our component store:
Nothing fancy here; we have a bunch of interfaces, and there is one in particular that defines the shape of our state (I prefer to name it that way to make its purpose clear).
Based on this, the simplest expression of a component-store implementation looks like this:
As you can see, we have simply created an injectable Angular service that extends the ComponentStore<T> class of NGRX component-store. In addition, we have set the generic type to our WhateverState interface to define the shape of our store data. Finally, notice that we’ve defined a default/initial state for our store by calling super.
At this point, our component-store service (CSS! :p) can already be used, but it isn’t very interesting so far.
What I want you to understand now is that this service can be injected at multiple places and can be instantiated multiple times (we’ll see how a bit further. This is super important because it’s a big differentiator with the global NGRX store.
The global NGRX store is created once and it is shared with many modules/components (even if they rely on/interact with different parts of the state tree).
Contrary to the global NGRX store, services based on component-store can exist multiple times, independently of each other. As I’ve explained in the previous article, the idea is that different instances of complex components can each have their own state, held by a dedicated component-store service instance.
Basic APIs of the ComponentStore class
As stated in the previous section, our empty component-store based service class (quite a mouthful) doesn’t do much for now. In its current state (pun intended), it can hold our initial/default state and expose it as an observable, but not much more.
Still, if you instantiate it, you’ll see that there are a few methods available.
Here are the main elements provided by the ComponentStore base lass:
state$: the current state held by the class instance exposed as an RxJS ObservablesetState: a function that can be used to update/replace the state of the current instance. As we’ll see later, there are two main variants for this functionselect: a function that can be used to define selectors. Created selectors can select/extract/compose/transform parts of the state tree held by the current instanceeffect: a function that can be used to define side-effects; pretty much the same idea as with NGRX. Effects can (for example) be used to trigger asynchronous operations (e.g., make calls to back-end services), trigger state updates, etcupdater: a function that can be used to define state update functions; functions that can update the state based on the provided argument. Updater functions are indeed reducers. It’s important to note that state update functions MUST return a new version of the state, never a mutated version of the same instance
We’ll explore each of those over the next sections.
WARNING: In the next sections, I’ll explain the base methods exposed by ComponentStore, but these will be shown out of their context, so please wait until the later sections covering the demo to get a better understanding of how these are all put together; otherwise you might only get a part of the picture.
Subscribing to the state / state updates
From a consumer’s point of view (e.g., component relying on an instance of the WhateverComponentStore service), the first thing that we can do is subscribe to the current state to get a hold of it and to be notified whenever it changes.
Each instance of the WhateverComponentStore component store has its own state. If you create another instance, then the state won’t be shared; instead, the other instance will have its own.
If you want to follow along, then go ahead and manually create an instance of the service:
With that instance created, we can already subscribe to the current state as follows:
When this code gets executed, we indeed get the current state back:
'Current state: ', Object{foo: 'default foo', bar: 'default bar', isWorkingFromHome: false, someData: [], users: Object{}}
As shown above, the state held by the component store service instance is observable. That in itself is pretty cool, but it only gets interesting if said state can be updated.. and of course it can.
Selecting parts of the state
Just like with NGRX Store, we can define and subscribe to selectors in order to retrieve specific parts of the state tree.
Again, as with NGRX Store selectors, component-store selectors can extract subsets of the state, but they can also compose/transform the data as required for consumption. This means that you can for instance denormalize data in component-store selectors just like you’d do with NGRX Store selectors.
Here’s an example showing how to select the foo property of our state tree:
As you can see, we simply have to pass a projection function to the select method. The projection function is called with the current state object and returns whatever it wants.
Above, note that fooSelector is an Observable, so we can easily subscribe to it to get the current value and be notified whenever the value changes:
Note that TypeScript type inference plays a big role here; everything is typed correctly.
Of course, the fun with selectors is also that they can be combined, so you could define a selector that extracts a part of the state tree, then another one that reuses the first one and performs additional manipulations.
NGRX component-store selectors are currently not memoized, but use distinctUntilChanged and shareReplay internally, meaning that we can subscribe multiple times to a selector and all of those subscriptions will get the same values (without triggering separate executions).
Initializing/setting the state
As we saw earlier, the default/initial state is defined in the constructor of our ComponentStore class. As a matter of fact, the class could accept the initial state as a constructor argument instead; that’s a design choice. In practice, I think that it makes more sense to set a default and to avoid passing the initial state through the constructor, but it’s up to you.
So how can we update the state?
A first way to do so is to use the setState function. Here’s an example:
Here, we have simply passed the new state as argument to the setState function. Alternatively, you can pass an updater function as follows:
With this style, you have access to the current state, so you can more easily update specific parts. Note that you MUST return a new object and certainly not mutate the existing one; otherwise, you’ll break the contract and the state will not be updated as you’d like. Immutability is super important, just like for NGRX Store and anything good in the universe, really.
You can of course call setStateas many times as you wish.
Updating the state
Calling setState is nice, but it’s also interesting to be able to define functions that are responsible for updating specific parts of the state. This is exactly what updater is about.
Creating an updater is as simple as this:
The updater function of ComponentStore accepts a function as argument. When it gets called, that function will receive two arguments:
- The current state
- Some updated value (above it is a string, but it could be anything you fancy)
Based on those inputs, the updater function’s role is to return a new version of the state.
Once again, updates MUST NOT mutate the existing state, but return a new state. I recommend you to take a look at Immer to use it when implementing such reducers.
The state update function can then easily be invoked as follows:
myUpdater("Updated foo");
When we do that, the state held by the service instance gets updated. Nice.
In addition, as highlighted by Alex, note that updaters can take observables as arguments (not only imperative data) and can unsubscribe. This means that you can chain streams together and make your code even more reactive ;-)
Handling side-effects
Effects are where most of the fun lies. By implementing effects, you can define complex scenarios that can be executed whenever the effect is invoked.
For instance, an effect can, based on the values it receives, decide to make a call to a remote API, call updaters to modify the state, etc. Sky’s the limit.
Here’s a very basic example of effect:
This toy example simply logs the values it receives to the console, but shows the crux of it. When the myEffect effect is called with a value, that value is passed down as the next value of the observable passed to the effect function, which can then pipe it into whatever it wants (as you know, once you have a stream in your hands, the universe is all yours).
By the way, we’re not forced to pass a value to an effect; we can also simply call one without values; in that case the calls will act as simple signals.
Effects will of course play a big role when implementing business logic with component-store. I’ll show you a more concrete example further on.
As with updaters, effects can also take observables as arguments, not only imperative data like I’ve shown in the example above!
What goes where?
So far you’ve seen how to define a bare bones ComponentStore class, how to instantiate it without Angular and what methods it exposes.
We saw how each of the built-in methods work in isolation, but that remains a bit abstract for now. At this point you might wonder where exactly to put those selectors, updaters and effects..
They certainly don’t belong in your components since you want to make them simpler, even though we saw that they can be created/passed/used literally anywhere.
As I’ll show you in the next sections, selectors, updaters and effects should actually be defined within the classes that extend from ComponentStore. That way, the class will maintain a specific state tree and will also encapsulate all the code that manipulates that state. Of course, the selectors/effects/updaters will be tied to a specific instance of the class and will interact with a specific state tree.
Let’s now go through the demo so that you get a more concrete feel of how to actually use component-store!
The demo
Now that we’ve discovered the public API of component-store, we can look at a more concrete example to put things in context.
If you want to look at the code I’ll describe next, you can check out the following Git repository: https://github.com/dsebastien/ngrx-component-store-demo
You can also check out the live demo to play with it.
The demo is not very advanced, but it shows how we can leverage component-store to extract state & logic into a custom service classes extending ComponentStore. In addition, the demo also shows how the service is configured.
Finally, the demo clearly shows that each instance of the component using the component-store based service gets its own independent state and is completely isolated from the other ones.
Please keep in mind that this demo is nothing but a dummy example that doesn’t necessarily makes sense in the grand scheme of things. So let’s just pretend it all makes sense ;-)
Domain model
The demo has a tiny domain model:
I didn’t worry too much about this. The demo allows to manipulate “lessons”.
Components
The idea of the demo is that, depending on the current state, a user can or cannot add/remove lessons and/or instructors.
There are two main Angular components in the demo. The first one, “lesson” is a dumb component that can display a specific lesson.
The second one is the “lessons-catalog”, which is a smart/presentational component, supposed to be complex enough to warrant the usage of component-store. That component is the one knowing about and using a service implemented using component-store.
Final result
Before we start looking at the code, let’s see how the demo looks like:
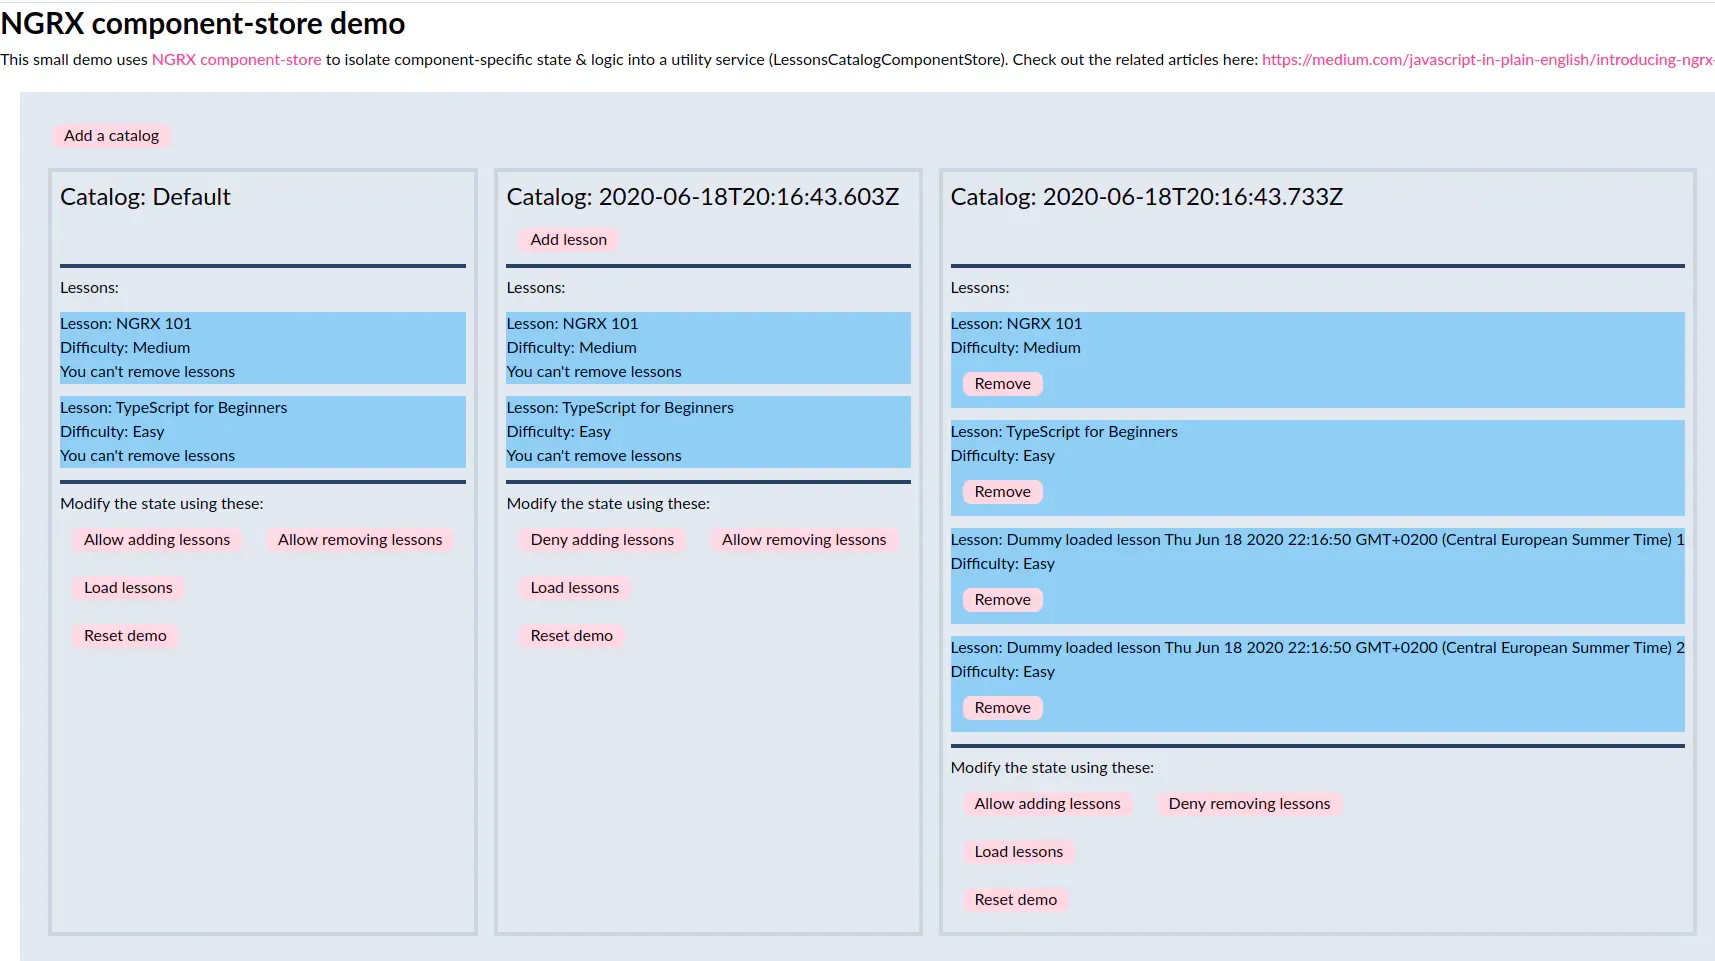
What you see above are three instances of the lesson-catalog component, next to each other. The “Add a catalog” button on top adds an instance of the lesson-catalog component.
Each of those component instances have their own instance of the component store, with a separate state. As you can see in the screenshot above, each catalog’s state evolves independently. For instance, the “Default” catalog doesn’t have the “Add lesson” or a “Remove” button below each lesson, etc.
Note that all of those components use the OnPush change detection strategy.
The buttons allow to manipulate the state.
Again, you can find the live demo on Netlify and the sources over at Github
Curious? Okay, let’s dive in!
Lessons catalog state
Here’s how the state of the lessons-catalog component looks like:
Nothing fancy here; just a few data points and a few flags to allow/deny some operations.
App component
The app component simply holds an array of catalog elements; clicking on the “Add” catalog element adds one to the collection.
Each time a new catalog is created, the app component creates/renders an additional lessons-catalog component:
Lesson component
The lesson component is as simple as it gets, a beautiful dumb component:
Lessons catalog component store
Ahh, now’s the moment to finally look at the component store implementation:
Now you can see where we do put the selectors, updaters and effects. All nicely regrouped in the component store service.
Let’s review one element of each type, even though we’ve covered those earlier in the article.
Selector:
This selector simply returns the canAddLessonsproperty of the state. Easy peasy.
Updater:
When called, this updater, called addLesson, receives the current state as well as a lesson object to update. Given how it’s implemented, it could as well be called addOrUpdate, but it doesn’t matter too much. As you can see, the updater function creates and returns a brand new state object (again, it’s important). In a production application, I’d recommend implementing it using Immer’s produce function.
Effect:
This loadLessons effect is not earth shattering, but it should give you an idea of how effects work. When effect are called, they expect to receive some input (actually multiple inputs over time), and the observable input is piped in magic and mysterious ways.
In this case, we can imagine that this effect triggers the asynchronous loading of data and then calls an updater to update the state tree.
If you like RxJS, then feel free to slap me in the face, I know I deserve it, but it’s just an example. If your RxJS-fu is not great, make sure to learn about the risks of using switchMap for such operations ;-)
BTW if you look at the code on Github, you’ll see that I’ve made the effect a tad more interesting, adding a loading state; setting it to true when the effect is started and back to false when it’s done.
One last thing: for real-world apps, don’t forget to handle errors in your effects. Just like with NGRX Store effects, component-store will let the observable stream die if an error occurs and is not handled!
Lessons catalog component
Last but not least, let’s look at the lessons-catalog component. This is where we should feel the impact of using our component store service.
There are a few things to mention here.
First of all, notice that the component defines LessonsCatalogComponentStore in its providers array. This is how we tie the lifecycle of the service with the one of this component (when this component is destroyed, so is the associated service instance!). It of course allows us to inject a separate instance of the service in each component instance. Note that it also makes the same service instance available to any component in this sub-tree of the application
Second, notice that we set an initial state in the ngOnInit method. We could imagine that this initial state is derived by this presentational component after it extracts information from the router or from somewhere else (e.g., service, global NGRX store, etc).
Finally, notice that there’s really not much in this component. It’s almost empty! And this is really cool; there’s not much state, not much logic. No need; that’s mostly in our component store now!
Finally, let’s look at the template:
As you can see, I’m directly using the catalog component store from the template. I could’ve added handler methods on the controller or defined fields to expose the selectors (i.e., shield the template away from the component store), but it felt like adding needless indirection.
It’s way too soon to provide design guidance (still learning), so don’t take this as the “correct” way to do it…
Don’t sweat over the ngrxPush pipe; I just wanted to give ngrx component a try and that’s a subject for an upcoming article :p. Basically, ngrxPush is a drop-in replacement of the async pipe.
The state of our component and child components are held by the component store and we can easily subscribe to specific state parts using the selectors we’ve seen earlier.
Also, operations like adding/removing things are directly asked to the component store, which has updaters and effects to take care of everything.
That’s it!
What’s missing?
Hopefully, what’s coming very soon is a first final release. I didn’t ask Alex when it’s going to be released, but I imagine in a not too distant future… ;-)
I saw that there are also a few open tickets around component-store:
- One to add schematics
- One to add ng add support
References
The code samples of this article are all available on Github: https://github.com/dsebastien/ngrx-component-store-demo
The live demo is online over at Netlify: https://ngrx-component-store-demo.netlify.app/
- Official docs: https://ngrx.io/guide/component-store
- Design doc: https://okrushko.dev/component-store-dd
- Alex live streams covering component-store: https://www.youtube.com/watch?v=EeNMGhLnBGg & https://www.youtube.com/watch?v=-hp72aA0wBw
- Sources of the ComponentStore class: https://github.com/ngrx/platform/blob/master/modules/component-store/src/component-store.ts
Conclusion
In this article, I’ve explained the concepts and the API of NGRX component store. I’ve also walked you through a simple demo, showing how easy it is to use.
Hopefully you should now have a clear idea about what NGRX component-store is and how it works.
I’m convinced that this new module of NGRX brings interesting ideas that are certainly valuable for isolating state/logic outside of complex components, making those more tractable.
As I’ve explained in the last article, component-store also brings an answer to cases where using the global NGRX store wouldn’t make sense.
Finally, it will allow us to make complex stateful components reusable and even shareable across applications. Maybe this paves the way for more easily integrating complex components into Storybook? Quite cool!
Kudos to Kevin Elko for coming up with the idea / original design and to Alex Okrushko for bringing this into NGRX!
That's it for today! ✨
Go Further


Want to go deeper?

About Sébastien
I'm Sébastien Dubois, and I'm on a mission to help knowledge workers escape information overload. After 20+ years in IT and seeing too many brilliant minds drowning in digital chaos, I've decided to help people build systems that actually work. Through the Knowii Community, my courses, products & services and my Website/Newsletter, I share practical and battle-tested systems.
I write about Knowledge Work, Personal Knowledge Management, Note-taking, Lifelong Learning, Personal Organization, Productivity, and more. I also craft lovely digital products and tools.
If you want to follow my work, then become a member and join our community.
Ready to get to the next level?
Want to level up as a developer?
- 📖 Dev Concepts — 12 volumes covering IT & software development from scratch
- 💼 Knowledge Worker Kit — Productivity guides for knowledge workers
- 🚀 Obsidian Starter Kit — Organize your dev knowledge
- 🎯 Join Knowii — Community + ALL courses & tools
Found this valuable? Share it with someone who needs it.