The Ultimate Beginner's Guide to Obsidian
Unlock the power of Obsidian with this ultimate beginner's guide, from setup to advanced note-taking and knowledge management techniques.

Introduction
Obsidian is my favorite note-taking, thinking, Personal Knowledge Management (PKM) and personal productivity tool. There are many reasons for that. In this article, I want to share my top recommendations for newcomers.

Let's dive in!
Who should use Obsidian?
Obsidian is one of the best note-taking applications out there. But it's way more than that. It's also a Tool for Thought, an application you can use to explore thoughts and ideas, capture knowledge, visualize concepts, and many more things.
Because of its versatility, Obsidian is an ideal application for:
- People who need to organize themselves
- People who feel overwhelmed
- People who keep forgetting what they read and learn
- People who need a place to capture their thoughts, feelings, ideas, inspiration and knowledge
- People who do research
- Students
- People who want to be more productive
- People who want to be more creative
- People who'd like to write a journal
- Knowledge Workers that deal with large amounts of information
- Lifelong learners who need to remember everything
And that's just the tip of the iceberg. Obsidian is awesome for curious minds. It provides a way to capture what your brain cannot. It provides a way to think deeply. It provides a place where you can be alone with your thoughts. It provides a place where you can safely store information. A place where you can connect the dots and get to the next level. Seen under that light, Obsidian is potentially for everyone.
Top reasons to use Obsidian
Here are the main reasons why I recommend Obsidian to my customers:
- It's free
- It's CRAZY fast: Obsidian is a desktop application and files are stored on your computer. It loads fast, and everything is snappy. This is a real pleasure to use compared to many Web-based alternatives out there
- Your data remains yours: Everything is stored locally. You keep control over your data. Obsidian never sends your data to "the cloud"
- It uses an open data format: Obsidian uses Markdown, which can be edited by thousands of applications. As such, your data can be edited easily anywhere, and you are not stuck with Obsidian
- It has thousands of plugins: Obsidian has a large catalog of community plugins. With those, you can customize almost everything. There's no limit to what you can do with Obsidian. You can add an AI partner, export to many formats, publish your notes on the Web, resize images, generate text or outlines, summarize texts, manage projects, connect other applications, etc
- The user interface is beautiful and deeply customizable: The default user interface is wonderful. There are different themes and you can install additional ones. You can customize any aspect of the interface through CSS and extensions
- It's a breeze to backup your data: Since everything is stored locally, it's very straightforward to create backups of your notes. You can copy the vault, use standard backup tools, make copies on cloud providers such as Google Drive or Microsoft OneDrive, etc
- It supports both text and visualizations: You can write and link all your notes, but you can also create visualizations using the built-in infinite canvas. You can also view all your notes as a graph (shown further in this tutorial)
There are many more reasons to use Obsidian, but those are my favorite ones. Thanks to Obsidian, I can regroup a large part of my knowledge in a single application. Not only that, I actually use Obsidian as the center of my productivity system. All my projects and tasks are part of Obsidian.
What are the best Obsidian features
We all have different needs. The "perfect" system for me is probably not the ideal one for you, even if there are "good practices" that we could share. Here are some Obsidian features I love...
With Obsidian, it's easy to organize your notes using a folder hierarchy. Those exist on your computer, so you can look at those using the normal file explorer of your computer, tablet or phone.
In addition to folders, you can add tags to your notes. This makes it a breeze to organize large collections of notes, and to find what you need when you need it.

Obsidian also supports templating, which makes it a breeze to be consistent and spare time when creating new notes. In my Obsidian vault, I use dozens of templates for different types of notes (e.g., meetings, contacts, books, quotes, etc)

Obsidian notes can be connected. And that's a killer feature. It's just like creating your own Wikipedia. Each note can be connected to other ones. And Obsidian also supports backlinks, which enable you to see when another note points to the current one. It helps a lot when exploring ideas.
The Graph View and Local Graph View are super useful to visualize your notes and their relationships. These can help discover "lonely" notes, and opportunities to connect those with the rest of your knowledge.
Obsidian also has super useful tools such as the Command Palette, which helps launch any command accessible through menus with a few keystrokes, or the File Opener, which you can use to quickly switch between your notes.
Last but not least, the community plugins turn Obsidian into a powerhouse, creating endless possibilities.
Does Obsidian work on my computer?
Obsidian is a cross-platform application. It is available for Windows, MacOS, and Linux. There are also mobile applications for iOS and Android. Thus, you can use Obsidian everywhere!
Is Obsidian free?
Obsidian is a free application. You don't have to pay anything to use it personally.
The only exception is for professional use, as mentioned on the official Website:
Commercial use means using Obsidian for revenue-generating or work-related activities within a for‑profit organization that has two or more employees. Government departments and agencies are considered commercial use, unless registered as a non-profit organization. For all other purposes, you're welcome to use Obsidian for free. Learn more.
Thus, you only have to pay for Obsidian if you are using it in a for-profit organization with two or more employees. You can find more details here:
Obsidian offers two (optional) paid services.
Obsidian Sync
The first paid option is Obsidian Sync. You can use that to synchronize your notes across any device or operating system. Note that there are free alternatives to this!
Obsidian Publish
The second paid option is Obsidian Publish, which enables publishing your notes as a wiki. Again, there are different alternatives to publish your notes.
How to download Obsidian
To download Obsidian, go to the following page and download the installer:
Once downloaded, locate the file, and launch the installer. Use the default settings unless you know what you are doing.
Obsidian Vaults
Obsidian has a few concepts you should be aware of. The first you'll encounter is the concept of the "vault". An Obsidian vault is a "workspace" for your notes. That workspace corresponds to a folder in your computer's (or mobile device) file system.
You can have as many vaults as you want, but you can only open one at a time. That being said, nothing prevents you from launching multiple Obsidian windows, each using a different vault.
Each Obsidian vault contains:
- Your notes, stored within Markdown files
- Your vault's configuration (i.e., everything you configure in Obsidian)
- Your installed plugins and their configuration
- Your installed themes
- ...
When you navigate your file system, it's easy to recognize that it corresponds to an Obsidian vault. That folder will contain a .obsidian folder at the root. That folder is the one containing everything except your notes: plugins, configuration and themes.
When you create a folder in your vault, a corresponding one will be created in your device's file system. Similarly, when you create a note, a file will be created in your file system. And it works both ways. If you create a folder in through your file system, it will appear in Obsidian. Obsidian maintains an internal "index" of your vault's content, but it doesn't prevent you from modifying anything you want using other applications.
As a result, creating a backup of your data can be as simple as using a tool that backs up your computer files. Note that since everything is kept locally on your device, it means that it is your responsibility to backup your files!
Markdown
Second, Obsidian uses the Markdown syntax. More precisely, it supports a combination of flavors of Markdown. It supports CommonMark, GitHub Flavored Markdown, and also extends those "open standards" with custom Markdown extensions, as documented here.
I will explain the basics of Markdown further in this article. But for now, you just need to know that:
- Markdown is a plaintext markup language. Markdown files are text files, with specific syntax to format text (e.g., put a word or sentence in bold, italic, define headings, create lists, etc)
- Each note in your vault will be written using the Markdown syntax and the extensions supported by Obsidian
- Each note in your vault will be saved as a text file with a
.mdfile extension - You will be able to edit your notes using any text editor (from notepad to more advanced text editors that natively support Markdown)
This is one of the best features of Obsidian, as your notes will forever be yours. Your data is not locked into a proprietary database, and nothing will prevent you from using other tools.
How to save notes with Obsidian?
When you edit notes with Obsidian, it automatically saves your changes every couple of seconds. You can also save manually, for instance using the Command Palette, or using the CTRL + S keyboard shortcut, but it's generally not needed.
Using the command palette, you can use the "Save current file" command:

How to add images to Obsidian notes?
You can add images to your notes in different ways.
Saving images to your vault
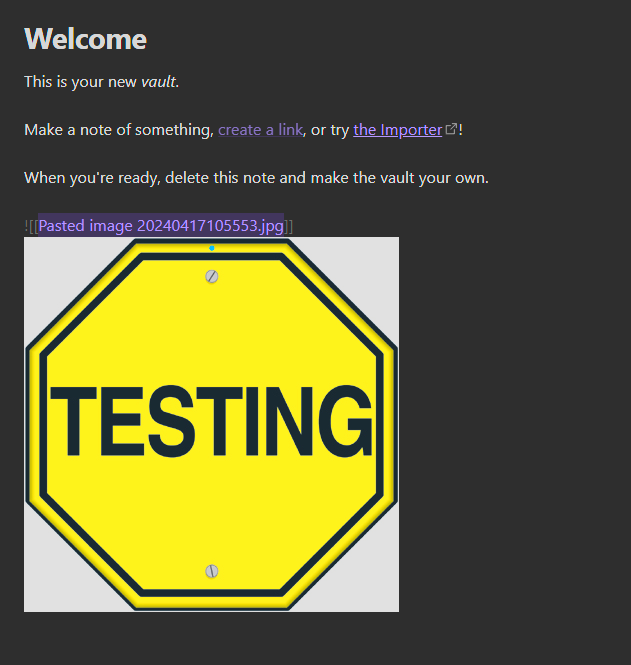
The easiest approach is to drag and drop an image from another application to your note. For instance, you can drag and drop an image from Google Chrome or from your operating system's file explorer. When you do this, Obsidian will:
- Save a copy of the image in your vault's root folder (unless you have changed the configuration to store those elsewhere)
- Embed the image into the current note
The advantage of this approach is that you will keep those images forever.
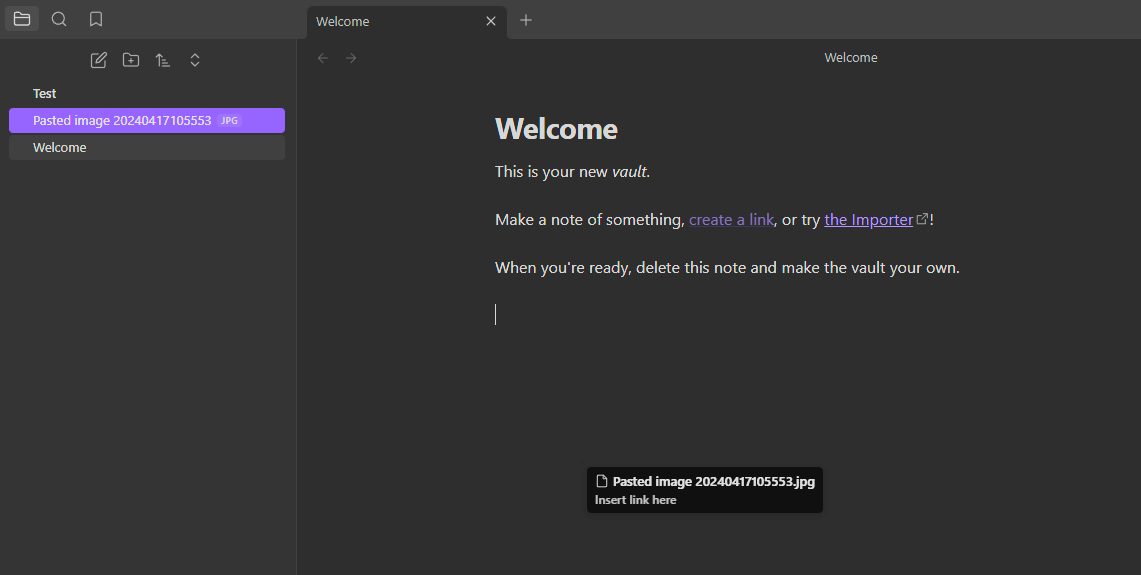
When you click on the image in your note, assuming that you are in the Editing view, you will see the Markdown syntax above the image:
As you can see, the syntax to embed images (and other file types actually) is the following:
![[path/name.fileextension]]
Reusing images in your vault
If the image you want to add is already stored in your Obsidian vault, then you can drag and drop it directly from the file explorer view onto your note:
When you do this, Obsidian will add the same syntax, and will reuse the same image. Each image in your vault (and actually all files) can be embedded/referenced in as many notes as you want.
What happens when you remove an image from your vault
If you remove the image from your vault, then the link to it will be broken in all the notes that reference it:

Embedding images from the Web
It is also possible to embed images directly from the Web using the following syntax:

The downside of this approach is that if the image disappears from the Web, your link will be broken. I don't recommend doing this.
How to control the image size?
Note that it's also possible to control the image dimensions using the following syntax:
![[image.extension|widthxheight]]
For instance:
![[foo.png|640x480]]
If you want to control the size of an image embedded from the Web, then you have to use this syntax instead:

It's also possible to only specify the width, which ensures that the aspect ratio of the image will be respected.
What else can you embed in your notes?
Obsidian does not only support image embeds. You can also embed other notes, images, audio, video and PDF files.
You can find examples for various file types in the official documentation:
How to organize Obsidian notes?
As I've mentioned, Obsidian stores your notes locally, within the folder you have selected to host your vault. Within your Obsidian vault, you can organize your notes any way you want. Obsidian gives you all the freedom you need. But that freedom can cause confusion for new users. When you get started, you will probably wonder how you should organize your notes.
Generally speaking, you should keep the folder structure you use as simple as possible, for as long as possible. The LIFT Principle is one that I value a lot. It's quite straightforward. You want to use a structure that:
- Makes it easy to locate and store information
- Makes it easy to identify information
- Is as flat as possible
- Stays dry
A structure that is as flat as possible is one where you avoid deep folder structures. I personally limit myself to at most three folders nested within each other:
Folder A
  Folder AA
    Folder AAA
Folder B
  Folder BB
    Folder CC
Limit the depth of your folder structures
If you create a more complex folder structure, then you'll waste a lot of time wondering where to file your notes and it'll be hard to locate those notes you need. More folders often means more busywork.
A "dry" structure is one where each type of note can only ever be stored within one folder. That is, a structure where you cannot have doubts as to where a note should go. That excludes creating a folder per topic, as notes can often be related to multiple topics, even if you keep those short and focused (more on this later).

A solid and maintainable folder structure is one that is both simple and generic. Simple in its structure, and generic with regards to what each parts contains. The extreme implementation of this principle is using no folders at all, and using other means to structure your information. I don't recommend this approach, although it does work for some people. My main issue with using a single folder is the fact that after you create a few thousand notes and add many attachments, other tools might start to struggle loading your folder, and you might encounter more and more name conflicts.
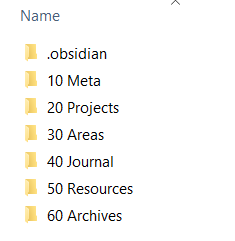
For my own folder structure, I chose to combine the PARA Method with the Johnny Decimal System. This helps me respect the LIFT Principle while creating a portable, scalable and maintainable structure. Let's quickly explore those two approaches.
The PARA method proposes the following structure at the root level:
- Projects: Your ongoing projects
- Areas: Your areas of interest/responsibility, the roles you "play", ...
- Resources: Reference material, templates, scripts, ...
- Archives: Past projects, resources you don't need anymore, ...
The nicest aspect of the PARA method is that you can apply it in many tools and platforms, including Obsidian of course! I personally use it for:
- My PKM system
- My bookmarks
- My documents
- My cloud storage
- ...
One challenge with the PARA method is clearly identifying your projects and areas in order to correctly structure your information. I have worked around this issue in Obsidian by creating generic areas, partly based on the Zettelkasten method, which matches my own needs:
- Fleeting notes: temporary notes that need to be reviewed/completed/converted
- Literature notes: my inspiration
- Permanent notes: my own notes
I've used the Johnny Decimal system to assign unique "identifiers" (numbers) to each folder and sub-folder. I try to reuse the same identifiers across tools, to make it easier for me to navigate.
Here's a glimpse of what my structure currently looks like:
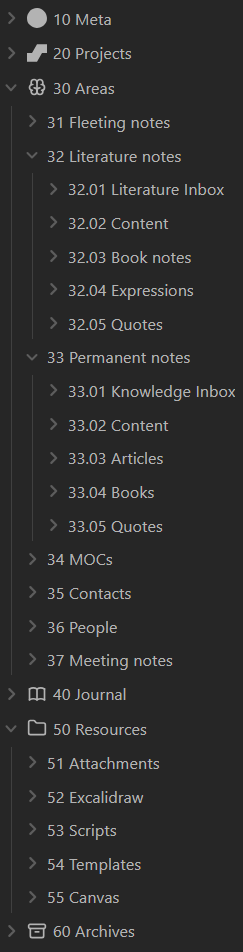
As you can see, it is not very deep, and many parts are either generic (e.g., literature notes content) or very specific (e.g., contacts). That structure is at the core of the Obsidian Starter Kit, which is the product that I have created based on my own experience and system. I combine this structure with a lot of automation (also included in the starter kit), to help me structure, tag and file those notes automatically.
Should I use multiple Obsidian vaults?
The second question that people ask me all the time is: "Should I use a single Obsidian vault, or multiple ones?". As often, the answer is "it depends".
I generally recommend most folks to use a single vault, unless they are certain that they can't or don't want to, whether for personal, practical or security reasons. Let's explore some of the pros and cons of using a single vault.
Pros:
- All your notes in a single place
- Single structure for all your notes
- Possible to link all your notes with each other
- Plugins/Themes installed and configured only once
- Configure everything only once
- Easier to backup and restore
Cons:
- No isolation (apart from folders/metadata) between your notes (e.g., no isolation between work and personal notes)
- Not possible to have different plugins/themes/configuration for different parts of your system
To me, the best reason to use a single vault is to keep things simple: one vault, one set of plugins/theme, a single configuration, etc. Second, when you have a single vault, you can link all your notes together, which you can't do if you split those up into multiple vaults. Multiple vaults add a lot of needless overhead.
Discover the User Interface of Obsidian
Alright. Time to explore the User Interface (UI) of Obsidian! While you don't need to know every little detail to become productive with Obsidian, knowing about the main elements of the interface will help you find your way around. Let's explore those together.
Please note that Obsidian has a great documentation website that you can find here.
Overview
The UI of Obsidian is structured as follows:
- The Left Side
- The Editor view
- The Right Side
- The Status Bar
Using the button in the top left corner, you can toggle the left side:
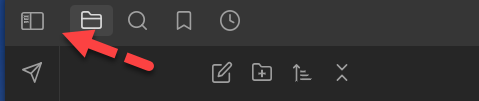
Using the same button on the top right corner of the Editor view, you can toggle the right side. Those two buttons are useful when you want to focus on writing.

Let's take a closer look at those elements.
The Left Side
On the left side of the UI, you will find:
- The ribbon
- The left Sidebar
- The left Sidebar View Switcher
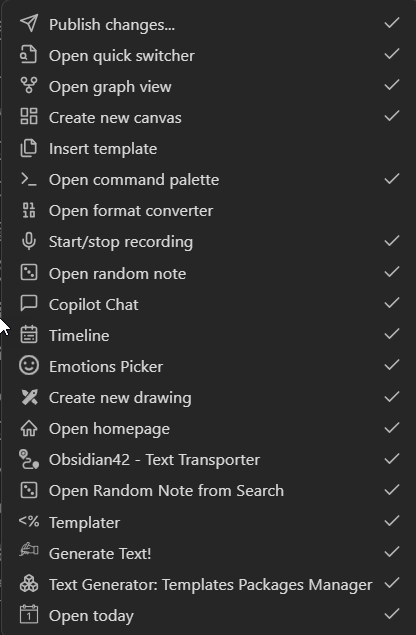
Inside of the ribbon, you can find icons for commands you will use on a regular basis. Those include means to open the Quick Switcher, open the Graph view, open the Command Palette, open the Settings view, open the Vault Switcher, etc. Note that certain plugins will add new icons in the ribbon.
TIP: You can right click within the ribbon to show/hide icons:
In the left sidebar, you will get different views depending on what you select in the left sidebar view switcher:

By default, the left sidebar view switcher lets you switch between the following views:
- Files: a file explorer for your notes
- Search
- Bookmarks
Again, certain plugins might add buttons to this part of the UI. Mine looks like this:

I'll explain those different views further in this article.
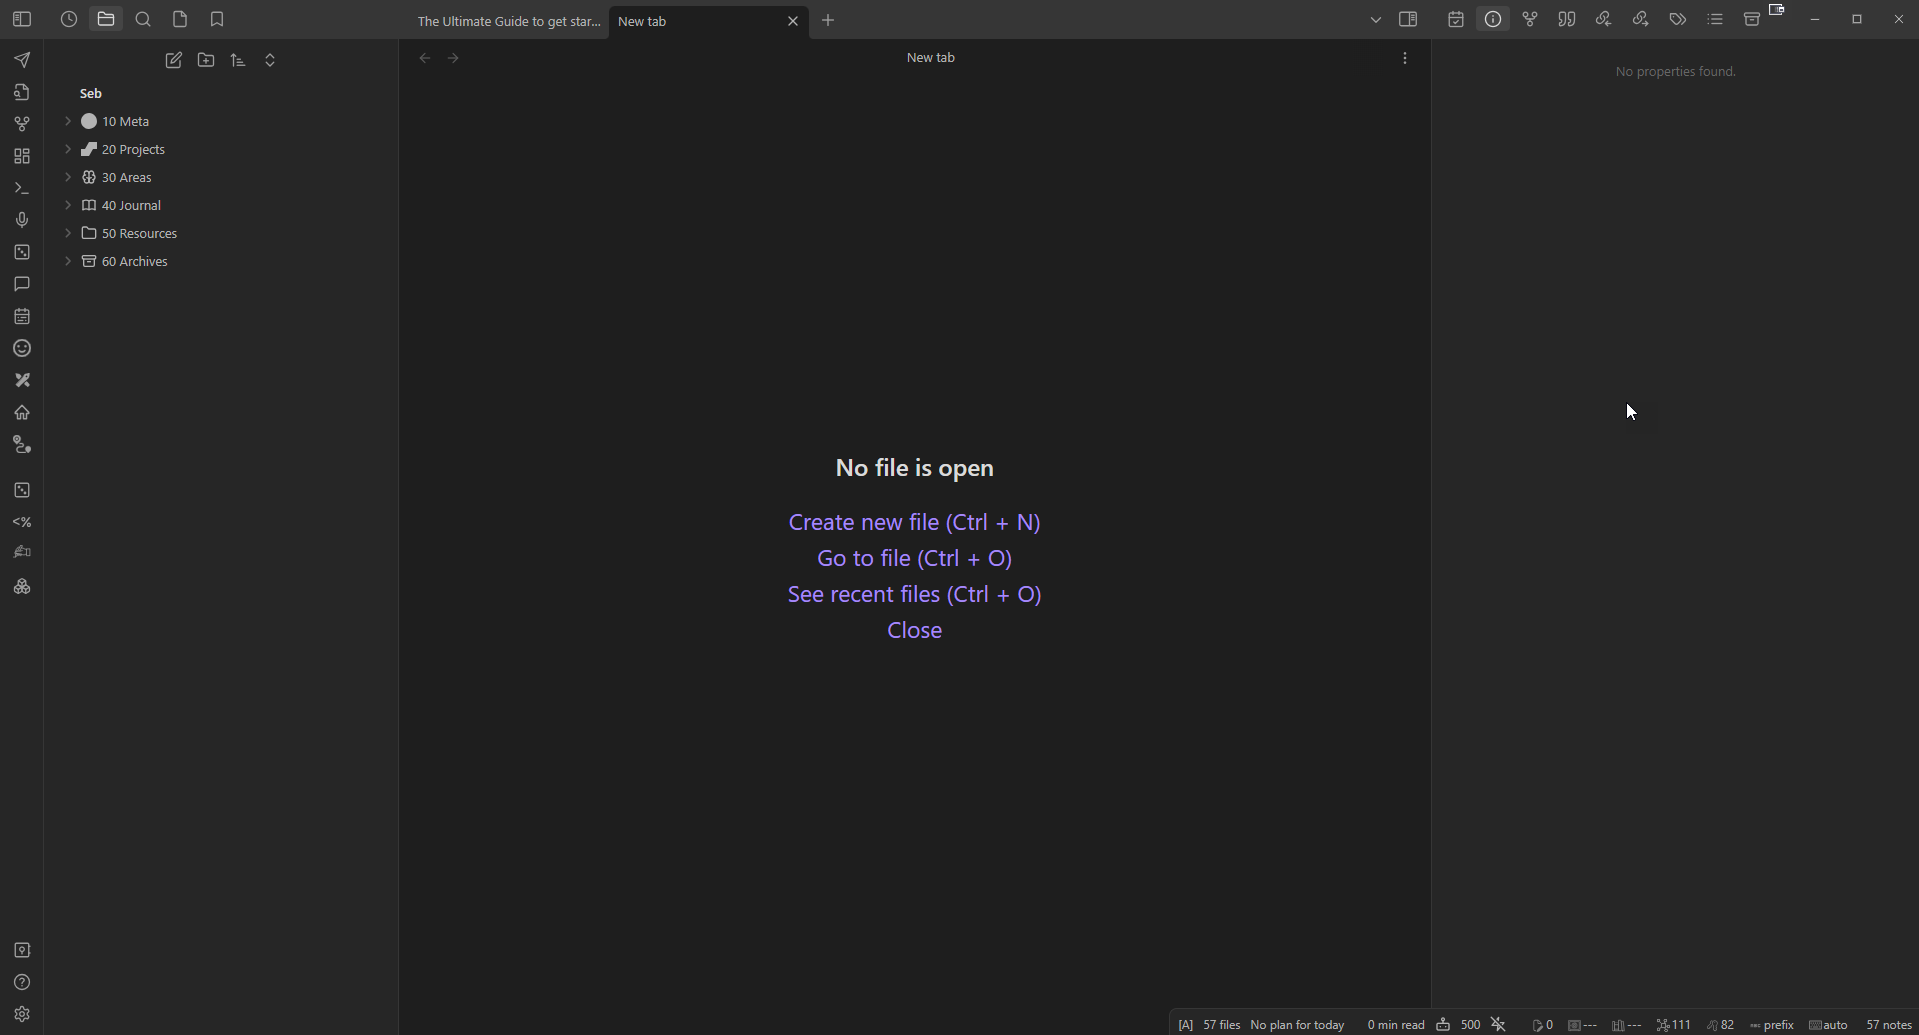
The Editor View
The central part of the UI is the Editor view. That view is like a Web browser for your notes. As you'll see, the analogy makes sense because there are important similarities between those.
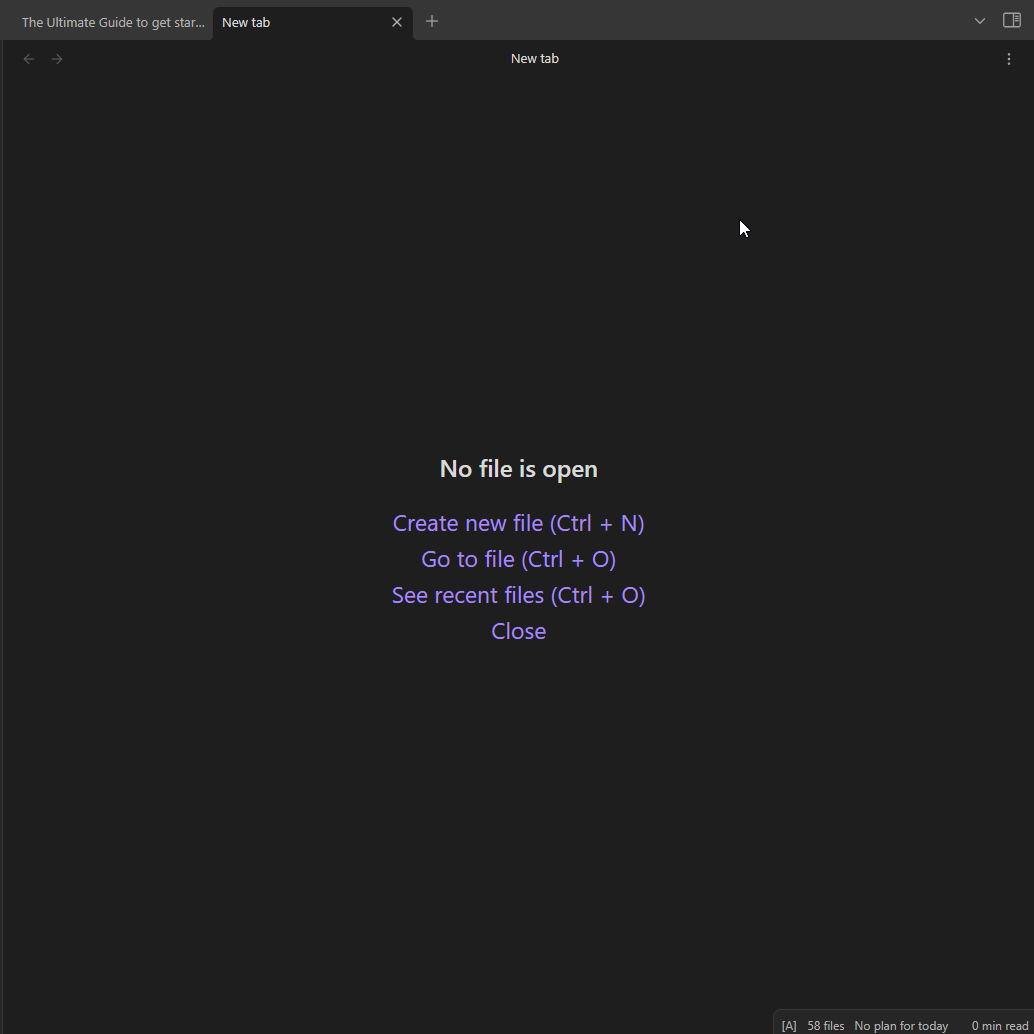
The Editor view lets you view and edit the notes in your vault. I will explain the syntax later on. For now, let's focus on the main elements and features of that view.
First, at the top of the editor view, you can open new tabs and switch between tabs. Each tab can show a specific note or view (more on this later):

If you click on the chevron at the right hand side, you will see a menu such as this:
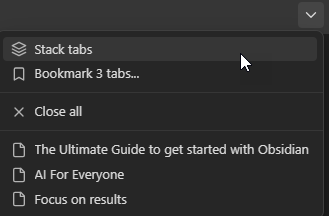
This menu lets you perform different operations on all the opened tabs:
- Stack/Unstack those
- Bookmark those
- Close those
- Switch between those
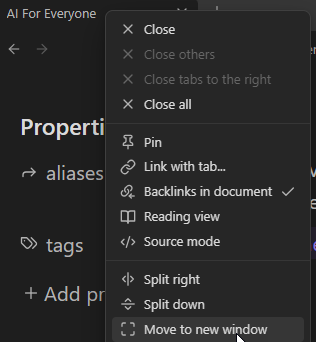
Right clicking on a tab will show a context menu:
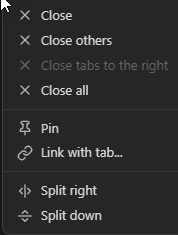
This menu lets you:
- Close the current tab
- Close all the tabs except for the current one
- Close all the tabs
- Pin the current tab
- Link tabs together
- Split the view
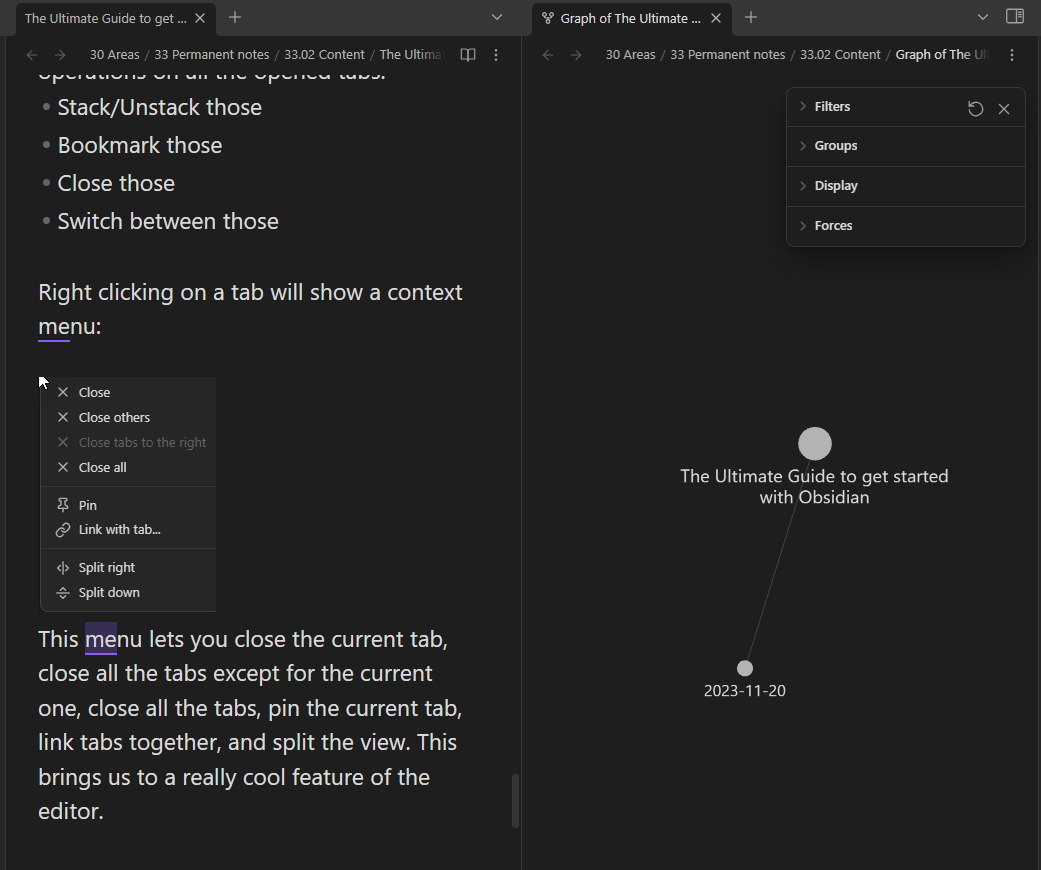
This brings us to a really cool feature of the editor. By splitting the editor view, you can display multiple notes and/or views at once:
You can also move tabs around by drag and dropping those:
You can also drag files from the File Explorer (left sidebar) to the tab bar to create a new tab showing the note you've dragged:

Last but not least, if you right click on a tab and select "Move to new window", you can show the tab in a new Obsidian window:
This is super useful to do when you have multiple screens, or a widescreen on which you have defined different zones.
The Editor
Within each tab of the editor view, there's the most important part of Obsidian: The Editor. As I've mentioned earlier, it's a text editor with Markdown support. Again, we'll explore the basics of Markdown a bit later.
At the top of the editor, you'll see the following when a note is opened:

The arrows in the top left corner enable you to go to the previous or next note. Again, this works the same way that Web browsers do. In the middle, you'll see the path to the current note as well as the name of the note. Finally, in the top right corner, you'll find a button that lets you switch between the two views of the editor:
- Editing view: Let's you modify the note
- Reading view: Let's you read the note comfortably (read-only)
To be honest, I almost never use reading view. In the editing view, there are two modes:
- Source mode: displays the Markdown markup
- Live Preview mode: displays the rendered Markdown
The Live Preview mode is great, because it renders the Markdown code, which looks much better:

In the example above, you can see that there is a nice-looking list of properties, and that the list (A, B, C) is rendered nicely. Also, everything can still be edited easily.
On the other hand, the Source mode displays the raw Markdown code:
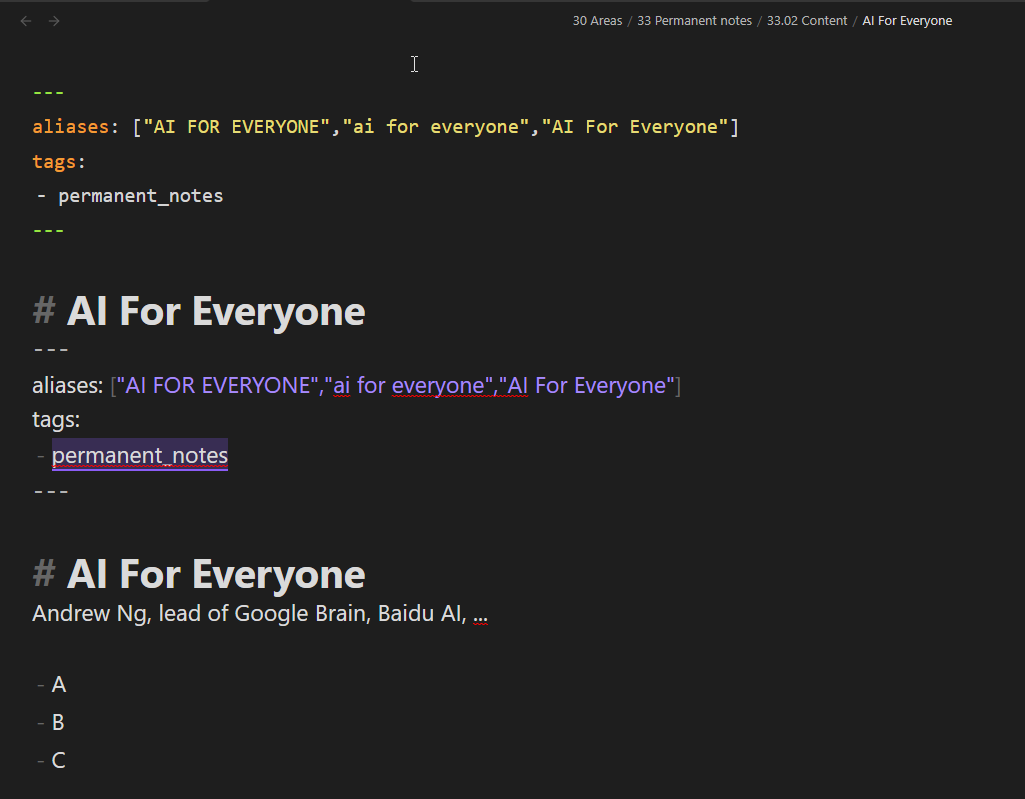
As its name implies, the source mode displays the "source code" of your notes: the Markdown markup. This is the content that you'll also see if you open your notes in a different text editor. In that mode, there is no editor for the properties. You have to edit the YAML manually (more on this later).
Last but not least, clicking on the hamburger menu in the top right corner will display the context menu for the current note:
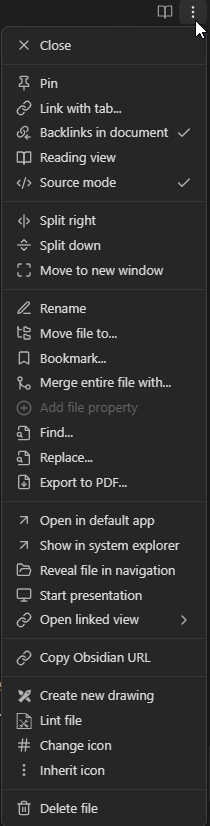
Interestingly, beyond renaming/moving/bookmarking the note, replacing text, etc, you can also:
- Show the note in your system's file explorer
- Reveal the file in the file explorer of Obsidian
- And more!
Note that plugins can also add new options to that menu.
The Status bar
Last but not least, the status bar at the bottom right displays various information, depending on the context (e.g., note that is being edited).

The status bar includes information such as:
- The number of words in the current note
- The number of characters
- The reading time
- The number of notes in your vault
- The number of backlinks of the current note
- ...
Again, plugins can customize this element of the interface.
The File Explorer
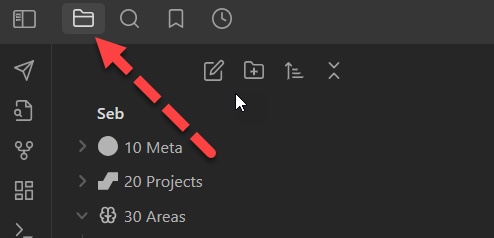
In the left sidebar, you can display the file explorer by clicking on the folder icon in the top left corner:
The File Explorer lets you:
- Create notes, canvases and folders
- Reorganize your vault (move elements around, rename those, delete those, etc)
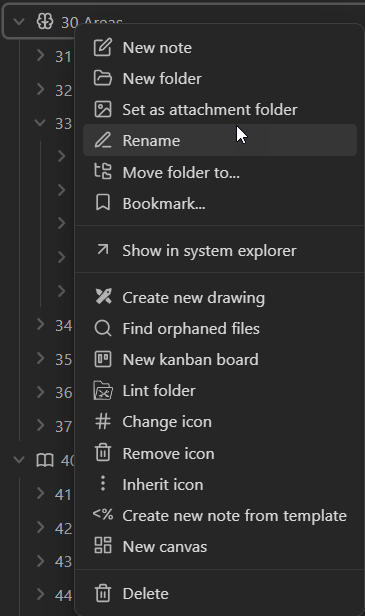
You can right click on any element to see the context menu:
On the top of that view, you can choose the sort order, expand and collapse the hierarchy, and create new notes and folders.
On the top of that view, you can choose the sort order, expand and collapse the hierarchy, and create new notes and folders:

The Search view
You can open the search view by clicking on the magnifying glass in the top left corner:
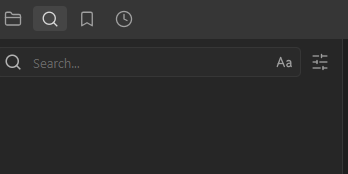
Using the search box, you can search across your vault in different ways:

For instance, if you want to search for notes containing a specific tag, you can search for #mytag. You can also search by path, by file name, by section keywords, by properties. And you can combine those approaches to refine your search results.
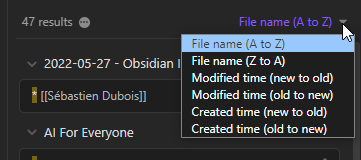
When you see your search results, you can choose the sort order:
Check out the official documentation to learn more about the search capabilities of Obsidian: https://help.obsidian.md/Plugins/Search
The Bookmarks view
The last built-in sidebar view is the Bookmarks view. Using this one, you can explore your bookmarks, reorganize those, etc.
You can create different types of bookmarks in Obsidian:
- Note bookmarks
- Folder bookmarks
- Section bookmarks
- Image bookmarks
- ...
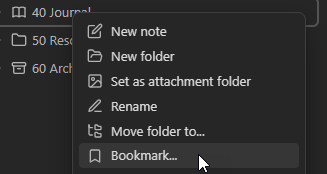
All you have to do to create one is to right click on the element in question (e.g., on a tab, on a file or folder in the file explorer, on an image in the editor, etc) and click on Bookmark. Here's an example with a folder:
Bookmarks are great to quickly go back to notes you are currently working on or use on a regular basis. I personally don't use those a lot as I prefer other means of finding/opening my notes, but they're still nice to have.
The Quick Switcher
The Quick Switcher is my favorite tool in Obsidian. It lets you quickly create or open notes. To show it, you either click on this icon in the ribbon:

Alternatively, you can use the "CTRL/CMD + O" keyboard shortcut.
When it opens, the Quick Switcher looks like this:
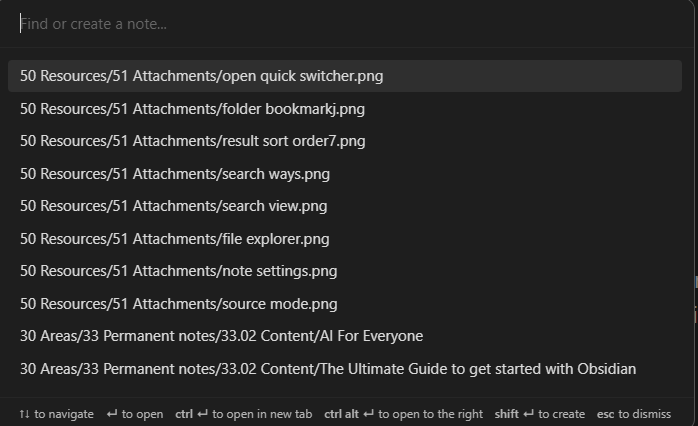
In the text box, you can simply type a part of the name of the note you're looking for, and hit "Enter" to open (or create) it. The list of results adjust automatically as you continue typing. If you hit "CTRL/CMD + Enter", then the selected note will open in a new tab. You can use the up and down arrows on your keyboard to navigate up and down. Pressing the escape key will close the Quick Switcher.
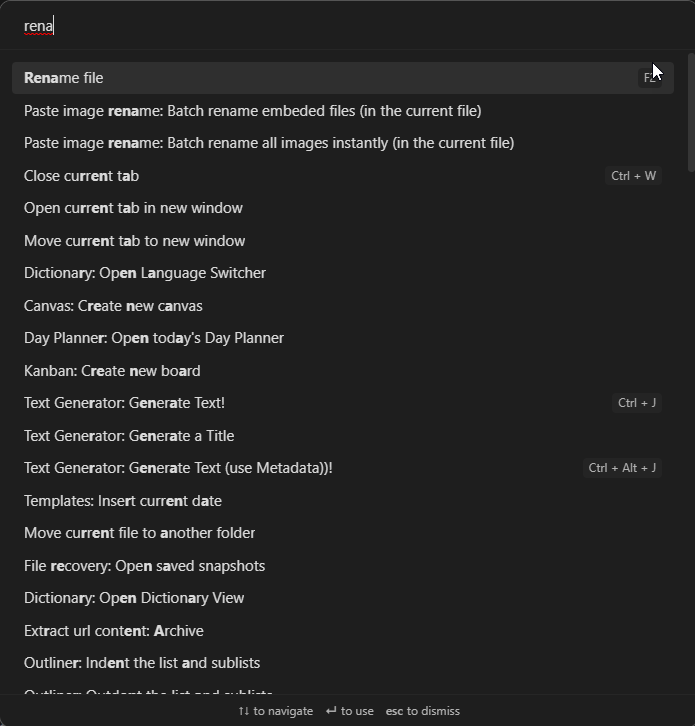
The Command Palette
The Command Palette is my second favorite time saver in Obsidian. It is quite similar to the Quick Switcher, except that it lets you look for and execute commands. Commands are all the actions you can perform through the various buttons and menus of the user interface. Note that the list of commands can also be expanded by various plugins, turning Obsidian into a real productivity power house.
To open the command palette, either hit the "CTRL/CMD + P" shortcut or click on the following icon in the ribbon:

In the example below, I was looking for the rename command. Pressing the "Enter" key would execute that command:
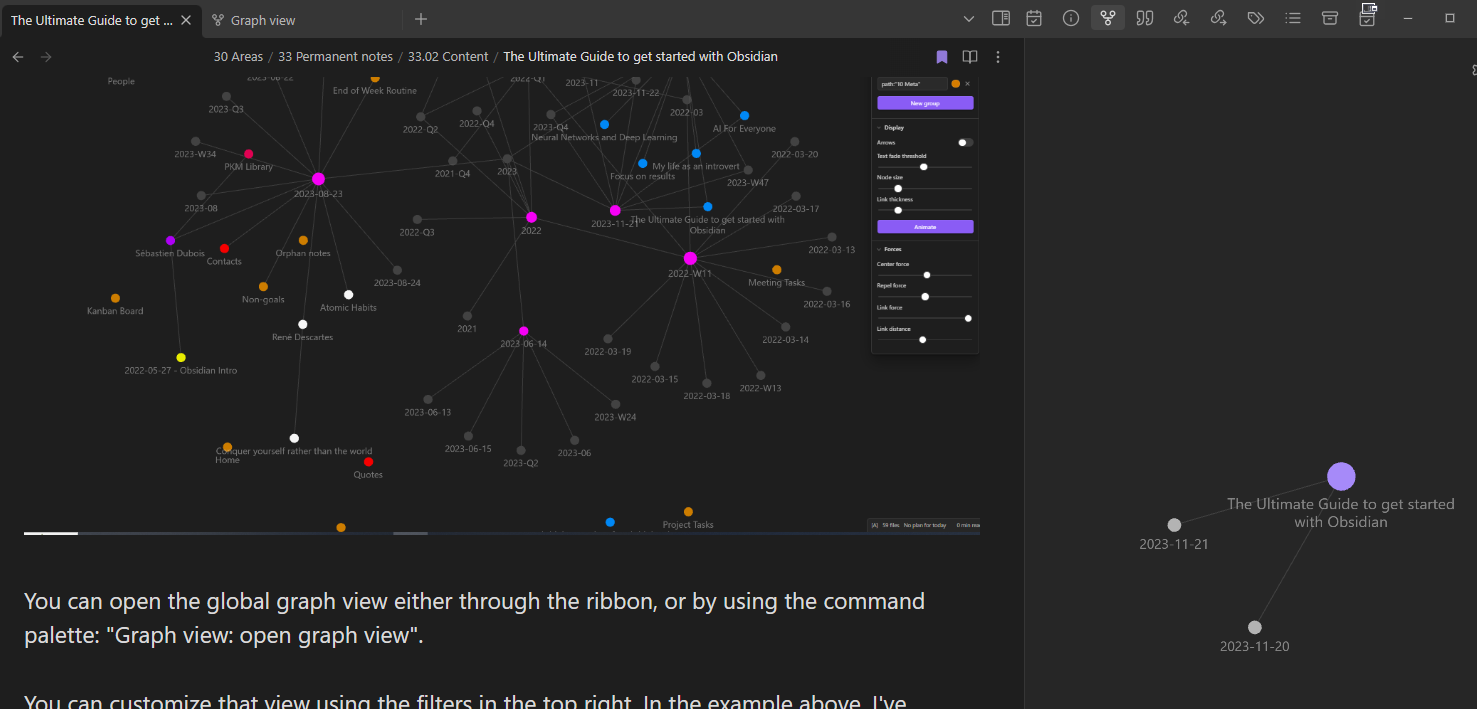
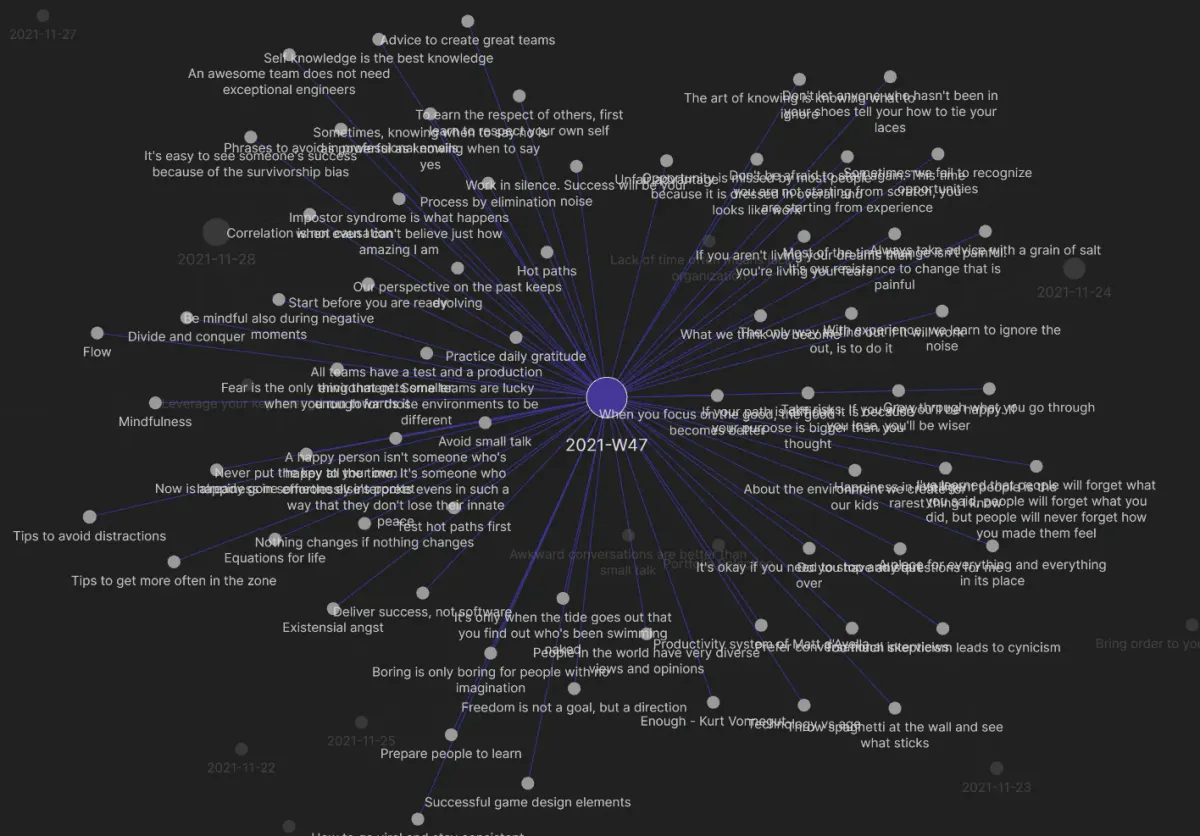
The Global Graph View
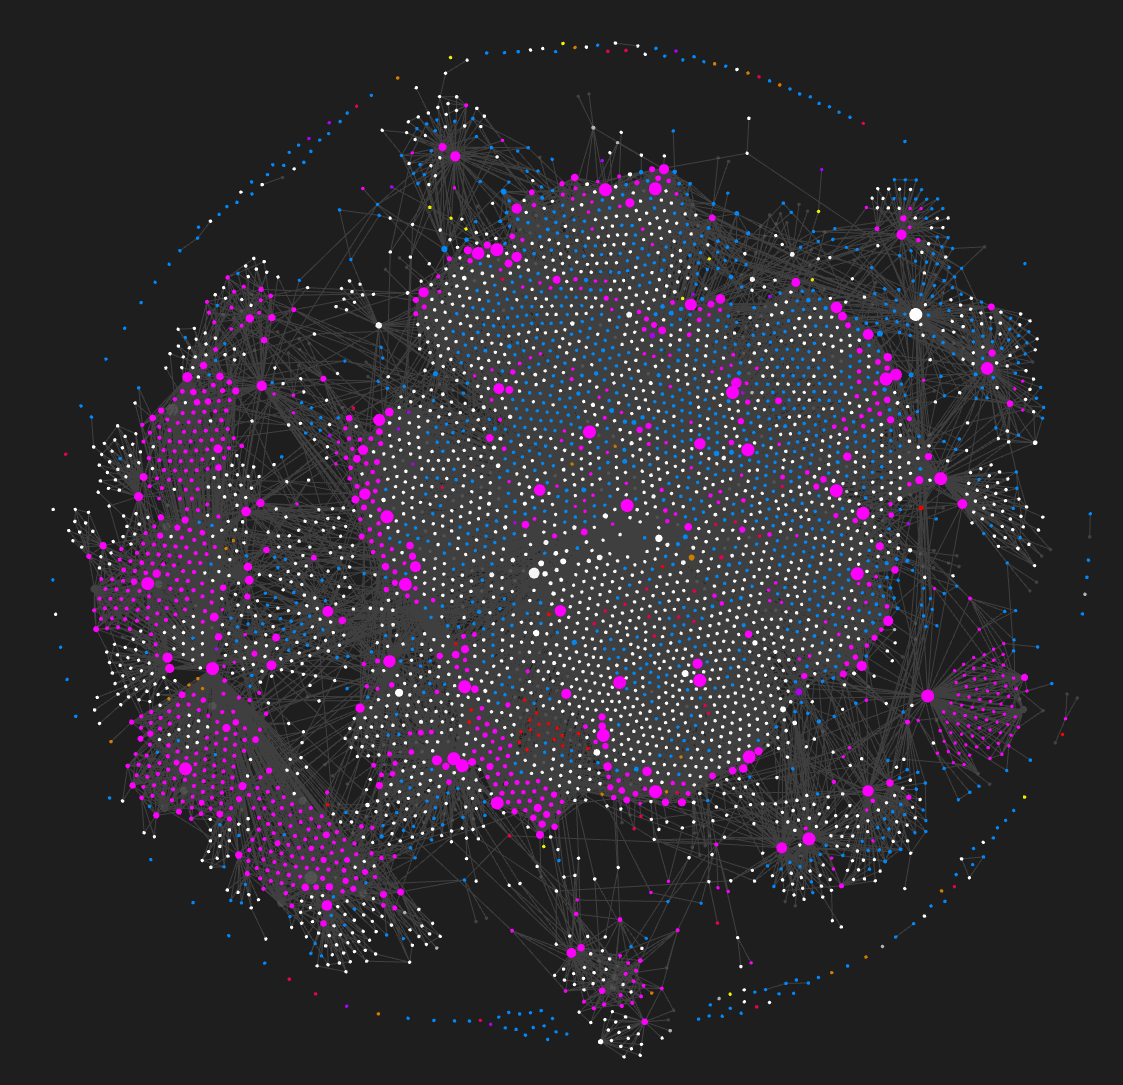
The Global Graph view is another cool feature of Obsidian. It lets you visualize all the notes and/or tags in your vault, as well as their links:
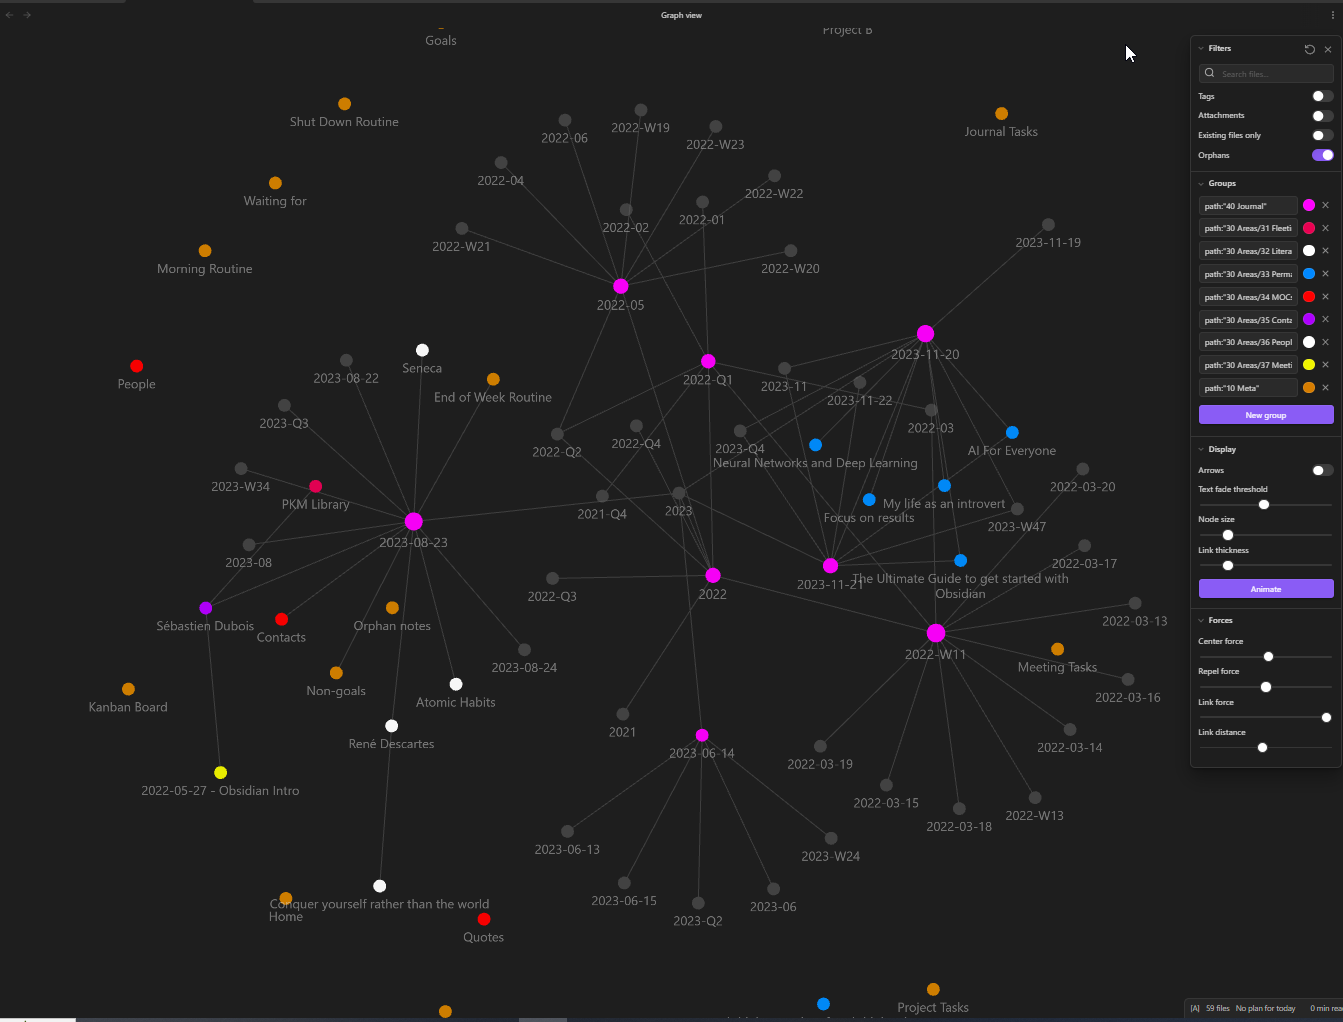
You can open the global graph view either through the ribbon, or by using the command palette: "Graph view: Open graph view".
You can customize that view using the filters in the top right. In the example above, I've defined a number of colored groups, enabling me to recognize different types of notes. Those filters are also part of my Obsidian Starter Kit.
The Local Graph View
Another graph view is available in Obsidian. That one is called the Local Graph View. It displays the relationships between the current note and other ones in your vault:
Just like the global graph view, you can configure it. To open it, you need to use the command palette: "Graph view: Open local graph". It will open and render in the right sidebar, but you can also display it in a tab if you prefer.
The Outgoing links and Backlinks Views
In the right sidebar, there are two interesting views, demonstrating the value of Obsidian for knowledge management: the Outgoing Links view and the Backlinks view. The former displays the outgoing links of the current note (i.e., links from that note to other notes), while the latter displays backlinks (i.e., links from other notes to the current one).
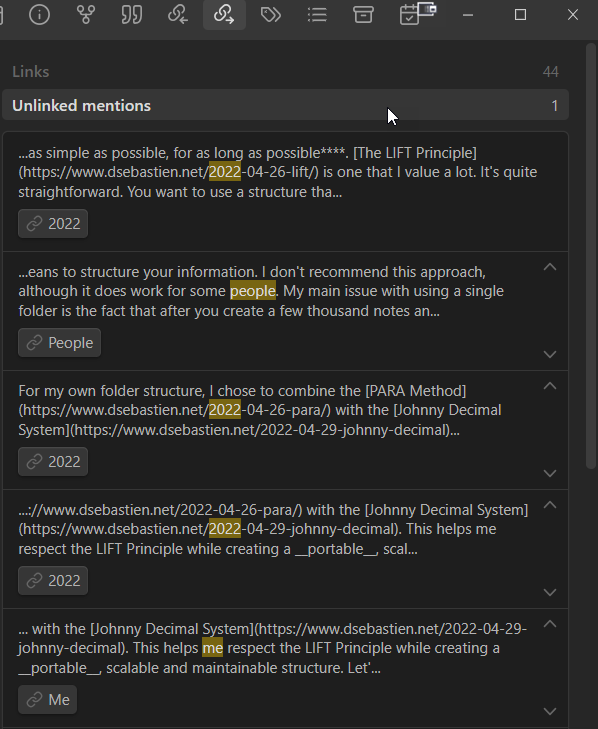
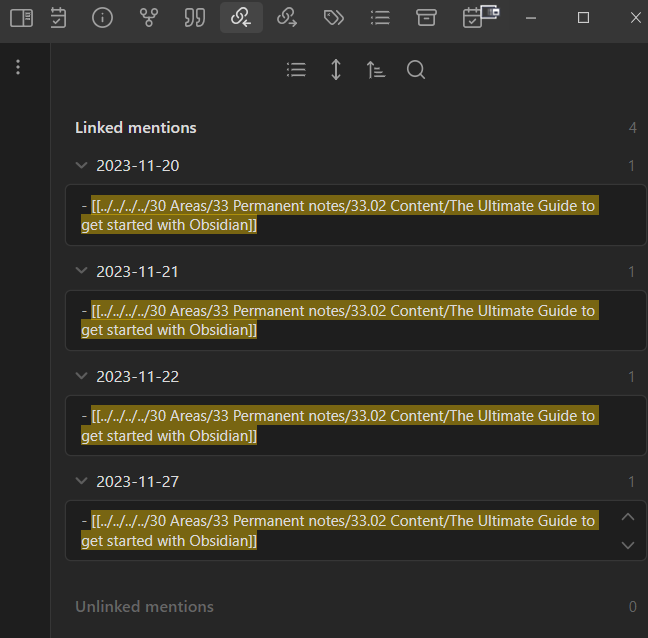
Those views are very useful to uncover and explore relationships between the notes in your vault.
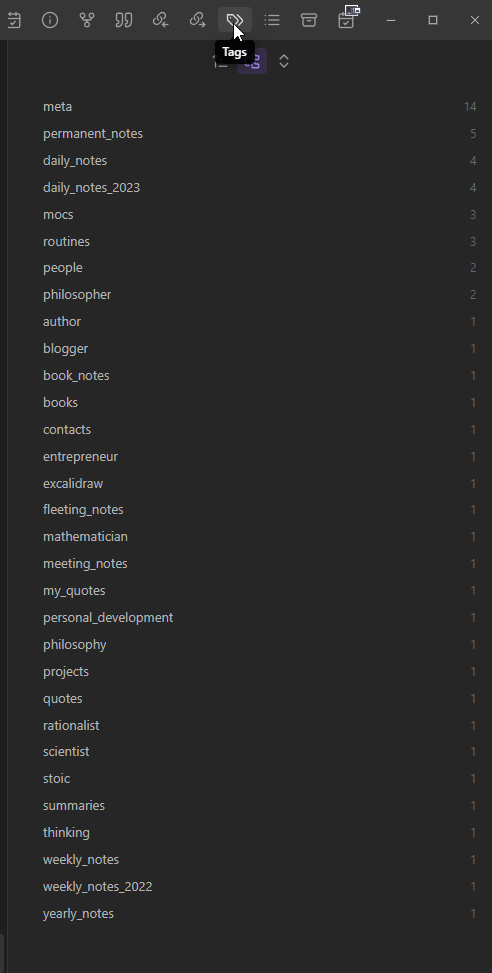
The Tags View
The built-in Tags view is interesting to explore the tags you have used in your vault, but doesn't provide much apart from being able to click on a tag and view the corresponding results in the Search view.
To display the Tags view, click, on the tag icon in the top right corner of Obsidian, or execute the following command using the palette: "Tags view: Show tags":
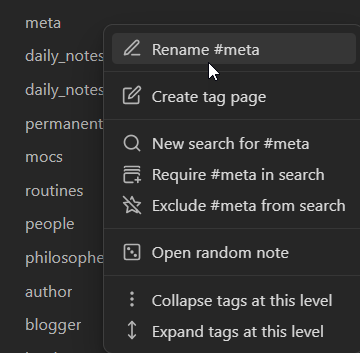
Luckily, there's an awesome community plugin called Tag Wrangler that improves the user experience of that screen. As we'll see in the section about community plugins, there's an awesome plugin called "Tag Wrangler" that drastically improves that screen and lets you actually manage tags (e.g., rename those).
 pjeby
pjebyThe Tag Wrangler plugin, among many others is included out of the box with the Obsidian Starter Kit.
The File Properties and All Properties Views
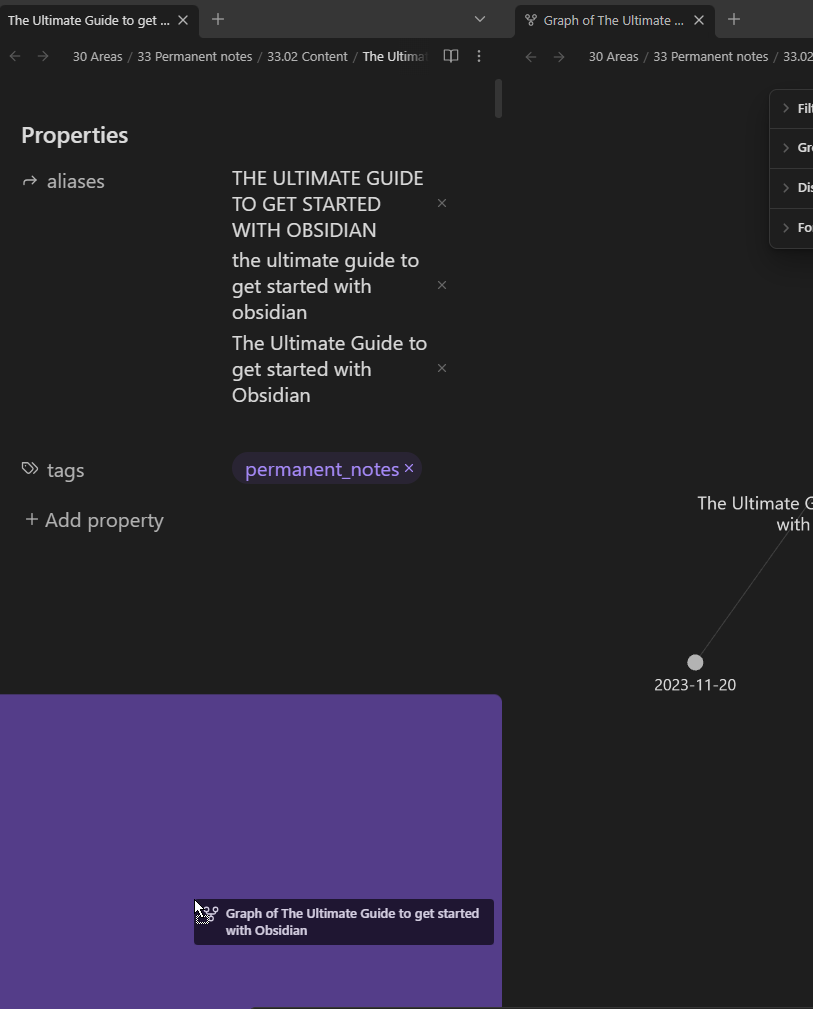
Another useful view that Obsidian includes is the Properties view. You can use it to add/modify/remove properties on your notes. I'll come back to this one later, when we'll explore metadata.
For now, all you need to know is that there are two properties views:

The file properties view lets you manage the properties of the note you're currently editing:
It is basically the same as what you see on the top of your notes in the editor. Although, displaying those in a side panel is (IMHO) easier to use.
Using the "Add property" button, you can add a property (i.e., metadata) to the current note. If you do, then you'll get to enter a name for your property and will be able to define the value:

If you right click on the icon on the left of a property, you'll get the following context menu:
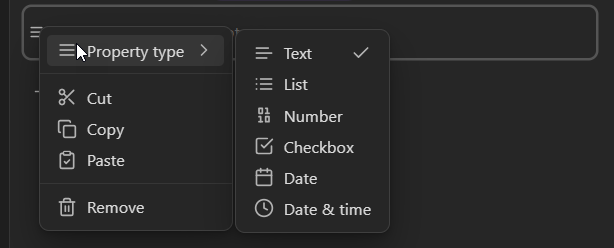
This context menu is very useful. You can use it to cut/copy/paste or remove properties (e.g., copy a property from one note to another). More importantly, you can use it to select the type of the property.
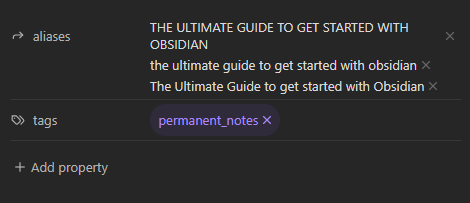
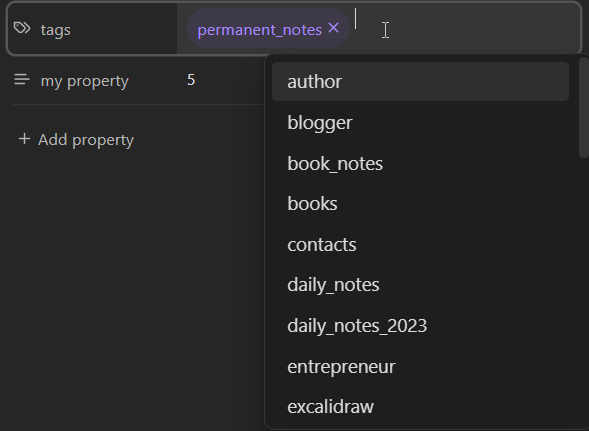
Note that there are two special property names: tags and aliases. Those two are recognized by Obsidian and treated specifically. If you create a property called "tags", then you will be able to easily add tags to your note. Also, in the value field, Obsidian will auto-complete tags that already exist in your vault:
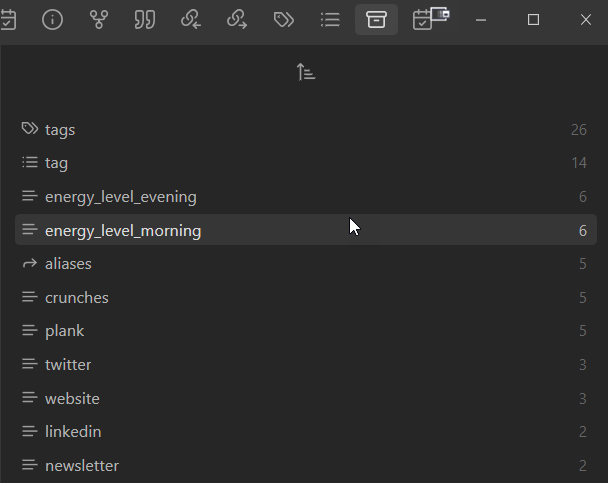
Finally, the "all properties" view will show you a list of all the property names used in your vault. This is useful when you want to find all notes where a specific property was used, or to ensure that your notes use the same property names (i.e., for coherence/consistency).
Canvas
Obsidian also lets us create Canvases to think visually. When you open a Canvas, you see the Canvas view instead of the editor. Inside of the Canvas view, you have an "infinite" canvas in which you can add cards, add existing notes or attachments (images, PDF documents, etc) and create links between all those. Here's how a Canvas looks like:
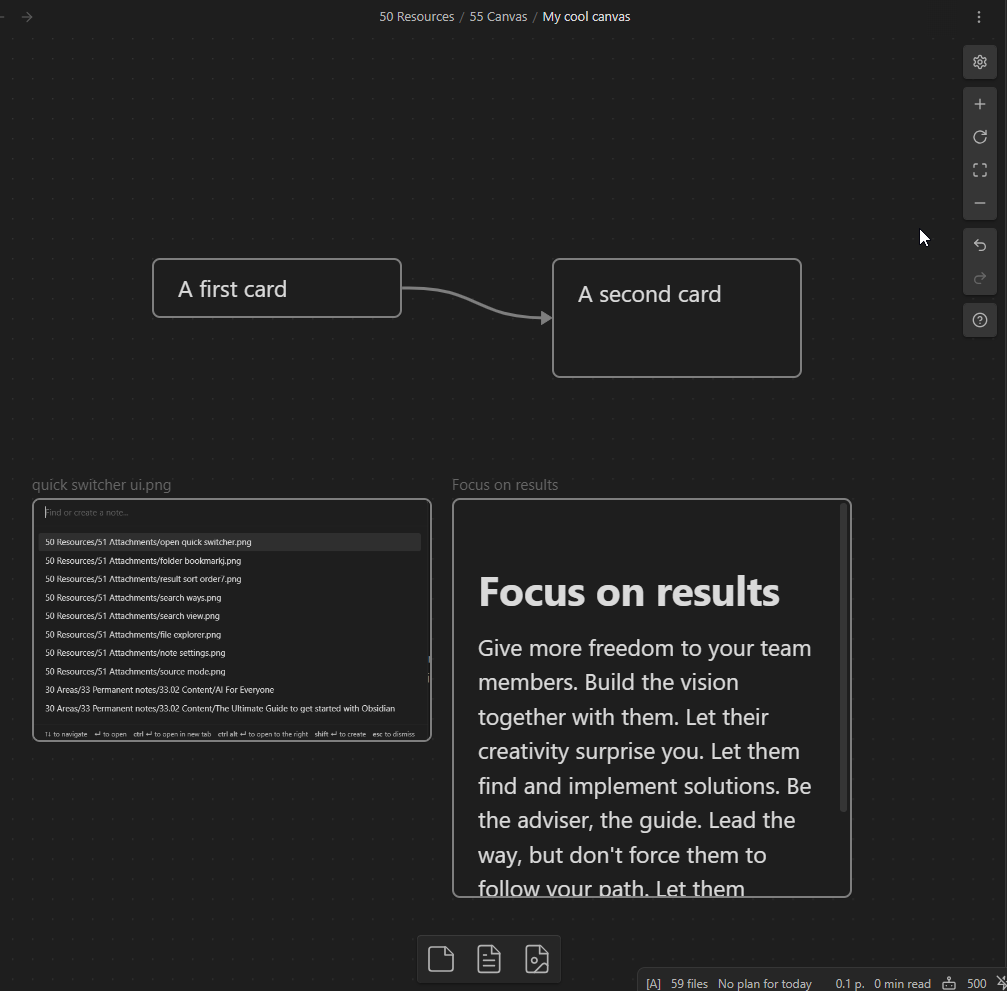
In the example above, I've added two cards (using the first button at the bottom), and created a link between those. I've also displayed an existing note (using the second button at the bottom). It's possible to double click on cards and notes to edit those directly within the canvas. Finally, I've also added an image from my vault using the last button at the bottom.
You can zoom in or out using the bottoms in the top right corner, but you can do the same by holding the CTRL/CMD button and using the mouse wheel (assuming you're in a computer). Another interesting option is the "Zoom to fit" button:
Using a canvas is a powerful way to explore and connect ideas within Obsidian. That being said, note that Canvas cards aren't notes. They will not appear in the File explorer. They only exist within the canvas.
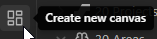
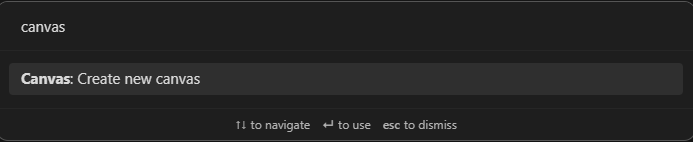
To create a canvas, you can either click on the "Create new canvas" button in the ribbon:
Or you can use the command palette and execute the following command;: "Canvas: Create new canvas":
You new canvas will appear in the File explorer, and will be stored on your file system within a file with a .canvas extension.
TIP: In the Settings, under Core Plugins > Canvas, you can select a default folder to create new canvas files in.
Settings
Last but not least, the Settings view lets you manage the configuration of Obsidian, its core plugins, as well as the community plugins.
To open the settings, either click on the cogwheel at the bottom left corner of the window, or launch the following command using the command palette: "Open settings":
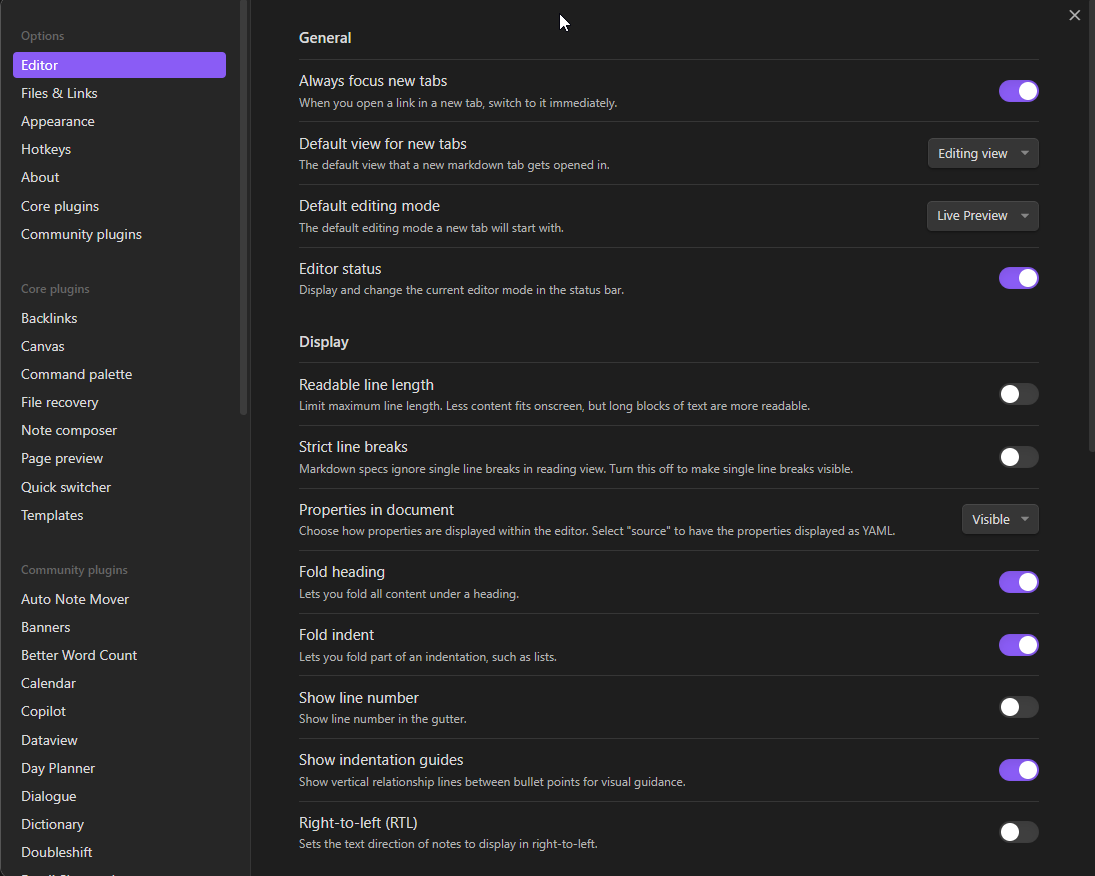
There are tons of settings, and it's beyond the scope of this article to explore those. But you should take some time to familiarize yourself with those.
Among other things, the settings view lets you:
- Configure the Editor
- Configure how files and links are managed/behave
- Hotkeys
- Enable, disable and configure core plugins (i.e., the built-in ones)
- Install, enable, disable and configure community plugins
Markdown
Introduction
Alright, now that you are familiar with the user interface of Obsidian, it's time to learn more about Markdown, since it is the syntax that you will use to write your notes.
Markdown is really useful to know about. Not only because it is the markup language used by Obsidian, but also because it is actually used and supported by many other tools and platforms.
My goal here is not to teach you the Markdown syntax or get into the nitty-gritty details. Instead, my goal is to give you an idea about what Markdown is, why it’s useful to know about it, its pros and cons, and where you can go to learn more!
Note that this content is based on an older article of mine:

The basics of Markdown
Markdown is a pure-text markup language created back in 2004 by John Gruber (Daring Fireball) and Aaron Swartz.
A markup language defines a set of rules to define, format, and render textual data. This might not make much sense to you if you’re not in IT, but that’s all right.
Markdown dictates how to represent certain things such as bold text, text in italics, headings, lists, quotes, emphasis, images, code, etc. Its syntax defines how text/content should look.
Here are a few examples (there’s more to know!). For each example, I start by showing you the Markdown syntax, and below it how the result looks when rendered by a capable editor (or when transformed into another format):
# My level 1 heading
My level 1 heading
## My level 2 heading
My level 2 heading
### My level 3 heading
My level 3 heading
**some text in bold**
some text in bold
_some text in italics_
some text in italics
_**some text in bold and italics**_
some text in bold and italics
> A quote
A quote
[An external link](https://dsebastien.net)
A list:
- A
- B
- C
- A
- B
- C
As you can see, Markdown is a text-based format, so you actually don’t need any specific tool to write Markdown. That being said, Obsidian is first and foremost a Markdown editor. It makes it very easy to write markdown content.
Markdown files use the “.md” extension. Note that the name “Markdown” is actually a fun reference to the term “Markup”.
Check out this link to see more examples: https://docs.github.com/en/get-started/writing-on-github/getting-started-with-writing-and-formatting-on-github/basic-writing-and-formatting-syntax. Also check out the references further down.
The benefits of using Markdown
Markdown is very popular among technical writers. But not only. Let me tell you why.
Markdown has various use cases: write notes, create documents, craft blog articles, write books, prepare presentations, emails, etc. It is also supported by many tools and platforms. This means that learning this syntax will prove useful in different situations.
Markdown defines a common set of rules that works across different text editors. It might not seem like much, but without something like this each editor would have to invent its own way of expressing things like bold text, text in italics, headings, lists, etc. And this would be problematic because your data would not be portable. Data portability corresponds to the ability for information to be easily migrated and understood by different tools, instead of being stuck with one specific vendor. European citizens have a right to data portability, as per GDPR article 20. So, first and foremost, Markdown provides you with a good level of confidence that your content will be portable. Of course, it really depends on what the editor you use supports. As we will see, there are different variants of Markdown, and certain text editors (including Obsidian!) add vendor-specific features that are not necessarily portable, which is something to be aware of.
In addition to data portability, since it is a text-based format, Markdown is also portable. You can write on one device and continue on any another, independently of its operating system.
Yes another benefit of Markdown lies in its simplicity and ease of use. It offers the simplicity and benefits of using pure text files, but with the power of word processors. You can quickly learn the basic syntax and create beautiful documents easily. The user experience of writing documents using Markdown is very different from that of using a word processor like Microsoft Word, Open Office, or Google Docs. If you’ve used those long enough, you know how bad it feels when the formatting breaks, and you spend a ton of time trying to fix it. It doesn’t happen with Markdown because the formatting is part of the text, making it much more obvious when and where something is wrong. It’s only my personal opinion, but there’s a lot more fluidity in the writing experience when using Markdown. As a blogger and author who has tried many tools and approaches over the years, I would choose Markdown or AsciiDoc (another popular markup language) over old-school documents any day of the week.
Markdown (and its most popular flavors) are supported by a vast number of tools. This means that you have many options to edit Markdown content, including many free and Open Source ones. I’ve listed many of those in the PKM Library. But even without that, given that it’s a plain-text format, you can actually edit it with any text editor.
Contrary to What You See Is What You Get (WYSIWYG) visual editors, Markdown lets us focus on the activity that really matters: writing. If you have to take your mouse around to highlight some text and find an icon on a ribbon to make that text bold, then you’re wasting time and energy without realizing it. Once you get used to the Markdown syntax, your mind will not even need to see the rendered version to know what it will look like. This is because the syntax is really lightweight and easy to interpret. As a matter of fact, Markdown was designed to look just as good when looking at the source or the rendered result.
One more benefit of Markdown is that it can be easily transformed into different file formats (e.g., PDF, HTML, DOCX, etc) using tools such as Pandoc. It’s also possible to convert document file formats to Markdown.
Since Markdown is pure text, it is also easy to backup. Create copies of the files and you are done. You can even go further and version your content using Source Control Management (SCM) tools such as Git. It’s a bit more advanced but worth looking into. It also makes it very easy to synchronize file format.
In conclusion, using Markdown is a great idea for future-proofing your content.
Markdown flavors
Note that Markdown is not a standard. There are different variants, often called “flavors”, which are not necessarily compatible with each other.
When Markdown was created, there was no standardization effort at all. Markdown was an informal specification. As it gained popularity, many flavors started appearing, because different groups of people needed different features (e.g., tables, footnotes, etc).
Around 2012, CommonMark was created. CommonMark is a formal and unambiguous specification. This is important to mention because of portability. Ideally, you want the content you create using one text editor to be recognized and rendered the same way by other editors. This is especially useful when you migrate a lot of content from one tool to another. So CommonMark is important. Luckily, Obsidian supports it out of the box.
A well-established variant of Markdown is GitHub Flavored Markdown (GFM), which is a superset of CommonMark introduced by GitHub, which is a very popular Website for software developers around the world. The GitHub flavored Markdown flavor introduces support for additional elements including tables, task lists, strike-through text, and code syntax highlighting. The good news is that Obsidian also supports GitHub Flavored Markdown. Actually, it even goes further because it also supports tags, LaTeX mathematical expressions, footnotes, internal links, and a syntax to embed notes and files.
Although those are not supported by Obsidian, here are a few other flavors:
- Reddit: https://www.reddit.com/wiki/markdown
- StackOverflow: https://stackoverflow.com/editing-help
- Discord: https://support.discord.com/hc/en-us/articles/210298617
- GitLab Flavored Markdown (GLFM): https://docs.gitlab.com/ee/user/markdown.html
- Doxygen: https://riptutorial.com/markdown/example/6811/doxygen-markdown
- Markdown Extra: https://michelf.ca/specs/markdown-extra/
- MultiMarkdown: https://fletcherpenney.net/multimarkdown/
- Microsoft Teams: https://support.microsoft.com/en-us/office/use-markdown-formatting-in-teams-4d10bd65-55e2-4b2d-a1f3-2bebdcd2c772
You can find a comparison here: https://gist.github.com/vimtaai/99f8c89e7d3d02a362117284684baa0f
The limitations of Markdown
While Markdown is awesome and while I’m a Markdown "believer" and advocate, it’s important to be aware that it isn’t perfect. Here are some of its limitations/issues:
- You can’t easily generate a table of contents for a Markdown document. Also, it isn’t ideal for long-form content. That being said, with tools such as Obsidian you can (and should!) actually split the content into more atomic notes
- While CommonMark and GitHub Flavored Markdown (see the previous section) provide good enough text formatting options, Markdown isn’t really extensible. If an editor incorporates additional Markdown features, those will be “proprietary” ones. Unless other editors bring support for those, you will lose portability
- Markdown has many flavors, and while many do support some parts of Markdown, there’s no guarantee that different Markdown editors will always interpret and render your content in the same way. That’s why it’s important to ensure which “flavor” of Markdown your editor supports (see the previous section)
- Markdown combines the content and the formatting. You might or might not like it. I appreciate it because it helps me focus on the text, its meaning, and emphasis
- Markdown doesn’t support defining semantic meaning. So, you can’t explain that a given paragraph is information, a warning, a problem, a concept, ... It focuses solely on text and formatting
- Markdown isn’t the most powerful tool for integrating images into your content. You can add images and control the size, but that’s about it. For instance, putting an image on the right side of a text paragraph or having text wrap an image is not possible with Markdown
I’ll leave you with these two pieces of advice:
- Whenever you pick a note-taking tool, check if it supports Markdown. If it does, make sure that it uses a well-known flavor like CommonMark or GitHub Flavored Markdown
- Be careful about proprietary Markdown extensions. They may feel nice but will almost always hurt data portability, making it harder for you to migrate your content elsewhere
References
- Markdown informal specification: https://daringfireball.net/projects/markdown/syntax
- CommonMark
- Official Website: https://commonmark.org/
- Formal specification: https://spec.commonmark.org/
- GitHub flavored Markdown
- Internet standard discussing Markdown: https://datatracker.ietf.org/doc/html/rfc7764
- Comparison of Markdown flavors: https://gist.github.com/vimtaai/99f8c89e7d3d02a362117284684baa0f
- Data portability
- Data portability @ Wikipedia: https://en.wikipedia.org/wiki/Data_portability
- GDPR article 20: https://gdpr-info.eu/art-20-gdpr/
- Tutorials
- Cheatsheets
- https://github.com/adam-p/markdown-here/wiki/Markdown-Cheatsheet
- https://www.markdownguide.org/cheat-sheet/
- Markdown version: https://www.markdownguide.org/assets/markdown-cheat-sheet.md
- https://towardsdatascience.com/the-ultimate-markdown-cheat-sheet-3d3976b31a0
- https://www.freecodecamp.org/news/markdown-cheat-sheet/
- https://devhints.io/markdown
Creating links and using backlinks
One of the key aspects of knowledge management is creating links between concepts, ideas, thoughts, and knowledge in general. As I've mentioned while introduciing the Links and Backlinks views, those are really useful to explore the relationships between your notes, and uncover ne ones.
Check out the official documentation of Obsidian to understand the different types of links you can create:
Also, as I've mentioned earlier, backlinks are also interesting to understand and leverage: https://help.obsidian.md/How+to/Working+with+backlinks
Links and backlinks increase the connectivity of your knowledge graph, and enable resurfacing related/useful notes when you need those.
Tagging your notes
Tagging is really a key practice to keep your notes organized, searchable, and useful. I strongly believe that organizing notes using folders has little value compared to tagging those. The problem with folders is that a note can often be associated with more than one "category" or "topic". Using folders to represent those is a problem, because a note can only be stored in one folder. That's where tags come in. A single note can contain as many tags as you want. You want to use those to categorize your notes, and link those with relevant topics and ideas.
Within your notes, you have two main options to add tags:
- Using
#footo add the "foo" tag- You can do this anywhere in your notes
- Adding and using the special "tags" property in your note metadata
- Either through the Properties view, or as YAML in source mode (see next section)
- Combining those two approaches
I personally prefer regrouping most of my tags inside of the note metadata. In both cases, you can add as many tags as you want.
Obsidian supports tags at various locations:
- In the Editor
- In the tag pane
- In the search view
- In the graph view
- ...
Using those, you can explore, filter, and modify your notes and your tags easily. But you can actually go further, and leverage the presence (or absence) of tags to automate certain operations in your vault.
Note that Obsidian has built-in support for tag hierarchies. Here’s an example: #psychology/positive_psychology
Tag hierarchies are interesting to better organize your tags, and discriminate between similar ones.
Check out the following article for more details: https://www.dsebastien.net/2022-05-17-why-and-how-to-tag-notes-in-your-pkm/
Also, make sure to read the official documentation: https://help.obsidian.md/How+to/Working+with+tags
Adding metadata to your notes
Obsidian supports adding metadata to your notes. Since version 1.5.0, it includes an easy-to-use Properties view (as we discussed earlier). But underneath the cover, if you look at the source code of your notes, you'll notice that the syntax that is used is really specific. It is actually a standard markup format called YAML.
If you're not technical, then no need to worry. Just add properties and set their types using the Properties view. You can learn more about that here: https://help.obsidian.md/Editing+and+formatting/Properties
But if you're curious, read-on. As I mentioned, the YAML syntax is a standard markup format. It is used a lot by software developers, and IT people in general. Here is an example:
---
location: Belgium
email: [email protected]
languages: [en, fr, nl]
website: <https://dsebastien.net>
tags: [contacts, entrepreneur, developer]
---

# Sébastien Dubois
...
YAML is not that complicated. Each line corresponds to a key-value pair. You can use what you want as key (i.e., property name). Values on the other hand must be one of the supported YAML types (e.g., text, array, etc). Again, remember that Obsidian treats the "aliases" and "tags" properties in a specific way.
Note that the three dashes --- mark the beginning and the end of the YAML metadata. That whole part is also called the "YAML front matter".
Embedding content in your Obsidian vault
Obsidian has great support for attachments. It not only lets you add various files to your vault (e.g., images, videos, PDF files, audio files, etc), but it also lets you embed those right into your notes.
Again, the official documentation clearly explains how to do this: https://help.obsidian.md/How+to/Format+your+notes#Embeds
Capturing information
Obsidian supports drag and drop out of the box and can automatically convert HTML (what is used for all Websites) to Markdown, the main syntax used by Obsidian. In addition, Obsidian can also embed other file types such as audio, images, PDF files, videos, etc.
Thanks to that support, you can drag and drop many things into your Obsidian notes. Everything you add will be stored in your Obsidian vault. The same goes for copy and paste.
It’s also possible to use Web clipper extensions to quickly capture content on the Web into your Obsidian vault. You can find more information about that here: https://help.obsidian.md/How+to/Capture+information#Use+a+clipper+extension
Most of the time, when I want to capture content from the Web, I just hit the CTRL + C keyboard shortcut after selecting what I need.
Obsidian Plugins
Obsidian includes extensive support for extensions. It is one of its key strengths.
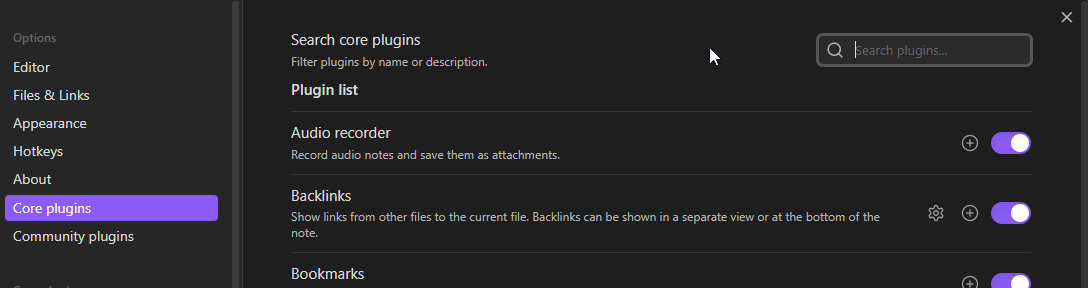
It includes a number of official plugins (e.g., file explorer, search, the graph view, the tag pane, starred notes, etc). Those are called "Core plugins". You can find all the details about those here: https://help.obsidian.md/Plugins/Audio+recorder. You can enable/disable those using the Settings view, by going in the "Core plugins" section:
But where Obsidian shines is with its community plugins. There is a large community of developers adding features to Obsidian through free and (often) open-source plugins. A number of those are included in the Obsidian Starter Kit.
By default, community plugins are not enabled. You have to disable the “Safe mode” to be able to use those. Given how much value community plugins bring to the table, I strongly recommend enabling those. That being said, always be careful about the community plugins you install. Make sure to only use trusted sources. Otherwise, you might easily get hacked.
By the way, don’t forget to regularly update your installed plugins. You can do so from the Settings view, under "Community Plugins":
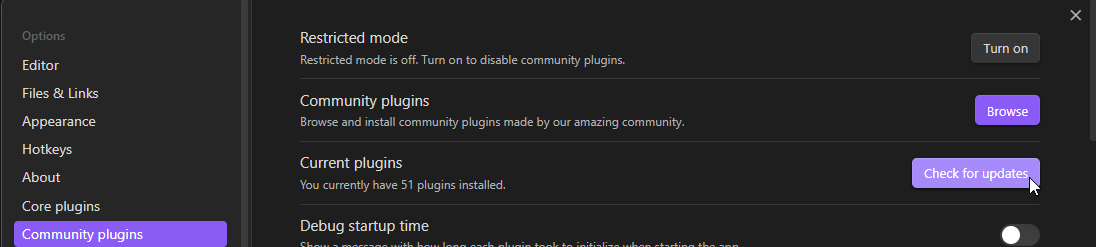
To install new plugins, click on "Browse" on the same screen.
WARNING: You can install additional plugins, but be cautious. Obsidian plugins don’t have any protection, so if you install a malicious one, you could be at great risk. I recommend only installing plugins from the official plugin repository. Those have been peer-reviewed at least once.
I've previously published a list of my favorite Obsidian plugins: https://www.dsebastien.net/2022-10-19-the-must-have-obsidian-plugins/

Customizing the interface of Obsidian
Obsidian is heavily customizable. In addition to the plugins which allow deeply extending the functionality of Obsidian, there are also tons of options you can play with. Moreover, you can also customize the look and feel of Obsidian using Cascading Style Sheets (CSS). This is an advanced topic that I won’t cover here, but you can find details in the official documentation:
Publishing your Obsidian notes on the Web
Obsidian Publish is a subscription-based service that Obsidian offers to let you publish your notes easily on the Web. You can find more details about it here: https://obsidian.md/publish
When you use Obsidian Publish, your published notes will be uploaded and hosted for you on the following domain: https://publish.obsidian.com
You can learn more about publishing and the possible customizations here: https://help.obsidian.md/Obsidian+Publish/Customize+your+site
Synchronizing your Obsidian notes across devices
Another thing you might want to do with your Obsidian vaults is synchronizing them across devices. Ideally, you want to be able to view and edit your content from all of your computers/tablets/phones without friction.
Synchronization is another subscription-based service that Obsidian offers: https://obsidian.md/sync. With that service, Obsidian takes care of synchronizing your data transparently. Every change you make is encrypted and stored safely on Obsidian’s servers, and then synchronized to your other devices.
You can learn more about synchronization here:
Note that there are other options to synchronize your content. For example, you can store your Obsidian vault within a file synchronization service such as Google Drive, Dropbox or Microsoft OneDrive and let those take care of copying your files around.
You can find a guide explaining this technique here (for Google Drive): https://forum.obsidian.md/t/sync-mobile-app-through-google-drive-android-windows10/20891
 Jose_T
Useful Obsidian keyboard shortcuts
Obsidian has awesome support for keyboard shortcuts. Here are a few key ones:
- CTRL/CMD + O: Find and open a note
- CTRL/CMD + P: Open the command palette to find and execute a command
- You can learn more about the Command palette here: https://help.obsidian.md/Plugins/Command+palette
- CTRL/CMD + N: Create a note
- CTRL/CMD + G: Open the graph view
- CTRL/CMD + SHIFT + T: Re-open the last closed pane
- CTRL/CMD + ALT + LEFT/RIGHT: Move to the previous/next “page” (note you were on)
- CTRL/CMD + ,: Open the settings
- CTRL + n: Create a new note
- CTRL/CMD + e (within a note): Switch between the viewing and editing modes
- ALT + e: Open the template modal to quickly insert a template in the current note
Check out the official documentation for more: https://help.obsidian.md/Customization/Custom+hotkeys
What is the best way to use Obsidian?
As with any other powerful tool, there are many ways to use and misuse Obsidian. There's no "best way" because the best way for one person might be a waste of time for the next.
To me, friction is a great indicator of the quality/match of your current system. If you feel that you are wasting too much time (1) taking notes, (2) filing notes or (3) retrieving notes, then it might be useful to experiment with other ways to organize your knowledge.
Here are my (current and personal!) preferences:
- I like organizing my notes with a simple folder structure to limit the time it takes me to file new notes
- I write a journal and capture new content in my daily notes, resisting the urge to create new/separate notes right away. This helps me stay focused
- I rely on my weekly reviews to extract knowledge from my daily notes into separate notes. When I do that, I take time to add tags/metadata and file the new notes. I create those using templates (time gain + consistency win) and file those automatically using the Auto Note Mover plugin (time gain). I add links and backlinks whenever possible and never consider notes final
- I use a stable base tag system to differentiate between notes: #daily_note, #book, #quote, #own_quote, #literature_note (not written by me), #permanent_note (written by me). I use tons of other tags to describe my notes.
Here are some articles I've published about my system, and things I recommend. Again, please consider that these are my PREFERENCES, not an ideal system.
Organization & naming:
Tags:
Daily notes:


Going further
What I've covered in this article should already take you a long way, but there's actually a ton more to know about Obsidian, note-taking and note-making.
Here are some pointers that you might find useful to further explore Obsidian:
- The Must-Have Obsidian plugins: https://www.dsebastien.net/2022-10-19-the-must-have-obsidian-plugins/
- How to add aliases to notes: https://help.obsidian.md/How+to/Add+aliases+to+note
- How to use callouts: https://help.obsidian.md/How+to/Use+callouts
- How to work with multiple cursors: https://help.obsidian.md/How+to/Working+with+multiple+cursors
- How to see unlinked mentions: https://help.obsidian.md/Plugins/Outgoing+links
- How to create and use templates: https://help.obsidian.md/Plugins/Templates
- Note that there's also a much more powerful alternative: https://github.com/SilentVoid13/Templater
- How to automatically move your notes: https://www.dsebastien.net/automatically-move-notes-in-obsidian/
Here are some links to my other articles about note-taking, note-making and PKM. Those should help you create better notes, which is IMHO way more important than mastering Obsidian:
- Why take and make notes: https://www.dsebastien.net/2022-11-16-why-take-notes/
- Why is Personal Knowledge Management (PKM) useful: https://www.dsebastien.net/why-is-personal-knowledge-management-pkm-useful/
- Note-taking vs note-making: https://www.dsebastien.net/2022-11-28-note-taking-vs-note-making/
- Effective note-taking tips: https://www.dsebastien.net/tips-to-get-started-with-note-taking/
- The Value of Atomic Notes: https://www.dsebastien.net/the-value-of-atomic-notes
- Journaling
- Organizing your PKM system: https://www.dsebastien.net/2021-12-03-personal-knowledge-management-organization/
- How to capture book notes and turn those into smart notes: https://www.dsebastien.net/2022-02-17-how-to-capture-book-notes-and-create-smart-notes/
- Why you need a single source of truth for your PKM system: https://www.dsebastien.net/2022-04-19-single-source-of-truth/
- The Zettelkasten method: https://www.dsebastien.net/2022-05-01-zettelkasten-method/
- Maps of Content (MoCs) for Knowledge Graphs: https://www.dsebastien.net/2022-05-15-maps-of-content/
- PKM practices to explore and master: https://www.dsebastien.net/ten-personal-knowledge-management-practices-to-explore-and-master/
- Daily note templates: https://www.dsebastien.net/my-daily-note-template-in-obsidian/
- Continuous note-taking: https://www.dsebastien.net/continuous-note-taking/
Conclusion
Obsidian is an awesome tool. And like many tools, there are many ways to misuse it. Also, many super useful features are not always obvious when you’re just getting started.
I hope that you have found this article interesting and useful. It’s a solid introduction, but there’s a lot more to know. That being said, do take things slow, and make sure to apply the KISS principle. Add complexity only when you really need to. And if you’re still not sure about how to approach Obsidian or PKM, then please take a look at my products.