
Navigate Your Obsidian Vault - Links, Graphs, Bookmarks and Hubs


This article is part 8 of my series on finding notes in Obsidian. The overview, with the map of all 12 parts, is The Complete Guide to Obsidian Search.
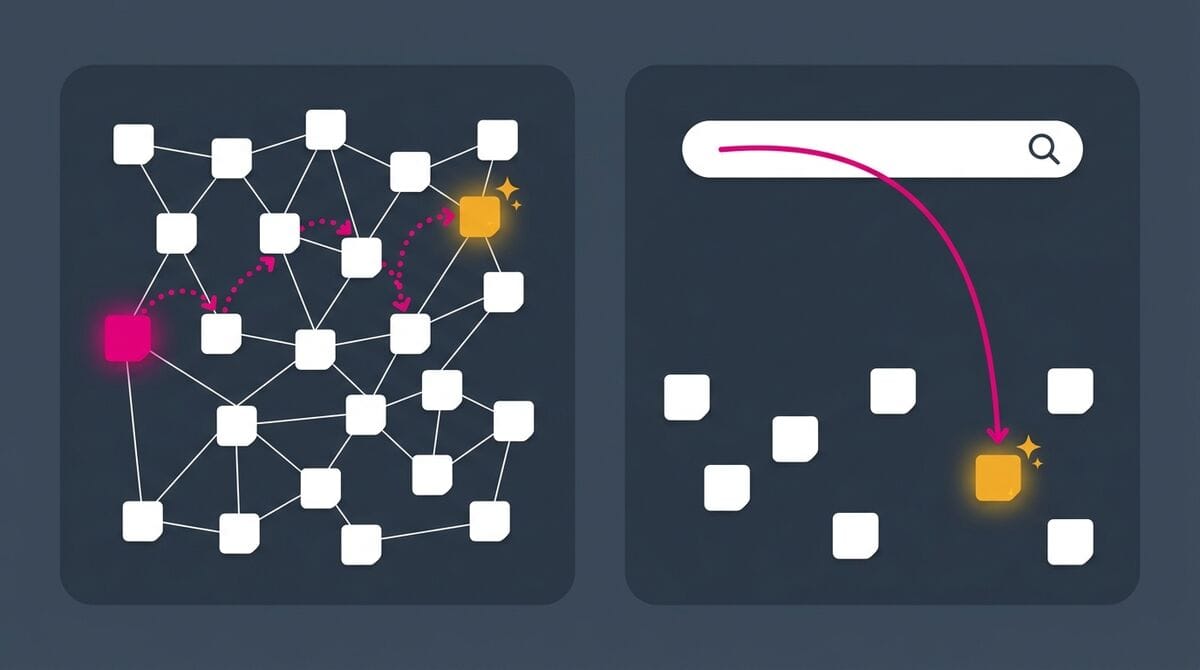
As I explain in the overview of this series, people mostly re-find things by orienteering, a series of small steps from something they know. Teevan's paper lists the benefits: it "decreased their cognitive load, allowed them to maintain a sense of location during their search, and gave them a better understanding of their search result." Marcia Bates described the same behavior back in 1989 as berrypicking: you pick bits from many places, and each find changes what you look for next.
In Obsidian, orienteering means starting from a note you can find (a person, a project, a Map of Content, the daily note of the right week) and walking the links. This part covers the tools for that walk: backlinks and unlinked mentions, the back and forward history, the local graph, Graph Explorer Base View and K-Plex, visual maps with Canvas and Excalidraw, Maps of Content that maintain themselves, project notes as hubs, bookmarks, pins and home notes, visual cues, and the Tags view with Tag Wrangler.
TL;DR
- Start from a note you can find, like a person, a project, a Map of Content or the daily note of the right week, and follow the links.
- Check backlinks and unlinked mentions after you create a note. They show the notes that already link to the concept or mention it. Rank unresolved links with
obsidian unresolved counts: a link used fifteen times is a missing hub. - Keep the local graph in a sidebar at depth 2, with color groups for projects, people and sources. K-Plex and Graph Explorer Base View give you maps with a fixed layout or a filtered subset.
- Let a query build your Maps of Content, then serialize the result with Dataview Serializer, so the graph, Publish,
rg, git and AI agents all see the links. - Link upward, once. A task links to its project, and the project note lists its tasks through a query: one note to find, everything else one click away.
- Keep a short list in sight: bookmarked searches, pinned tabs, sidebar notes, a home note and one icon per note type. Merge duplicate tags with Tag Wrangler.
Links, backlinks and unlinked mentions
Every wikilink is a path you can follow in both directions. You only wrote it in one place, but Obsidian keeps track of it from both ends. That matters for finding: you rarely remember where you mentioned something, but you often remember what you mentioned. Open the note about that thing, and every note that points to it is listed for you.
The core Backlinks pane shows two lists for the current note:
- Linked mentions: notes that link to it.
- Unlinked mentions: notes that contain its name (or one of its aliases) as plain text, without a link. Each one has a Link button to turn it into a real link.
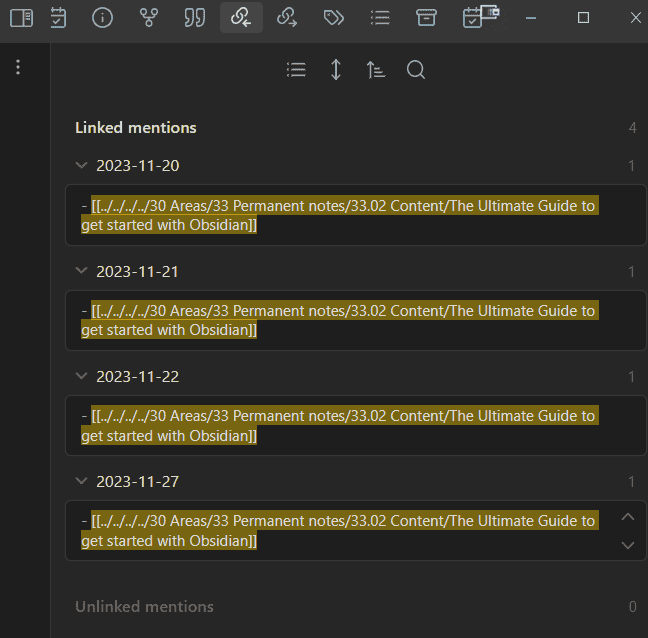
The Backlinks pane has a search box that accepts the same syntax as the Search view, plus options to show more context, collapse results and change the sort order. You can also show backlinks at the bottom of every note ("Show backlinks at the bottom of notes" in the plugin settings, or the "Backlinks: Toggle backlinks in document" command).
Getting more out of the Backlinks pane
The Backlinks tab lives in the right sidebar. If you closed it, run Backlinks: Show backlinks from the command palette. Its toolbar has four buttons, and each one is useful for finding:
- Show search filter opens a filter box with the full Search syntax. On a busy note, this is how you narrow hundreds of mentions down to the few you need. On a person note,
tag:#type/meetingkeeps only the meeting notes that mention them,"budget"keeps only the mentions near that word, andpath:Projectskeeps only the project notes. - Show more context switches each mention from a truncated line to the full paragraph around it. Turn it on when the reason for the link is in the sentence before or after it.
- Collapse results hides the mentions and keeps only the note names. Use it to scan a long list of linking notes quickly, then expand the one you want.
- Change sort order changes the order of the linking notes. Sorting by modified time puts the notes that touched the topic most recently at the top, which is often what you're looking for.
Two more options are easy to miss:
- Lock the backlinks to one note. The Backlinks tab follows the active note. The Backlinks: Open backlinks for the current note command opens a separate tab, linked to that note (it shows a link icon), that stays on it while you move around. Open it on a Map of Content or a person note, then click through the linking notes one by one without losing the list.
- Backlinks in document puts the same two lists at the bottom of the note itself. It's handy on a laptop screen where the right sidebar is often closed.
Gotcha: files matching your Excluded files patterns (Settings → Files and links) never appear in unlinked mentions. If a note you expect is missing from the list, check that setting first.
The Outgoing links pane
The Outgoing links pane does the reverse: links from the current note, plus unlinked mentions of other notes inside it. That's a list of notes you could link from here.
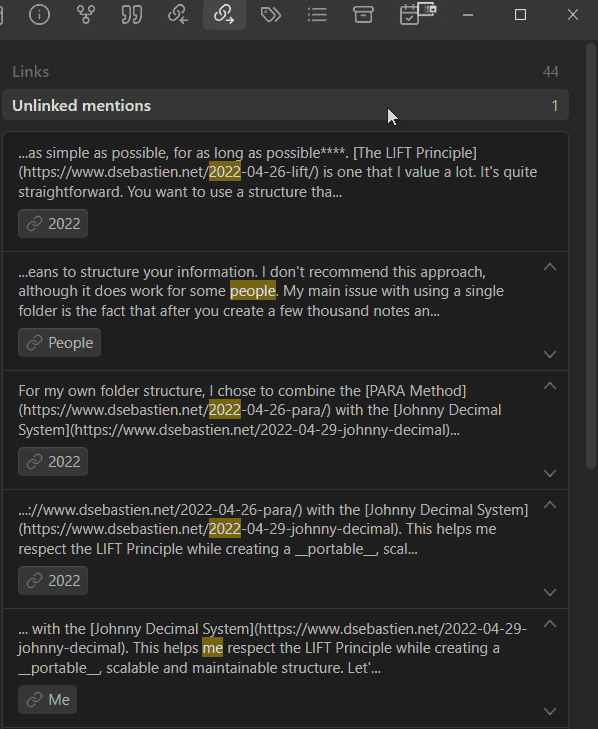
The two sections answer two different questions:
- Links lists every link in the current note. Click one to open it. On a long note, this is faster than scrolling to find the link you remember.
- Unlinked mentions lists every piece of text in the current note that matches the name or alias of another note in your vault. Click the button with the note's name to turn that text into a link.
Two details from the official docs: when several notes share the same name, hover over the button to see the full path of the note it would link to. And you can create a link from a mention inside a code block, but links in code blocks don't show up in the Links section.
Turn unlinked mentions into links
I call unlinked mentions "the cheapest way to densify a knowledge graph" in my Obsidian Unlinked Mentions note. Every time you click Link, you create a new path that future you can follow. Aliases widen the net. Titles made of common words create noise, which is one more reason to use explicit titles.
Matching is case-insensitive and includes aliases, so every alias you add to a note makes it catch more mentions. Two habits turn this into a routine:
- After you create a note, check its unlinked mentions (Backlinks pane). They list the older notes that already talk about the concept without linking to it. Say you create a note called "Spaced repetition": its unlinked mentions show every book note, daily note and article draft where you typed those words. Link the relevant ones, and the new note is connected from day one.
- After you finish writing a note, check the Outgoing links pane. Its unlinked mentions show the concepts you wrote about that already have a note. Link them, and the new note points into the rest of your vault.
Review the mentions before clicking: a match on the title doesn't mean the text is about that note. If you have a note called "Focus" and another called "Focus Mode", the word "focus" in a sentence about your morning coffee matches too.
The main limit: core Obsidian only checks the current note. There is no vault-wide view of all the unlinked mentions everywhere. Better Backlinks (part 9) shows them with more context, Link Unlinked Mentions (part 9) links all the matches in the current note in one pass, and Automatic Linker (part 9) can link note names across the whole vault.
Since Obsidian 1.12, links from canvases count as backlinks too.
Two shortcuts make link-walking faster. Hover over a link while holding Ctrl/Cmd to preview the target without opening it (the Page preview core plugin). And Ctrl/Cmd+Alt+← / → moves back and forward through the notes you visited, like a browser.
From the terminal, obsidian backlinks file="Progressive summarization" lists the 26 notes in my vault that link to that note, instantly. Text search tools can't do that as reliably, because Obsidian resolves every link form (with aliases, headings or paths) to the right note. Add counts to see how many times each note links to it, or format=json to hand the list to a script or an AI agent. obsidian links file="..." gives you the outgoing links.
Rank unresolved links to find missing hubs
An unresolved link is a link to a note that doesn't exist yet. Obsidian lets you create them on purpose: you write [[Spaced repetition]] before the note exists, and clicking the link creates it. Steph Ango explains why he keeps them in his vault: "Unresolved links are important because they are breadcrumbs for future connections between things."
For finding, they're a signal. An unresolved link used once is a breadcrumb. One used fifteen times is a missing hub: fifteen notes point to the same idea, and none of them can be reached from it. The moment you create the note, its backlinks list all fifteen.
The Obsidian CLI lists them with a count for each:
obsidian unresolved counts | sort -t$'\t' -k2,2nr | head -20   # most-linked missing notes first
obsidian unresolved verbose | grep "Speculative Decoding"          # which notes link to one of them
Inside the app, the global graph shows unresolved links as nodes when you turn off Existing files only in its filters. The "Find broken links" command of the Find orphaned files plugin (part 9) gives you a list to work through, the Broken Links plugin groups them by folder or by file (broken links to headings and blocks included), and Graph Explorer Base View shows them as "frontier" nodes (below).
Gotchas:
- The CLI doesn't care about Excluded files. My count includes links from my excluded prompts folder. Filter the
verboseoutput by path if you only care about the notes you search. - Don't create notes for every breadcrumb. An empty note created for a link used once adds one more result to every search, and nothing else. Create notes from the top of the ranked list, and give each one at least a sentence and a type.
Retrace your steps: back, forward and closed tabs
Link-walking only works if you can walk back. And "the note I had open five minutes ago" is one of the most common things you'll look for. Obsidian keeps a browser-like history for that, with more in it than the two arrows.
Back and forward. "Navigate back" and "Navigate forward" are Ctrl+Alt+← / → on Windows and Linux, and Cmd+Option+← / → on macOS (I mentioned them briefly above). Going back restores your scroll position and cursor, so you land exactly where you left. Each tab has its own history: the trail belongs to the tab, not to the app.
The history list. Right-click the back or forward arrow at the top of a note (or press and hold it) and you get the list of notes in that direction, by title. Click one to jump several steps at once. Ctrl/Cmd-click an entry, or the arrow itself, and it opens in a new tab, so the current trail stays intact.
Reopen a closed tab. Closed a tab by mistake? Ctrl+Shift+T (Cmd+Shift+T on macOS) runs "Undo close tab" and brings it back, like in a browser.
On mobile, the first two buttons of the navigation bar go back and forward (they're greyed out when there's nothing to go back to), and a two-finger swipe left or right does the same.
Gotcha: because history is per tab, a note you opened in a new tab (with Ctrl/Cmd-click) is not in the history of the tab you came from. For "what did I open recently, in any tab?", open the quick switcher with an empty query, or use Recent Files (part 9).
If you want more, the Pane Relief plugin saves per-tab history across restarts and with your workspaces, and shows counts on the arrows. It hasn't been updated since early 2025, so check that it still works before relying on it.
The local graph
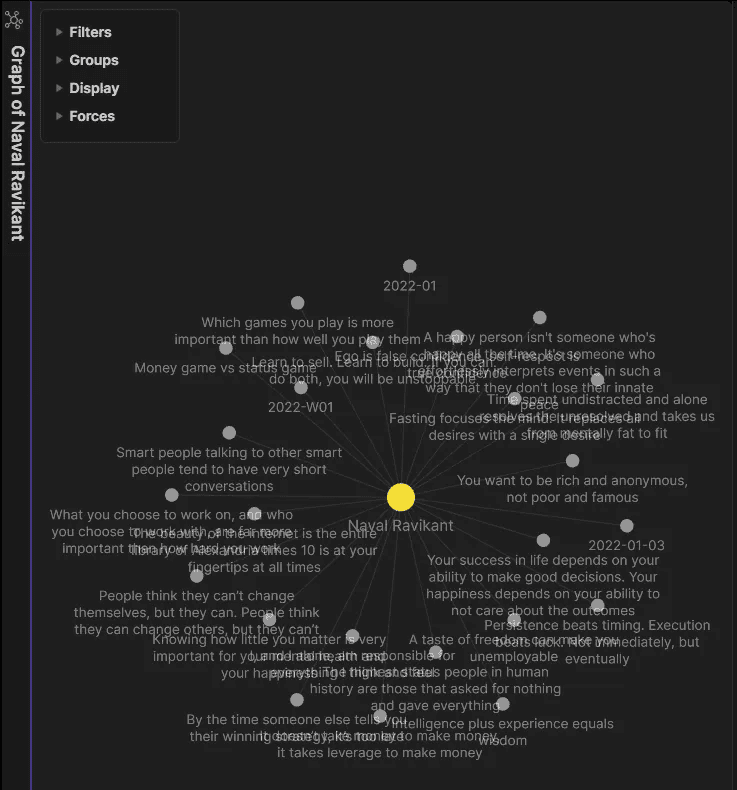
The global graph view is beautiful, but in a big vault it's mostly decoration. The local graph is more useful: it shows the neighborhood of the current note, and that makes it an orienteering tool.
The reason is the same as for backlinks, one step further. The Backlinks pane shows the notes one link away. The local graph shows them too, plus the notes two or three links away, and the links between all of them. When you're looking for "that note connected to the project, somehow", the local graph often shows it before you can name it.
Open it with the "Open local graph" command. Then:
- Increase the depth to see neighbors of neighbors. One of my Obsidian tips: keep the local graph in a sidebar (drag its tab there), with a depth of 2. It updates as you move between notes, as long as you don't pin that tab.
- Filter it with the same syntax as the Search view.
- Color nodes with groups. Each group is a search query:
path:Projects,tag:#type/project,[type:book]. You see at a glance which neighbors are projects, books or people. - Toggle orphans in the global graph to spot notes with no connections at all.
Open the local graph of a hub note (a person, a project, a MoC) and you get a map of everything around it. Sometimes that's faster than writing a query.
The settings that matter for finding
Click the cog icon in the upper-right corner of the graph to open its settings. The local graph has every setting of the global Graph view, plus a few of its own.
Depth. The slider at the top of the local graph's filter panel. Depth 1 shows the notes directly linked to the current one. Each extra level adds the notes connected to the previous level. Depth 2 is usually the sweet spot. On a hub note, depth 3 often pulls in a large part of the vault, and you're back to decoration.
Link direction. The local graph's filters also let you show or hide incoming links, outgoing links and neighbor links (links between the neighbors themselves). Keep only incoming links, and you get a visual version of the Backlinks pane. Turn on Arrows in the Display section to see which note links to which.
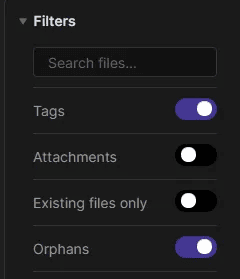
Filters.
- Search files takes any search term.
-path:Journaldrops the daily notes that link to everything and crowd the graph.-tag:#type/quotedrops quotes.[type:book]keeps only books. - Tags adds your tags as nodes. Notes that share a tag get connected through it, even when they don't link to each other. That surfaces related notes that links alone would miss.
- Attachments adds images, PDFs and other files as nodes. Turn it on when you're looking for a file you attached to a note, not the note itself.
- Existing files only hides links to notes that don't exist yet. Turn it off when you want to see the gaps: the concepts you linked to but never wrote about.
- Orphans shows or hides notes without any links. In the global graph, it's a quick way to find the notes with no links at all.
Groups. Click New group, type a search term, pick a color. A useful starter set: one color for projects, one for people, one for books or sources, one for Maps of Content. On the local graph of a topic, you then see at a glance which projects and which sources it touches.
Display. The bigger the node, the more notes link to it. On a local graph, the big nodes are the hubs around your note: often the best next step when you're orienteering.
To interact with the graph: hover a node to highlight its connections, click it to open the note, right-click it for the note's context menu. + and - zoom, the arrow keys move around.
Gotchas:
- Excluded files never appear in the graph.
- You can bookmark the global graph, with its filters and groups, but not a local graph. If you rely on a set of groups, set them on the global graph too and bookmark it.
Graph Explorer Base View and K-Plex
Two plugins take this idea further.
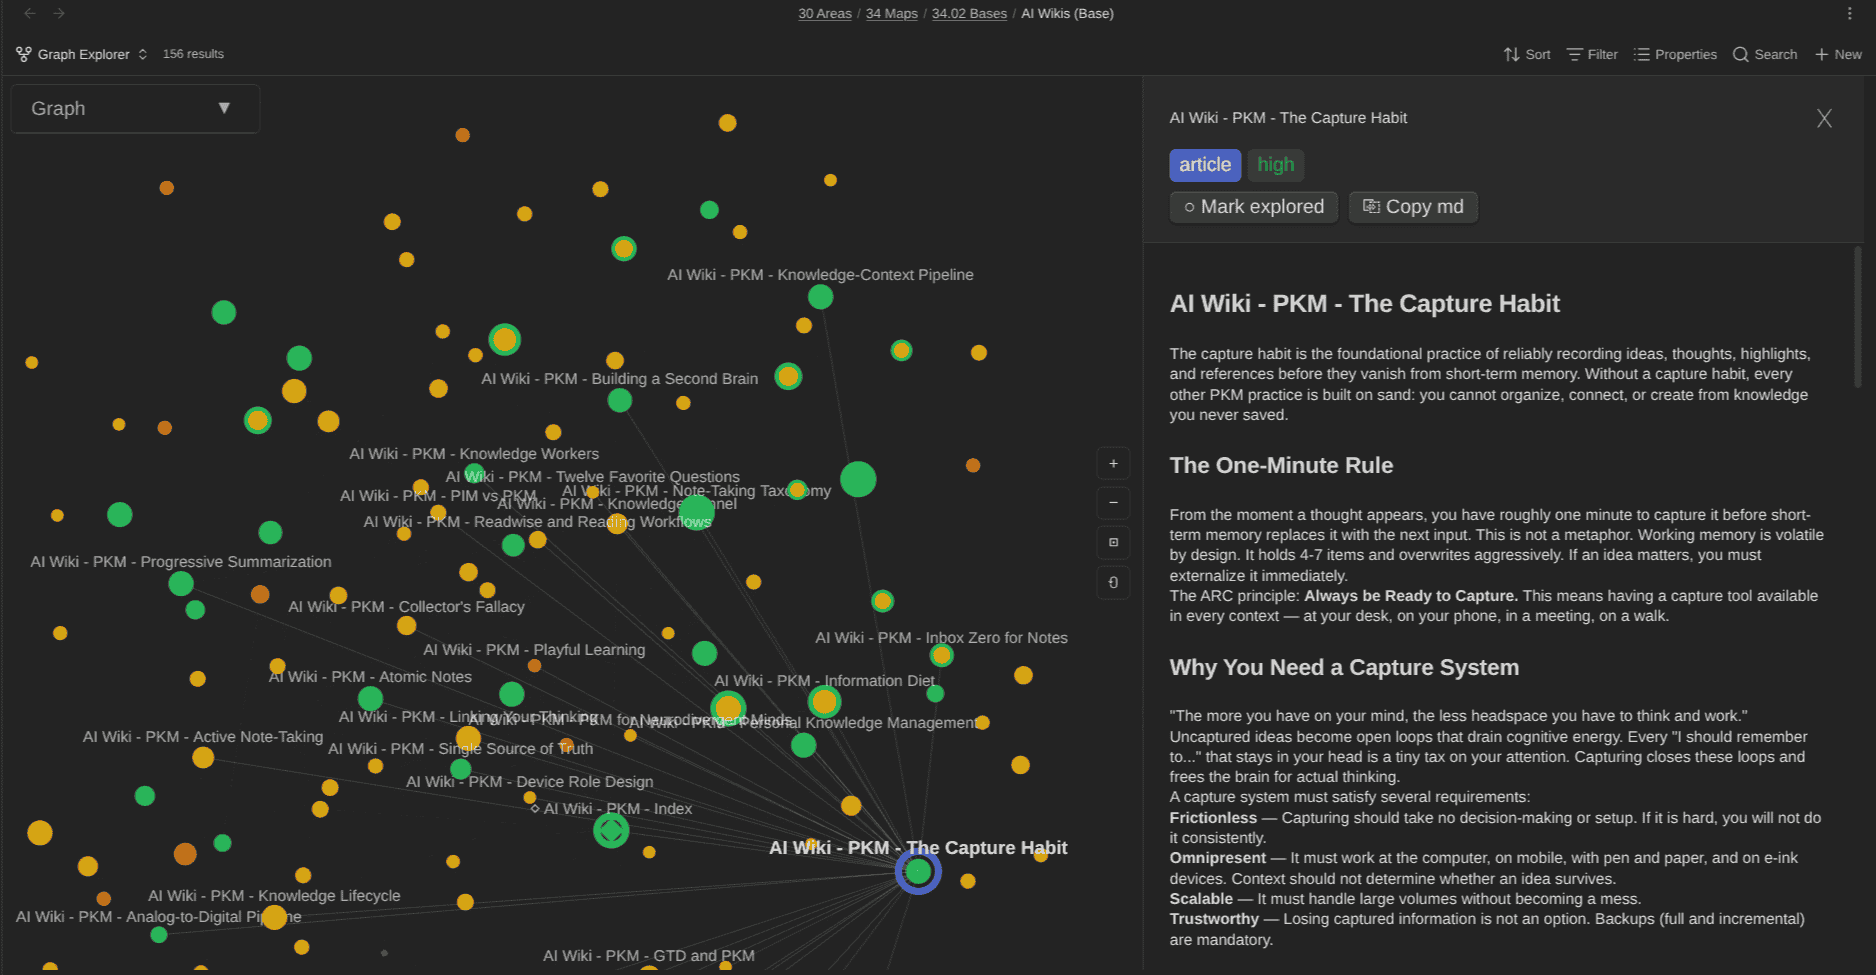
My Graph Explorer Base View plugin renders the notes that a Base matches as an interactive graph. Instead of your whole vault, you see exactly the subset you filtered: one tag, one folder, one note type. It has a live search (matches stay visible, everything else dims), filters for explored and unexplored notes, and "frontier" nodes that show links to notes that don't exist yet. I built it to work through LLM wikis note by note, and I explain why in this article.
 Sebastien Dubois

Using Graph Explorer Base View
The setup takes three steps:
- Create a Base that filters the notes you want to explore (a tag, a folder, a note type, a property value).
- Add a view to it and pick Graph Explorer as the view type.
- Configure the view: what to color nodes by, what to size them by, and whether to show external and frontier nodes.
The features that help you find things:
- Search dims everything except the matching nodes, so you see where they sit in the structure, not just their names.
- Color by any property: tags, creation date, maturity, or any frontmatter field. Color by date, and you see which part of a topic you wrote about recently.
- External nodes show the notes outside the Base that the notes inside it link to. That's how you spot related notes your filter missed.
- Frontier nodes show links to notes that don't exist yet: the gaps in a topic.
- A side panel shows the selected note in full, with clickable links that navigate inside the graph.
- A minimap, and keyboard navigation:
Tabcycles through nodes, arrow keys move to neighbors.
Node positions are saved per view. Drag the important notes where you want them, and they'll be there next time, which gives you a small version of the memory palace idea described below.
Each view keeps its own settings, so you can have one graph per Base.
K-Plex
K-Plex, by Zsolt Viczián (the author of the Excalidraw plugin and ExcaliBrain), is a spatial navigator centered on one note. Its layout is fixed: parents above, children below, related notes on the sides. As I wrote in my note about it: "The graph view shows you that notes are connected. It doesn't show you how… K-Plex answers that with position." A fuzzy search over titles, aliases and paths recenters the map on the result, and you can right-click a connector to see why two notes are linked (a property, a link, a folder or a tag). Lenses filter the map by keywords, tags and note types, and an incremental index keeps large vaults fast. K-Plex runs on desktop and mobile, and it's bundled with the Obsidian Starter Kit since v5.
The fixed layout is what makes it a finding tool. In the core graph, the physics simulation puts notes somewhere different every time. In K-Plex, a parent is always above and a child always below, so after a few visits you read the map at a glance, and you remember where a note was relative to another one.
The full layout:
- Parents above
- Children below
- Friends and previous notes on the left
- Challengers and next notes on the right
- Siblings (notes that share a parent) in a separate area, when you turn them on
How to use it. Open it from the brain icon in the ribbon or with K-Plex: Open graph. Open in side panel keeps it next to your note, and Open in pop-out window gives it its own window on a second screen. Then:
- Click a node to put it in the center.
- Double-click a node to open the note.
- Search (command or toolbar) finds any note by title, alias or path and centers the map on it.
- Right-click a connector to see why two notes are linked. When a note sits somewhere you didn't expect, this tells you which property, link, folder or tag put it there.
Where the relationships come from. K-Plex knows two kinds:
- Declared relationships come from properties you add on purpose:
Parent,Child,Friend,Challenger, and their aliases (up,down,similar,opposes,previous,next...). Drag from one of the small gates around a node to another node, and K-Plex writes the property for you. In the editor, typing::p,::c,::lor::rsuggests a parent, child, left (friend) or right (challenger) field. - Inferred relationships come from ordinary links, drawn dashed. A one-way link makes the target a child. Two notes that link to each other are friends.
That inference has one surprising effect if you link upward, as the Obsidian Starter Kit does: a task links to its project, so K-Plex shows the project below the task, as a child. Two fixes, both explained in the K-Plex tutorial: declare a field like related_goals as a Parents field in the settings, or turn on Inverse inferred parent/child direction so every one-way link points to a parent. The second one flips notes that link down (a MoC listing its notes), so pick the option that matches how you link most.
Settings worth a look (Settings → K-Plex):
| Setting | What it changes |
|---|---|
| Note tab link | Whether K-Plex follows the note you're editing. In OSK it's not linked by default; use Focus active note to recenter it on demand |
| Show siblings | Shows the notes that share a parent with the centered one |
| Show inferred relationships | Turn off to see only the relationships you declared |
| Excluded path prefixes | Keeps templates, archives or attachments out of the map |
| Maximum nodes per zone | Default 100. Lower it when a daily note or a big MoC gets crowded |
If a note you just created doesn't show up, run Rebuild index. K-Plex doesn't need Excalidraw or Dataview to run.
Visual maps: build memory palaces with Canvas and Excalidraw
The method of loci, better known as the memory palace, is an old memorization technique: you associate each piece of information with a place in a space you know well (your house, a street you walk every day), and you retrieve it by walking through those places in your mind. Greek and Roman orators used it, Frances Yates described it in The Art of Memory, and memory contest champions still use it to recall faces, digits and lists of words. I keep a short note about it: Mind palace.
You can borrow the idea for your vault. A canvas or an Excalidraw drawing is a place. Put notes at specific spots, group them, connect them, color them. When you look for one of them later, you can go back to the map and find it where you put it ("top left, in the agents group"), even if you've forgotten its title. That's orienteering again, with a map you designed yourself. Teevan's participants valued keeping "a sense of location" during their searches, and Barreau and Nardi found that people prefer finding their files by location, partly because the location also reminds them of what's there.
Here's what Obsidian gives you to build these maps:
- Canvas (the core Canvas plugin) is an infinite board. Drop notes from your vault as file cards (they show the note's current content), add text cards, images, PDFs and web pages, put related cards in labeled groups, use colors and sizes, and draw labeled arrows between cards.
- Canvases are part of your search and link graph. Core Search indexes the text on canvases. And since Obsidian 1.12, links from canvases count as backlinks: a note you placed on a map lists that canvas in its backlinks. So the path works both ways, from the map to the note, and from the note back to every map it appears on. To search inside the canvas you have open, use Simple CanvaSearch (part 9).
- Excalidraw is the freehand version: shapes, arrows, sketches, embedded notes and images, links to notes. Drawings are stored as Markdown files with their text elements in a dedicated section, so core Search finds the words you typed in a drawing. Its "Search for text in drawing" command finds text inside the current drawing.
- Automatic layouts. K-Plex and ExcaliBrain (above and in part 9) place notes around the current one by relationship: parents above, children below. They're spatial maps you don't have to build, but you don't choose where things go either.
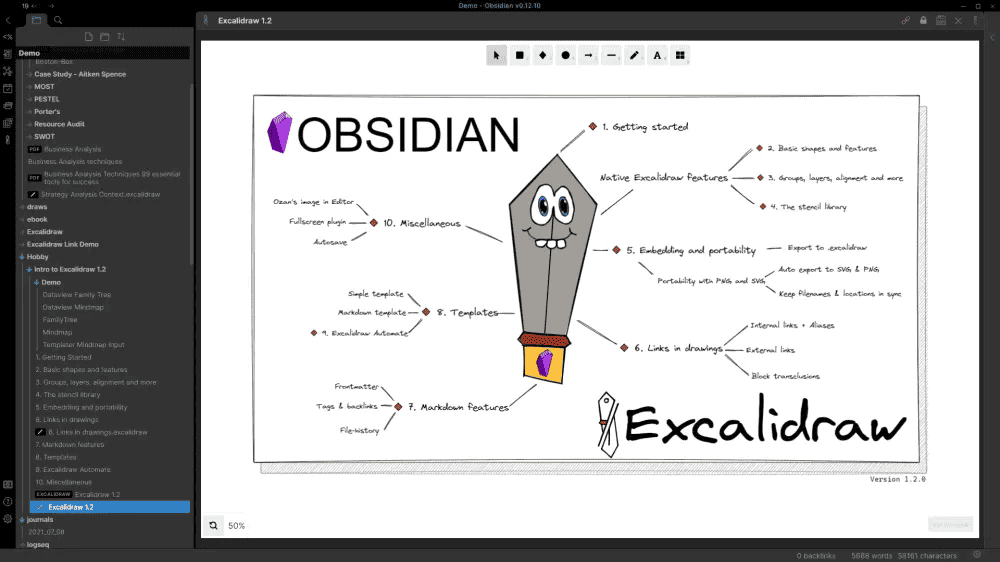
The maps that work best are thematic: one per topic, per research question, per ongoing project, per course you teach. My vault has 37 canvases, for example:
- an "AI Concepts Teaching Map" with nine groups, from "Level 1: What is AI?" to "Level 9: Building with AI", holding about 200 concept cards
- the map of my AI-maintained PKM wiki: nine thematic groups and 205 cards, each card linking to one wiki page
- project canvases for an architecture, an implementation plan and boards of inspiration
A few tips to keep these maps useful:
- Use file cards for anything you'll want to find again. A file card is a real note, with backlinks and a place in the quick switcher. Text cards are fine for labels and short ideas, but they only live inside the
.canvasfile. - Make the maps themselves findable. Give each canvas a descriptive name, link it from the related Map of Content or project note, bookmark the ones you open often, or open your main map at startup with the Homepage plugin.
- Expect to maintain them by hand. A canvas doesn't add new notes on its own. If a map needs to stay complete, pair it with a query-built MoC (next section) and keep the canvas for the layout that matters to you.
In the Obsidian Starter Kit, visual maps have their own folder and their own system, described in Obsidian Starter Kit - System - Visualization System (Canvas, Excalidraw, mind maps, Mermaid, the graph, Graph Explorer, K-Plex and Kanban). And my Note Village plugin is a playful variant of the same idea: a village whose areas are your most used tags, which I describe in its note as "a mind palace of sorts".
Maps of Content that maintain themselves
A Map of Content is a hand-made entry point into a topic. Its weakness is maintenance: you add a note about the topic, forget to add it to the map, and the map slowly rots.
That rot is worse than it sounds for finding. A map you can't trust forces you back to search, because you never know whether the note you're looking for is missing from the map or missing from the vault.
The fix I use is to let a query build the map, then write the result into the note. Here's the example from my Dataview guide:
# Systems Thinking (MoC)

## Notes
<!-- QueryToSerialize: LIST FROM #systems_thinking AND !#type/quote WHERE public_note = true SORT file.name ASC LIMIT 3 -->
<!-- SerializedQuery: LIST FROM #systems_thinking AND !#type/quote WHERE public_note = true SORT file.name ASC LIMIT 3 -->
- [[A business is a system]]
- [[A great artist with a bad system can be beaten by a mediocre artist with a good one]]
- [[AI Wiki - PKM - Complex Thinking]]

<!-- SerializedQuery END -->
(I added a LIMIT 3 to keep the example short. My real map has no limit.)
The tag decides membership. The query keeps the map complete. And my Dataview Serializer plugin writes the result into the note as real Markdown links. Tag any note #systems_thinking, and it joins the map at the next refresh. To make sure maps refresh even when the change happened in another note, add your maps folder to the plugin's "Folders to force update" setting.
How to set it up
- Install and enable the Dataview plugin and the Dataview Serializer plugin (it needs both).
- Create the MoC note, and decide what puts a note on the map: a tag, a property value, a folder, or a link to the MoC itself.
- Run the Insert query block command, and write your Dataview query in the comment it creates. If you already have a regular
dataviewcode block, Convert Dataview query at cursor does it for you (and Convert all Dataview queries in current file handles a whole note). - Save. The plugin runs the query through Dataview and writes the result between the
SerializedQuerymarkers. The comments don't show in Reading view. - Add the folder that holds your MoCs to Folders to force update (see below).
Four directives, four refresh behaviors
The word at the start of the comment decides when the result gets rewritten:
| Directive | When the result is written |
|---|---|
QueryToSerialize | Every time the file is saved. The default, and the right one for MoCs |
QueryToSerializeManual | Only when you ask, with a command or the refresh button next to the query |
QueryToSerializeOnce | Once. After that, only a command or the refresh button updates it |
QueryToSerializeOnceAndEject | Once, then the markers delete themselves, and plain Markdown is all that's left |
The plugin compares the new result with the old one before writing, so a query whose result didn't change never touches the file. Your git history and your sync stay quiet.
The settings that keep maps complete
- Folders to force update. By default, only the file you save gets re-serialized. But a MoC depends on other notes: when you tag a new note, the file that changed is that note, not the map. Files in the folders listed here are re-serialized whenever any file in the vault changes. Those updates wait 10 seconds after the last change (regular updates wait 500 ms), so a sync that pulls down hundreds of notes rebuilds your maps once, not hundreds of times. Paths can contain date placeholders (
Daily/{{year}}/{{month}}), useful when daily notes carry queries and only the current month needs to stay fresh. - Folders to scan limits where the Scan and serialize all Dataview queries command looks. Folders to ignore excludes folders from serialization entirely.
- Link format pins how serialized links are written (shortest path by default, or absolute paths). Absolute paths avoid commit noise when several devices sync the same vault through git.
- Per-note opt-out: add
dataview_serializer_ignore: trueto a note's properties, and the plugin skips it.
Why the result has to be written down
Why write the result into the note instead of letting Dataview render it? Because rendered query results are invisible outside the renderer. They don't appear in the graph, in backlinks, on Obsidian Publish, in grep, in git diffs, or to an AI agent reading the raw file. The agent sees the query, never the answer. Serialized results show up everywhere, and AI agents can read them. My rule: "serialize indexes, MoCs, published notes, and anything an agent reads. Keep dynamic views for dashboards you look at and act on immediately."

Each of those five matters for finding:
- Graph and backlinks. A rendered
LISTof 40 links creates zero graph edges and zero backlinks. Serialized, every note on the map lists the MoC in its backlinks, so you can walk up from any note to its map. - Obsidian Publish doesn't render Dataview. A published MoC built on a live query is an empty block. Serialized, it's a list of links your readers can follow, and that Publish search can find.
grep, ripgrep and every text search tool read the bytes on disk. A rendered result isn't on disk.- Git diffs record the query and never the answer. Serialized, you can see when a note joined or left a map.
- AI agents read files. An agent that opens a live-query MoC sees one line of query syntax. An agent that opens a serialized MoC sees the full list of notes on the topic, and can follow them.
For scale: my vault has 39 Bases, next to more than 15,000 serialized Dataview queries.
I covered all of this in depth in the Dataview guide (see the "AI agents" and "Serialize what matters" sections) and in this article about Dataview Serializer 2.0. The tutorial on creating simple Maps of Content and the Dataview Serializer tutorial walk through the setup step by step. And if you want to know more about MoCs themselves, read my article about Maps of Content.
 Sebastien Dubois

 Sebastien Dubois

Findability vs Plugins
This series lists dozens of plugins, and part 9 has a whole table of stale ones. Plugins get abandoned, break after an update, or stop fitting your workflow. If a path to a note only exists inside a plugin, it disappears with that plugin.
That's why I treat findability in layers, the same way I approach graceful degradation in general:
- What lives in the files survives everything. Titles, aliases, properties, explicit links and serialized MoCs are plain text and YAML. Any editor,
rg, git, an AI agent or the next app you move to can read them. That's the File over app principle. - What lives in a plugin is a convenience. Live Dataview queries, Omnisearch's index, embeddings, a custom file explorer: they make finding faster, and you can rebuild them, but they're not the foundation.
A useful question: for every note you really need to find, is there at least one path to it that's written in the files?
You need to design and build your system so that it can serve you for decades, not months!
 Sebastien Dubois

Project and activity notes as hubs
A Map of Content is a hub for a topic. A project note can be the hub for a piece of work. Everything about a project is reachable from one note. You only need to find that note, and everything else is one click away.
That's how my vault works. Each project has a note named with a (Project) suffix, so a few letters of the project's name in the quick switcher are enough to open it. From there, I reach:
- the tasks, meeting notes, ideas and other notes that belong to the project, through its backlinks and its local graph
- the decisions, in a Decision Log section
- the people, attachments and references, through links in the note
- the work itself, through live views embedded in the note
The body of my project notes follows the same structure every time: objective, success criteria, stakeholders, scope (in and out), timeline, deliverables, decision log, progress log, lessons learned, dependencies, risks and issues, notes, references and related notes. I don't fill everything in, far from it, but I do when it's useful to me.
At the bottom come three live views of the project's tasks, embedded from my Kanban Action Planner plugin with a fixed filter, and two sections listing the project's tasks and ideas:
## Board
![[Actions (Base).base#Kanban: Tasks|mode=board height=800 filter=parent:"My Project (Project)"]]

## Schedule
![[Actions (Base).base#Kanban: Tasks|mode=calendar height=600 filter=parent:"My Project (Project)"]]

## Breakdown
![[Actions (Base).base#Kanban: Tasks|mode=wbs height=600 filter=parent:"My Project (Project)"]]
The trick that keeps the hub complete without maintenance is to link upward, once. The child holds the link to its parent. A task links to its project. The project doesn't list its tasks, because the template's ## Tasks section is a Dataview Serializer query that finds every task linking to it. The link lives in a property (related_projects on the task), so Bases, queries, the graph and AI agents can all follow it.
The same works for things that never end. A project is time-bound: it delivers something and closes. An activity is an ongoing area of responsibility: publishing a newsletter, maintaining plugins, your day job. Its note (… (Activity)) holds its purpose, its standards, its cadence and its log, and lists the projects, tasks and ideas that link to it. The task note behind this series, for example, links to my "Write Articles" activity through its related_activities property, so that activity's note lists it next to the other articles in progress.
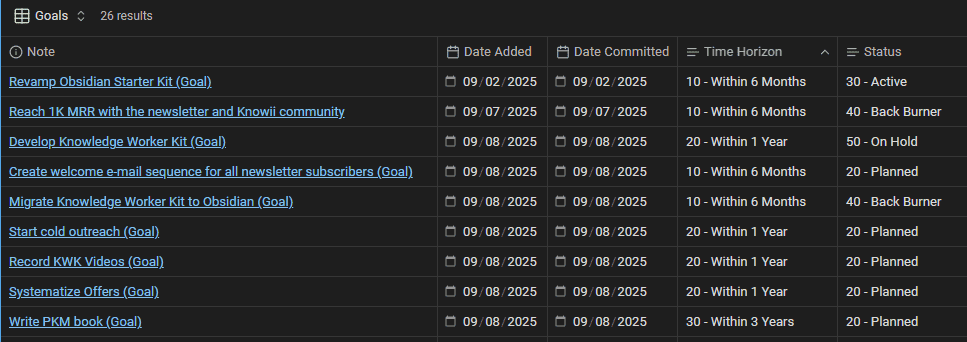
Hubs help AI agents too. Point an agent at a project note, and it gets the objective, the decisions, the risks and the links to everything else in one read, instead of searching the vault for scattered fragments.
The Obsidian Starter Kit ships this setup pre-configured as its Action System: templates for goals, plans, projects, activities, tasks and ideas, the related_* properties that connect them, the sections that fill themselves from incoming links, and the Board, Schedule and Breakdown views on every new project. The details are in Obsidian Starter Kit - System - Action System and Obsidian Starter Kit - Theory - The action system.
 Dwayne Appleby

Bookmarks
The core Bookmarks plugin lets you bookmark notes, folders, headings, blocks, links, graphs (but not local graphs) and searches. You can organize bookmarks in groups. Since Obsidian 1.13, the Bookmarks pane has its own search box, and since 1.14 its filter matches full paths and supports -term exclusions.
The recent files list is whatever you happened to open last, and search needs you to type something. Bookmarks are the short list you curate yourself, one click away.
What you can bookmark, and how
Open the Bookmarks tab from its icon in the left sidebar, or with Bookmarks: Show bookmarks.
| What | How to bookmark it |
|---|---|
| A note or any file | Bookmark the active tab button at the top of the Bookmarks tab, right-click the file in the file explorer, or the Bookmark command |
| A folder | Right-click it in the file explorer → Bookmark |
| A heading | Right-click the heading → Bookmark this heading, or Bookmark heading under cursor |
| A block | Bookmark block under cursor |
| A search | In the Search view, the three dots next to the result count → Bookmark (see part 5) |
| The graph | Right-click the graph view's tab → Bookmark. It keeps the graph's settings. Local graphs can't be bookmarked |
| A web page | Open it in the Web viewer, then the three dots in its address bar → Bookmark |
Each time, the Add bookmark dialog lets you set a title and pick a group. Bookmark something that's already bookmarked, and the dialog becomes Edit bookmark: that's where you rename it or move it to another group.
Two shortcuts save time when you start a piece of work:
- Several files at once. In the file explorer,
Alt-click files (orShift-click a range), then right-click → Bookmark. - All the open tabs of a tab group. The down arrow in the upper-right corner of the tab group → Bookmark N tabs. That turns the notes you have open for a project into a group you can reopen later.
Heading and block bookmarks are the underused ones. Bookmark the "Decision Log" heading of a project note, or the block that holds a checklist you reuse, and you land on that exact spot instead of the top of a long note.
Bookmarked searches
I personally don't use bookmarks a lot for notes. But bookmarked searches are great for queries you run every week, and bookmarks are a nice way to keep a small working set at hand.
A bookmarked search stores the query, not the results. Click it, and Search runs it again on the current state of your vault. So it works best for questions you ask again and again. A few examples:
task-todo:review: notes with open tasks that mention "review"tag:#type/project [status:Active]: my active projects (property values match as substrings, soActivematches30 - Active)line:(meeting budget): the lines where both words appear together
Give each one a title that says what it answers ("Open review tasks"), not the query syntax. You'll find it faster, and you won't have to decode it in six months.
Organize bookmark groups so you can find bookmarks
Bookmarks have the same problem as notes: past a few dozen, you start searching for them. A few rules keep the list useful:
- Group by what you're doing, not by what the item is. "Current project", "Weekly review", "Writing" work better than "Notes", "Searches", "Folders". When you sit down for your weekly review, everything for it sits in one group.
- Keep a "Searches" group if your bookmarked searches are reused across contexts.
- Name bookmarks with the words you'd type to find them. Since 1.13, you can filter the Bookmarks pane, and since 1.14 the filter matches full paths and
-termexcludes items.-archivehides anything with "archive" in its path. - Collapse the groups you don't need right now. Expand and collapse each group from its arrow. Drag bookmarks to reorder them, or into another group to move them.
- Prune. A bookmark you haven't clicked in months is noise in the list you look at most.
Gotchas: removing a group removes every bookmark in it, so move the ones you want to keep first. Bookmarks are stored in .obsidian/bookmarks.json, inside your vault's config folder. If you sync your vault, sync that folder too, or your bookmarks stay on one device.
Reaching bookmarks faster
- Quick Switcher++ has a bookmarks mode: type
'in the switcher to search your bookmarks by name. - Grappling Hook gives you one-key jumps between bookmarked files (more on both in part 9).
- From the terminal,
obsidian bookmarkslists them, andobsidian bookmark search="tag:#status/in_progress" title="In progress"adds a bookmarked search. The same command takesfile=,subpath=(a heading or block),folder=orurl=. An AI agent can set up your working set for a project this way.
Pins, sidebars and home notes
Notes you keep in sight don't need to be searched for. A few habits help:
- Pin tabs for notes you keep coming back to during a project.
- Attach notes and panels to the sidebars. Drag a note (or a Base, or the local graph) into the left or right sidebar, and it stays there. I recorded short videos about using the sidebars and attaching notes to them.
- Pin a note to the top-left buttons to keep it one click away:
- Reveal the active file in the file explorer so you see a note's neighbors. Since Obsidian 1.8.2, the file explorer has an "Auto-reveal current file" toggle at the top, and the "Files: Reveal current file in navigation" command does it on demand. I also recorded a short video about the Reveal Active File plugin, which adds a button for it. I often use this to find notes that are in the same area as others.
- Start from a home note or dashboard. The Homepage plugin opens a note, a canvas, a Base or a workspace on startup.
- Pin notes in your navigator. Notebook Navigator has pinned notes and shortcuts, and the Pinned notes plugin does something similar.
Here's how each of these works, and when it's worth it.
Pinned tabs
Right-click a tab and choose Pin. A pinned tab stays open, and links you click inside it always open in a separate tab. That second part is the useful one: pin a Map of Content or a project note, click through its links, and the hub stays put. You never lose your starting point, which is exactly what orienteering needs. Right-click → Unpin when you're done.
Notes and panes in the sidebars
On desktop, drag a note from the file explorer or from its tab into a sidebar, and it opens there. The two sidebars then act as a second and third workspace next to your editor.
How a tab pinned in the sidebar behaves depends on what it is (from the official docs):
- Notes and Bases stay in place. Notes you open go to the main editor instead of replacing them. Keep a project's task Base or your MoC there while you work.
- Panes like Backlinks or Outgoing links stay on the last note you selected, instead of following the active note. Pin the Backlinks pane of a MoC, and you can go through its linked notes without the list changing under you.
Good candidates for the sidebars: today's daily note, the hub note of your current project, a Base of your open tasks, the local graph.
Pin notes to the ribbon
The Pinned notes plugin pins frequently used notes as buttons in the ribbon, at the left edge of the window. One click, no typing. Keep it to a handful of notes you open every day; past that, the ribbon becomes one more list to scan.
Home notes and dashboards
A home note is the note you start from. Make it the hub of your hubs: links to your active projects, your main Maps of Content, the searches you bookmarked, and a few live views.
The Homepage plugin opens it for you. By default it opens a note called Home at startup, and its settings let you pick any note, canvas, Base or workspace instead, or a random note, the graph view, or today's daily note. Other options worth knowing:
- Open homepage, as a command or a ribbon button, brings you back to it at any time.
- You decide what happens to the tabs left open from your last session: keep them, replace the last one, or close them all.
- You can force the view (Reading, Source or Live Preview).
- It can run any command when the home note opens, which lets you chain it with other plugins.
I personally don't use a dashboard and prefer to rely on my daily notes. But using a home note is not a bad alternative. It's just that whatever you put there isn't connected to time, which I reckon is a pity.
The home note is just a note, so it can hold anything: text, headings, images, tasks, Dataview queries, embedded Base views. With Meta Bind, it can even hold input fields bound to its own properties: type a topic in a text field, and an embedded Base that filters on this.topic follows along. A simple structure:
# Home

## Now
- [[Write the guide (Project)]]
- [[Newsletter (Activity)]]

## Maps
- [[Systems Thinking (MoC)]]
- [[Writing (MoC)]]

## Open tasks
![[Tasks.base#Open]]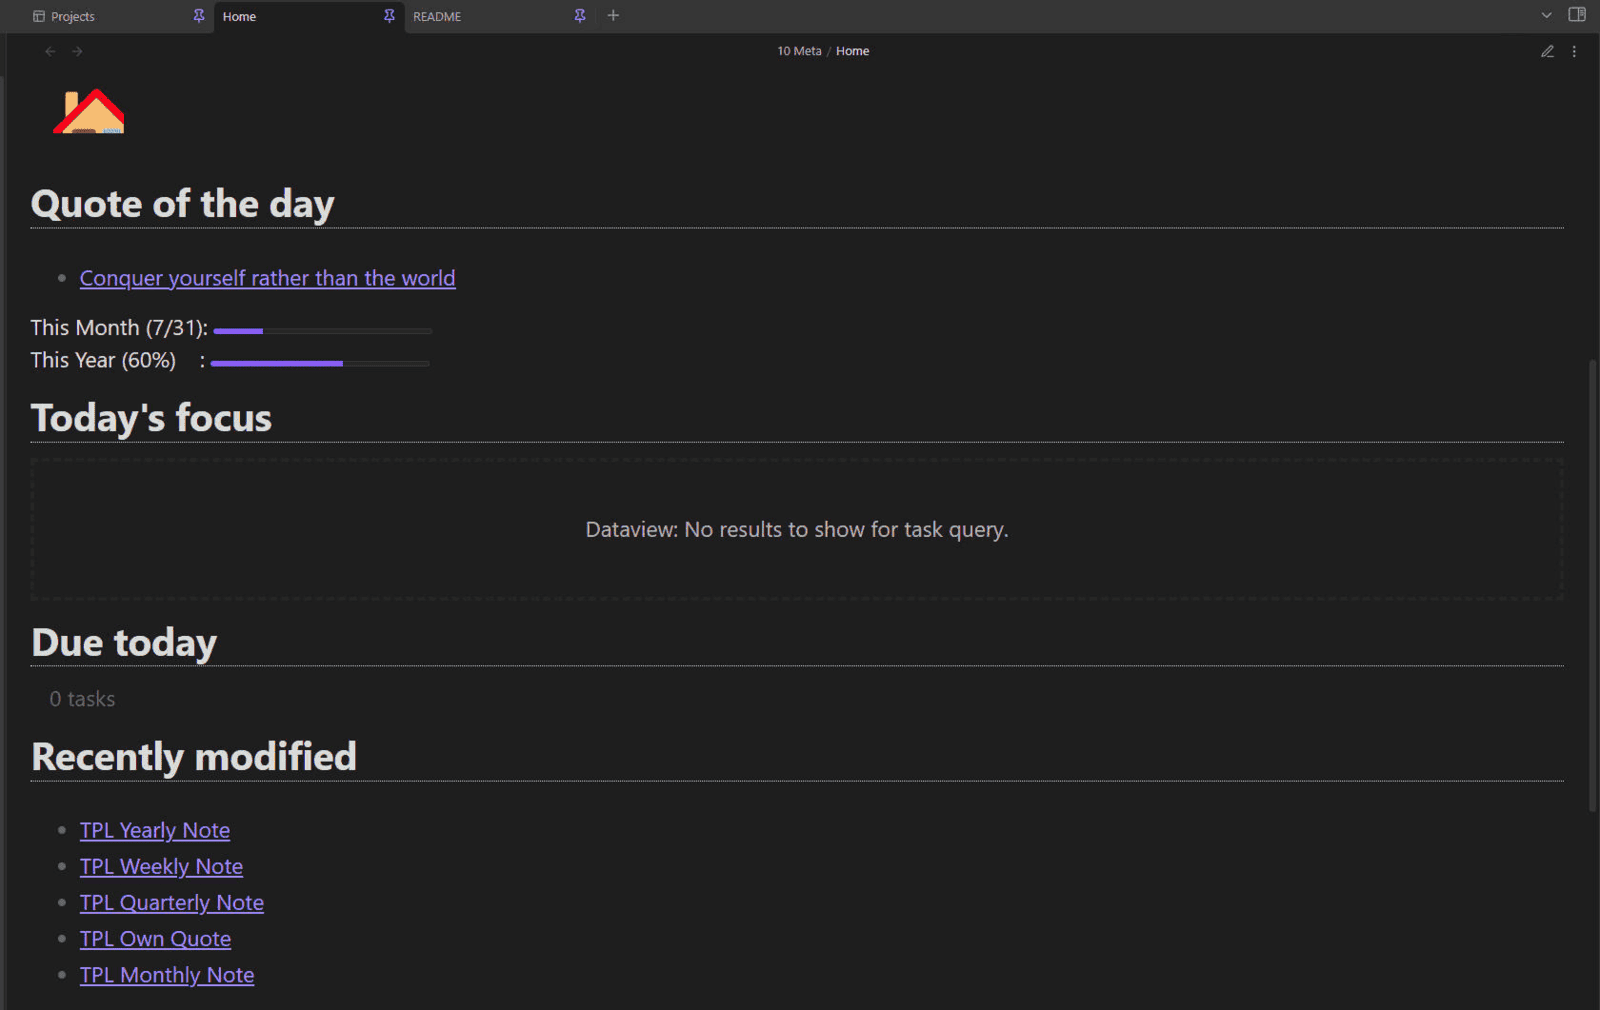
Gotcha: the live queries on a home note are invisible to AI agents, for the same reasons as any live query. Serialize the lists that don't need to update in real time.
Pinned notes and shortcuts in Notebook Navigator
Notebook Navigator (covered in part 9) has two separate features for keeping things in sight:
- Pinned notes stay at the top of a folder or tag. Right-click a note → Pin note. A pinned note is at the top of its list whenever you open that folder or tag, so the overview note of a folder is always the first thing you see. Toggle pinned section shows or hides them.
- Shortcuts are a list at the top of the navigation pane that holds notes, folders, tags, properties and saved searches. Add the active note with Add to shortcuts. Bind Open shortcut 1 to Open shortcut 9 to hotkeys, and your nine most important places are each one keystroke away.
The Notebook Navigator tutorial suggests pinning daily notes, key Bases and active projects, and keeping pins lean: review and prune them monthly.
Workspaces: one layout per context
Different work needs different things in sight. When you write, you want the draft, its outline and its backlinks. When you review, you want a Base of open projects and a Search pane with the right query. Rebuilding that layout by hand every time is friction, and friction means you won't do it.
The Workspaces core plugin saves a layout and restores it in one step. A workspace remembers the open files and tabs, and the width and visibility of each sidebar. Save one with "Manage workspace layouts" (ribbon or command palette), give it a name, and load it later from the same dialog or with "Workspaces: Load workspace layout".
What makes it useful for finding: the panes you saved keep their state. Obsidian's Search view stores its query (plus sort order and display options) as part of that state, so a "Weekly review" workspace can reopen with a Search pane already running the query you use for your review. Combine that with a Base and a pinned MoC in the sidebar (see "Pinned tabs" and "Notes and panes in the sidebars" above), and switching context becomes a single command.
A few ways to reach your workspaces faster:
- Assign a hotkey to "Workspaces: Load workspace layout" (Settings → Hotkeys).
- In Quick Switcher++, type
+to list and load workspaces. - The Homepage plugin can open a workspace at startup instead of a note.
Gotchas: a workspace is a snapshot. Tabs you open after loading it aren't added automatically; to update a workspace, save again under the same name (or use "Workspaces: Save and load another layout"). And keep the list short. Three or four contexts (e.g., writing, research, review) are easy to remember. Fifteen are one more list you have to search. In part 7, I explain why workspaces are also a good reason not to split your notes into several vaults.
Make notes recognizable at a glance
When you scan a list (the file explorer, a Base, search results, your tabs), you don't recall anything. You recognize. Picking the right item from a list in front of you is much easier than producing its name from memory, and that's what the "I" (Identify) in the FILE framework from part 1 is about: you should know what a note is before you open it. It's also part of why navigation is cheaper than search, as the attention study by Bergman and colleagues (part 1) suggests.
Names do most of the work: type suffixes, dates, claim titles. Visual cues do the rest, and you set them up once.
Icons per note type. In my vault, the Obsidian Starter Kit gives each note type its own icon (set in the type's definition) and shows it in the file explorer, in tabs and in the tab title bar. A meeting note, a person note and a project note look different in a list of fifty files, before you read a single word.

Same for folders:
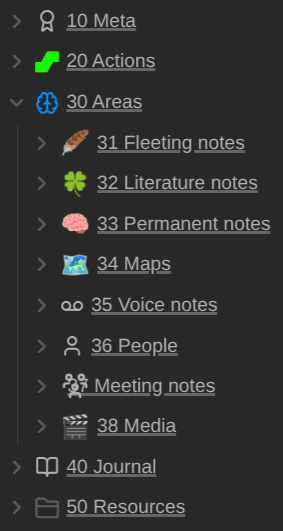
Notebook Navigator goes further. It can color folders, tags, properties and files, give them icons (icon packs, emojis or Lucide icons), read and write those icons in frontmatter, and map icons to file names or file types. Iconize is the classic plugin for icons in the file explorer, in tabs and above note titles, with custom rules that apply icons automatically. It's enabled in my vault and still works, but it's no longer maintained. For a new setup, Notebook Navigator's icons are the maintained option.
Callouts inside notes. Each built-in callout type has its own color and icon (summary in cyan, warning in orange, success in green, and so on), so a decision in a > [!success] callout or a summary in a > [!summary] callout stands out when you scroll. How to use them as landmarks, and how to jump to them, is in "Callouts: landmarks you can jump to" (part 5).
Banner images at the top of notes (the Banners plugin) tell you where you are the moment a hub note opens. Keep them for a few hub notes, like your home note or your main MoCs. It hasn't been updated since 2022, so check that it still works before installing it.
**Give visual cues to note types, not topics**. You have a dozen or so types, and they rarely change. Topics multiply, and past a handful of colors, you stop telling them apart. The same idea shows up elsewhere in this series: the Johnny Decimal numbers you recognize without reading (part 3), and the book covers of the Bookshelf Base (part 9).
The tags pane and Tag Wrangler
The Tags view (core plugin) lists all your tags, nested, with counts, sorted by name or frequency. It has a filter box. Click a tag and Obsidian opens Search with tag:#that-tag. For tags to work as pathways, though, they need to stay clean.
Using the Tags view
The Tags view is an index of your vault by topic, with a count next to each entry. A few things it does that are easy to miss:
Ctrl/Cmd-click a tag to add it to the current search term (or remove it), instead of replacing the search. Click#type/book, thenCtrl/Cmd-click#ai, and you get the book notes about AI.- Show nested tags switches between a tree (
#status→in_progress,done) and a flat list. - Expand all and Collapse all open or close the whole hierarchy. Each level also has its own arrow.
- Sort by frequency to see which tags carry your vault, and which ones were used once and forgotten.
That last one is also how you spot the mess: #book and #books, #meeting and #meetings, #ai and #AI (tags are case-insensitive, so the last two are one tag, displayed with the casing Obsidian found first). Every duplicate splits your notes between two pathways, and a search on one misses the other. My Obsidian Tags note covers the conventions that prevent this.
Tag Wrangler
That's what Tag Wrangler is for. It lets you:
- rename or merge a tag, including its nested tags, across the whole vault
- right-click a tag to add
tag:#xas a requirement, or-tag:#xas an exclusion, to the current search - create a tag page: a note that has the tag as an alias, so you can find it in the quick switcher by the tag's name
- open a random note with that tag (when Smart Random Note is installed)
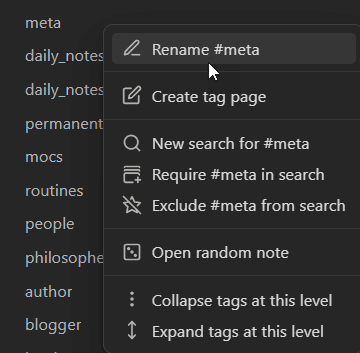
Tag Wrangler has no UI of its own. It adds a context menu to the Tags view (and to tags in your notes), so the core Tags view plugin has to be enabled.
Renaming and merging. Right-click a tag → Rename. Tag Wrangler uses Obsidian's own parse data to find real tags only (#bar inside a Markdown link isn't touched), and it renames tags in the note body and in the properties. Renaming a parent renames its children: #x/y → #a/b turns #x/y/z into #a/b/z. That's also how you restructure a hierarchy:
#x/y→#xturns#x/y/zinto#x/z(one level less)#x/y→#letters/x/ymoves the whole branch under a new parent#books→#bookmerges the two. Tag Wrangler detects the merge and asks you to confirm
You can also drag a tag onto another one in the Tags view to rename or reorganize it, and drag a tag into the editor to insert it as text.
Tag pages. A tag page is a note that has the tag as an alias. It's the place to explain what the tag means, when to use it, and to link the key notes that carry it. To create one, right-click the tag → Create Tag Page, or Alt/Option-click a tag anywhere (in the Tags view or in a note). The note gets an alias like this one (the quotes are required, or Obsidian doesn't see it as a tag alias):
---
aliases:
  - "#systems_thinking"
---
Then:
Alt/Option-click the tag anywhere to open its page. AddCtrl/Cmdto open it in a new tab.- Type
#systems_thinkingin the quick switcher to open the page from the keyboard. Ctrl/Cmd-hover the tag to preview the page.- Open the tag page's unlinked mentions in the Backlinks pane: they list every place where the tag is used in the body of a note (not in the tags property), with Link buttons if you want to turn some of them into links.
You can rename or move the tag page wherever you like, as long as it keeps the alias. Renaming the tag with Tag Wrangler updates the alias too.
Random note. With Smart Random Note installed, the context menu can open a random note with that tag: a small dose of resurfacing within one topic. Note that Smart Random Note hasn't been updated since 2021.
If you prefer browsing tags like folders, TagFolder shows your notes in a tree built from tag combinations. More on it in part 9.
The All properties view
The All properties view (Properties view core plugin) does the same for properties: it lists every property in your vault with its type, sorted by name or frequency. Click one to search for it, right-click to rename it across the vault.
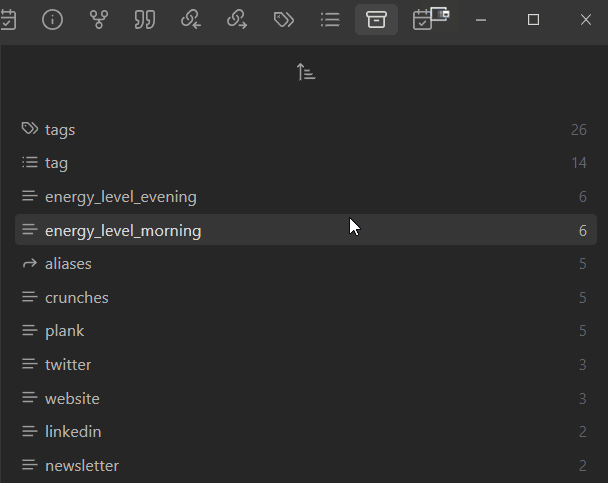
Use it the way you use the Tags view: sort by frequency, look for near-duplicates (author and authors, source and sources), and rename one into the other. A property that exists under two names is a search that misses half its results. Since Obsidian 1.10, you can also delete a property from every note at once from this view. More in my note about the Properties view.
FAQ
How do I find all the notes that link to a note? Open the Backlinks pane on that note. For a list you can filter and sort, use a Base with file.hasLink(file("X.md")), or file.hasLink(this) in a sidebar Base to always see the notes linking to the current one. From the terminal: obsidian backlinks file="X", or rg -F -l '[[X]]' . with Obsidian closed. Don't forget the unlinked mentions: notes that mention the title without linking to it.
How do I find orphan notes? Use a Base with file.backlinks.length == 0 and file.links.length == 0, run obsidian orphans (notes nothing links to) from the terminal, or install the Find orphaned files and broken links plugin. Orphans are the notes you'll never reach by navigation, so review that list regularly: link them, merge them or archive them.
What should I do with unresolved links? Nothing, for most of them: a link to a note that doesn't exist yet is a breadcrumb. Rank them with obsidian unresolved counts, create the notes that many notes link to, and fix the broken ones (typos, old paths, links that use an alias instead of the file name).
Conclusion
You don't need to remember a note's name to find it. You need one note you can find, and links that lead from there: backlinks, the local graph, Maps of Content that keep themselves complete, and project notes that collect everything about a piece of work. Write those paths into the files rather than into a plugin, and they'll still work in ten years.
Next in the series: The Best Obsidian Plugins for Finding Notes. Previous: Search Your Obsidian Vault From Outside Obsidian.
 Sébastien Dubois

Prefer to read the whole series in one place? I turned it into an ebook, The Obsidian Search Handbook, with an exercise at the end of every chapter (the Complete edition adds a starter pack and worksheets).
Sébastien Dubois
Free cheat sheet. The commands and operators worth remembering, and the search escalation ladder (which tool to try first, depending on what you remember about the note), on 13 pages you can keep next to your vault. Enter your email and I'll send it right away: the Obsidian Search Cheat Sheet.
 Sebastien Dubois

Get the free Obsidian Search Cheat Sheet. 13 pages to keep next to your vault: the search operators worth remembering and the search escalation ladder. Enter your email and I'll send it right away. You'll also get a few short follow-up emails about finding notes in Obsidian, and you can unsubscribe at any time.
About Sébastien
Ready to get to the next level?
Found this valuable? Share it with someone who needs it.