How to Self-Host OpenClaw Securely on a VPS: A Security-First Guide
Running AI agents on your own infrastructure is powerful. And dangerous if done wrong. Here's how to do it right.


Running AI agents on your own infrastructure is one of the most powerful things you can do as a creator. It's also one of the most dangerous if you get it wrong.
In this article, I want to help you set up OpenClaw on a Virtual Private Server (VPS) with security as the top priority.
Introduction
If you've read my article on Agentic Knowledge Management, you know I believe AI agents are the next evolution of Personal Knowledge Management (PKM). Instead of you invoking AI, your AI monitors your knowledge base and proposes actions autonomously; with or without your approval.
OpenClaw is one way to make that vision real TODAY. But keep in mind that AI agents are powerful AND dangerous. They can read your files, execute code, browse the web, and interact with services on your behalf. That's incredible leverage... Until your agent gets compromised (and that happens way faster than you imagine).
This guide takes a security-conscious approach.
You'll learn how to:
- Set up a hardened Ubuntu Virtual Private Server (VPS) from scratch
- Install and configure OpenClaw securely
- Use Tailscale for Zero Trust and with no public exposure
- Strictly limit access to your server
- Protect your network from agents gone rogue
- Set up the browser agent for web browsing capabilities
- Configure your agent's abilities
- Monitor your agent and know when something goes wrong
TL;DR
- Create a VPS with Ubuntu, harden SSH, install fail2ban, create a swap file
- Use Tailscale for secure, private access. Never expose services publicly
- Create a dedicated user for OpenClaw (not root, not your admin account)
- Install development dependencies (jq, Node Version Manager (nvm), Bun, pnpm, Homebrew, GitHub CLI)
- Only allow traffic through Tailscale, and leverage the Tailscale shield/firewall
- Configure the web client with the Brave Search API
- Run OpenClaw gateway as a systemd service
- Set up the browser agent for web browsing capabilities
- Monitor with journalctl and security audits
- Never install this on your main computer (nor on a computer within your private network)
Key principle: Your AI agent runs in isolation. If it gets compromised, the blast radius is limited to that VPS, not your entire life (cfr., Zero Trust Security)
Why Self-Host AI Agents?
You might wonder why not just use cloud AI services. Here's why self-hosting matters for creators:
- Privacy: Your knowledge base stays yours
- Control: You decide what your agent can and cannot do
- Customization: Configure it exactly for your workflows
- Cost: Predictable costs vs. variable API fees
- Learning: Understanding the infrastructure makes you a better operator
- Avoid vendor lock-in: Your thing, on "your" machine. Your rules, total freedom
But self-hosting comes with responsibility. You are now the sysadmin. This guide helps you do it right.

Benefits of This Setup
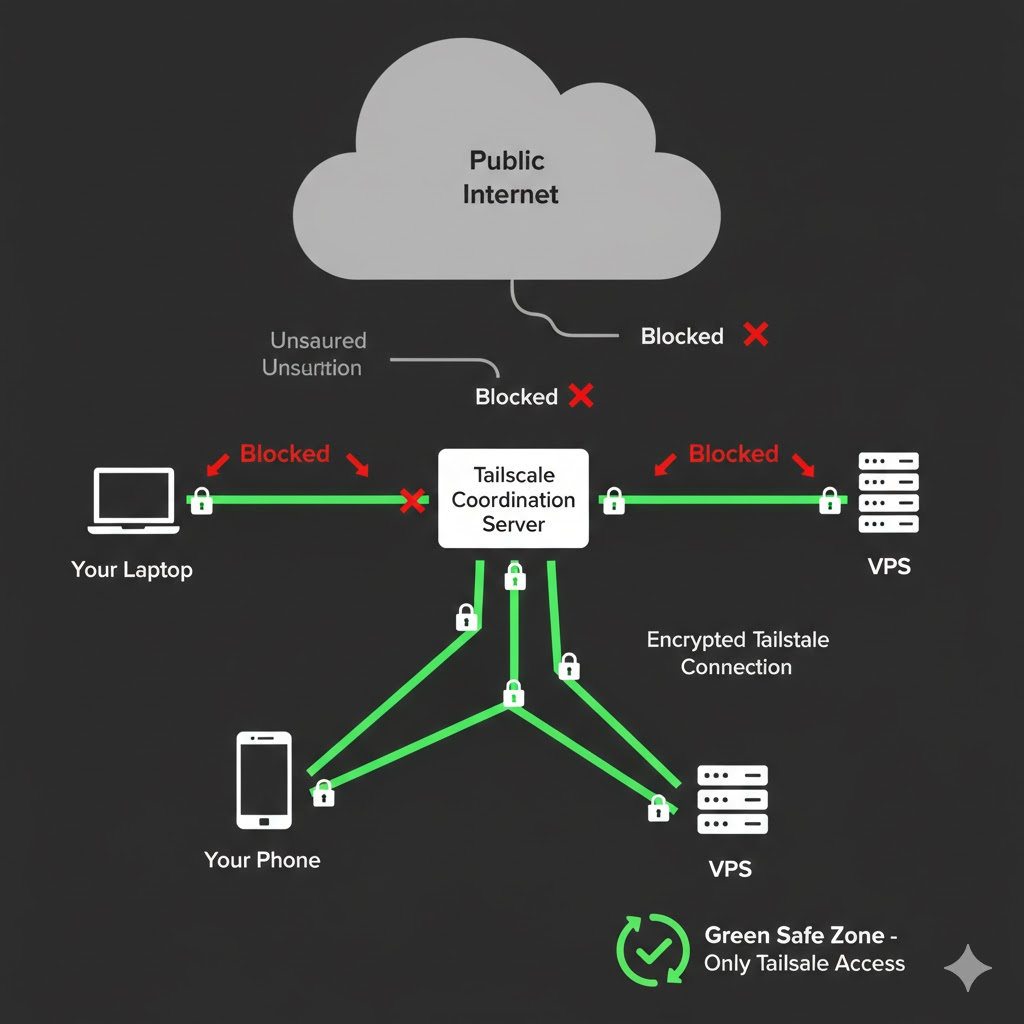
- Zero public exposure: Nothing accessible from the internet directly
- Tailscale mesh networking: Encrypted, authenticated connections
- Defense in depth: Multiple security layers (SSH hardening + fail2ban + UFW + Tailscale + auto-updates)
- Isolation: Dedicated user account limits blast radius
- Monitoring: Know when something goes wrong
Prerequisites
Before you start, you'll need:
- A VPS provider account (Hetzner, DigitalOcean, Vultr, OVH, etc.)
- Basic terminal familiarity (you don't need to be a sysadmin)
- A Tailscale account (free tier works fine)
- SSH key pair on your local machine
- Some time ahead of you
Step 1: Create and Access Your VPS
Explanation
Start with a fresh Ubuntu VPS. Most providers offer one-click Ubuntu images. Choose the latest available (LTS) version.
Commands
# SSH into your new VPS as root
ssh root@<your-vps-ip>

# Change the root password immediately
passwd

# Update the system fully
sudo apt update && sudo apt upgrade -y
sudo apt dist-upgrade -y

# Change the hostname to something meaningful
sudo hostnamectl set-hostname <your-hostname>
Common Pitfalls
⛔ Don't skip changing the root password. Many VPS providers email you the initial password in plaintext.
⛔ Don't use a weak password. Use a password manager to generate something strong.
⛔ Don't skip dist-upgrade. It handles package upgrades that upgrade won't (kernel updates, dependency changes).
In general, I recommend using a strong passphrase. tip: if you can remember it, it's not strong enough.
Step 2: Create Your Admin User
Explanation
Never run services as root. Create a personal admin account for yourself.
Commands
# Create your user
adduser <yourusername>

# Add to sudoers
usermod -aG sudo <yourusername>

# Switch to your new user
su <yourusername>

# Create SSH directory with correct permissions
mkdir ~/.ssh
chmod 700 ~/.ssh

# Add your public key (copy from your local machine)
nano ~/.ssh/authorized_keys
# Paste your public key, save

# Set correct ownership and permissions
sudo chown -R <yourusername> ~/.ssh
sudo chgrp -R <yourusername> ~/.ssh
chmod 0700 ~/.ssh
chmod 0600 ~/.ssh/authorized_keys
Common Pitfalls
⛔ Don't forget to test SSH access with your key BEFORE disabling password auth. You could lock yourself out.
Step 3: Harden SSH
Explanation
SSH is your gateway to the server. Lock it down hard.
Commands
sudo nano /etc/ssh/sshd_config
Set these values:
PermitRootLogin no
PasswordAuthentication no
PermitEmptyPasswords no
Then reload:
sudo sshd -t && sudo systemctl reload ssh
Common Pitfalls
⛔ Always run sshd -t to test config syntax before reloading. A typo can lock you out.
Step 4: Install Fail2Ban
Explanation
Fail2ban automatically bans IPs after failed login attempts. It's your first line of defense against brute-force attacks.
Commands
sudo apt update && sudo apt upgrade -y
sudo apt install fail2ban -y
sudo systemctl enable --now fail2ban
Common Pitfalls
⛔ Don't skip this. Bots constantly scan for vulnerable SSH servers. Within minutes of deploying a VPS, you'll see login attempts.
Step 5: Create a Swap File
Explanation
A swap file provides overflow memory when RAM runs out. This prevents out-of-memory crashes, which is especially important for AI workloads.
Commands
sudo fallocate -l 2G /swapfile
sudo chmod 600 /swapfile
sudo mkswap /swapfile
sudo swapon /swapfile
echo '/swapfile none swap sw 0 0' | sudo tee -a /etc/fstab

# Verify it's working
free -h
Common Pitfalls
⛔ Adjust the swap size based on your VPS RAM. 2G is a reasonable default for most setups.
Step 6: Install and Configure Tailscale
Explanation
Tailscale creates a private mesh network between your devices. Your VPS becomes accessible only to YOUR devices. Completely invisible to the public internet.
Commands
# Install Tailscale
curl -fsSL https://tailscale.com/install.sh | sh

# Start Tailscale and authenticate
sudo tailscale up

# Follow the link to authenticate

# Verify it's running
tailscale status

# Get your VPS's Tailscale IP (note this down)
tailscale ip -4
On your own computer, also run:
# Get your Tailscale IP
tailscale ip -4

# CRITICAL: Block incoming traffic to your machine
# If your VPS gets compromised, you don't want it reaching your computer
sudo tailscale set --shields-up=true
Update Your SSH Config
Now that your VPS is on Tailscale, update your local SSH config to use the Tailscale IP:
# On your computer, edit ~/.ssh/config
# Add an entry like:
Host my-vps
    HostName <vps-tailscale-ip>
    User <yourusername>
    IdentityFile ~/.ssh/id_ed25519
Validate that you can connect via the Tailscale IP before proceeding.
Common Pitfalls
⛔ Don't skip shields-up on your personal machine. This is non-negotiable. Your VPS can call OUT to your machine if compromised.
⛔ Consider disabling key expiry for your VPS in the Tailscale admin console. Otherwise you'll need to re-auth periodically.
Step 7: Configure UFW Firewall
Explanation
Uncomplicated Firewall (UFW) blocks all traffic except what you explicitly allow. Combined with Tailscale, this means your services are ONLY accessible through your private network.
Commands
sudo apt install ufw -y
sudo ufw enable

# Default: deny everything incoming
sudo ufw default deny incoming
sudo ufw default allow outgoing

# Allow all traffic through Tailscale interface
sudo ufw allow in on tailscale0

# Allow web ports ONLY from your Tailscale network
sudo ufw allow from <your-tailscale-ip>/24 to any port 443 proto tcp
sudo ufw allow from <your-tailscale-ip>/24 to any port 80 proto tcp

# Verify and reload
sudo ufw status verbose
sudo ufw reload
sudo service ssh restart
Common Pitfalls
⛔ Don't allow port 22 from the public internet. SSH through Tailscale instead.
⛔ Replace <your-tailscale-ip> with your actual Tailscale IP from step 6.
Step 8: Create the OpenClaw User
Explanation
Create a dedicated user for OpenClaw. This limits the blast radius if something goes wrong.
Commands
sudo adduser openclaw
sudo usermod -aG sudo openclaw
su - openclaw
Common Pitfalls
⛔ Don't run OpenClaw as your personal admin user. Isolation matters.
Step 9: Install Dependencies
Explanation
OpenClaw and its ecosystem need several development tools. Install them under the OpenClaw user account.
Commands
# As the openclaw user

# Install jq (JSON processing)
sudo apt install jq -y

# Install nvm (Node.js version manager)
curl -o- https://raw.githubusercontent.com/nvm-sh/nvm/v0.40.4/install.sh | bash
source ~/.bashrc
nvm install --lts
nvm use --lts

# Install Bun
sudo apt install unzip -y
curl -fsSL https://bun.com/install | bash
source ~/.bashrc

# Install pnpm
curl -fsSL https://get.pnpm.io/install.sh | sh -
source ~/.bashrc

# Install Homebrew
/bin/bash -c "$(curl -fsSL https://raw.githubusercontent.com/Homebrew/install/HEAD/install.sh)"
echo >> ~/.bashrc
echo 'eval "$(/home/linuxbrew/.linuxbrew/bin/brew shellenv bash)"' >> ~/.bashrc
source ~/.bashrc

# Install GitHub CLI
curl -fsSL https://cli.github.com/packages/githubcli-archive-keyring.gpg | sudo dd of=/usr/share/keyrings/githubcli-archive-keyring.gpg
sudo chmod go+r /usr/share/keyrings/githubcli-archive-keyring.gpg
echo "deb [arch=$(dpkg --print-architecture) signed-by=/usr/share/keyrings/githubcli-archive-keyring.gpg] https://cli.github.com/packages stable main" | sudo tee /etc/apt/sources.list.d/github-cli.list > /dev/null
sudo apt update && sudo apt install gh -y
Common Pitfalls
⛔ Make sure you're logged in as the openclaw user when installing these.
⛔ Run source ~/.bashrc after each installation that modifies your PATH.
Step 10: Install OpenClaw
Explanation
Now let's install OpenClaw itself.
Commands
# As the openclaw user
curl -fsSL https://openclaw.ai/install.sh | bash
exec bash
source ~/.profile
Common Pitfalls
⛔ Make sure you're logged in as the openclaw user, not root or your admin account.
Step 11: Configure OpenClaw for Tailscale
Explanation
Configure OpenClaw to bind to your Tailscale IP, not the public interface.
Commands
openclaw configure
When prompted:
- Where will the Gateway run? → Local (this machine)
- Select sections to configure → Gateway
- Gateway port → 18789 (default)
- Gateway bind mode → Tailnet (Tailscale IP)
- Tailscale exposure → Serve (Private HTTPS for your tailnet)
- Reset Tailscale serve/funnel on exit? → No
During configuration, you can also connect your messaging platforms (WhatsApp, Telegram, etc.) if you want your agent reachable through those channels.
Then expose via Tailscale:
sudo tailscale serve --bg 18789
sudo tailscale serve status

# To disable it later if needed:
# sudo tailscale serve --https=443 off
TIP: You can find your Tailscale DNS name at https://login.tailscale.com/admin/dns
Common Pitfalls
⛔ Never choose "Funnel" which exposes to the public internet. Always use "Serve" for private access.
Step 12: Start the Gateway and Approve Devices
Explanation
Before setting up the systemd service, start the gateway manually to verify everything works and approve your client devices.
Commands
# Start the gateway manually
openclaw gateway --force

# In another terminal, list pending devices
openclaw devices list

# Approve your device
openclaw devices approve <Request>

# Connect with your browser to the Tailscale service URL to verify access
Common Pitfalls
⛔ Don't skip device approval. Without it, your devices won't be able to connect to the gateway.
Step 13: Configure Web Client
Explanation
Configure OpenClaw's web capabilities, including web search via the Brave Search API.
Commands
openclaw configure --section web
When prompted, enter your Brave Search API key. You can get one at https://api-dashboard.search.brave.com/app/keys
Common Pitfalls
⛔ The free tier of the Brave Search API is sufficient for personal use.
Step 14: Run Security Audits
Explanation
OpenClaw has built-in security auditing. Use it.
Commands
# Run audits
openclaw doctor
openclaw security audit
openclaw security audit --deep
openclaw security audit --fix
Add trusted proxies to your config:
nano ~/.openclaw/openclaw.json
Inside the "gateway" object, add:
"trustedProxies": ["127.0.0.1"]
Common Pitfalls
⛔ Run these audits regularly, not just once. Security is ongoing.
Step 15: Set Up systemd Services
Explanation
Run OpenClaw as a proper systemd service that starts automatically and restarts on failure.
Commands
mkdir -p ~/.config/systemd/user/
nano ~/.config/systemd/user/openclaw-gateway.service
Add this content:
[Unit]
Description=OpenClaw Gateway
After=network-online.target
Wants=network-online.target

[Service]
Type=simple
ExecStart=/home/openclaw/.npm-global/bin/openclaw gateway --port 18789
Restart=always
RestartSec=5
Environment=HOME=/home/openclaw
Environment=PATH=/usr/local/bin:/usr/bin:/bin:/home/openclaw/.npm-global/bin
Environment=NODE_ENV=production

[Install]
WantedBy=default.target
Enable it:
systemctl --user enable --now openclaw-gateway.service
systemctl --user status openclaw-gateway
Common Pitfalls
⛔ Adjust the ExecStart path if your installation differs.
Step 16: Set Up the Browser Agent
Explanation
Give your agent web browsing capabilities by installing a browser and running it as a headless service.
Commands
# Install the browser agent
npm install -g agent-browser
agent-browser install --with-deps

# Install Google Chrome
wget https://dl.google.com/linux/direct/google-chrome-stable_current_amd64.deb
sudo dpkg -i google-chrome-stable_current_amd64.deb
sudo apt --fix-broken install -y
Create a systemd service for the browser:
nano ~/.config/systemd/user/openclaw-browser.service
Add this content:
[Unit]
Description=OpenClaw Browser (Chrome CDP)
After=network.target

[Service]
ExecStart=/usr/bin/google-chrome --headless --no-sandbox --disable-gpu --remote-debugging-port=18800 --user-data-dir=%h/.openclaw/browser/openclaw/user-data about:blank
Restart=on-failure
RestartSec=5

[Install]
WantedBy=default.target
Enable and test:
systemctl --user enable --now openclaw-browser.service

# Test the browser is running
curl -s http://127.0.0.1:18791/ | jq '{running, pid, chosenBrowser}'
curl -s -X POST http://127.0.0.1:18791/start
curl -s http://127.0.0.1:18791/tabs
Configure OpenClaw to use it:
nano ~/.openclaw/openclaw.json
Add inside the config:
"browser": {
    "enabled": true,
    "executablePath": "/usr/bin/google-chrome-stable",
    "headless": true,
    "noSandbox": true
}
Common Pitfalls
⛔ If dpkg reports dependency errors, sudo apt --fix-broken install -y will resolve them.
Note that headless browsers are usually blocked by Cloudflare and the like. If you want your agent to surf the Web unhindered, you'll have to give it access to a non-headless browser.
Step 17: Install and Configure Skills
Explanation
OpenClaw has a skill system that extends your agent's capabilities. Configure the ones you need. But be VERY cautious. Skills ARE among the top sources of risk for your agent (and for LLMs in general)!
Commands
openclaw configure
Navigate to the skills configuration, select the skills you want using space, then hit enter.
Recommended skills:
- summarize
- video-frames
Common Pitfalls
⛔ Be careful with third-party skills. They're a potential vector for prompt injection. Only install skills from people you trust.
Seriously, BE VERY CAREFUL about this. Just days after the release of OpenClaw, it was found that the most popular skill was in fact malware. And I'm sure it's true of many skills out there. Consider that skills are dangerous dependencies to add to your system, potentially leading to catastrophe.
Step 18: Monitoring Basics
Explanation
You need to know when something goes wrong. Basic monitoring is essential.
Commands
# View real-time logs
journalctl --user -u openclaw-gateway -f

# Check service status
systemctl --user status openclaw-gateway

# Periodic security checks
openclaw security audit --deep
Set a reminder to check logs weekly and run security audits.
Common Pitfalls
⛔ Don't set and forget. AI Agents are powerful. Monitor them.
Step 19: Backup Your Configuration
Explanation
Back up your OpenClaw configuration regularly.
Commands
tar czf openclaw-backup-$(date +%Y%m%d).tar.gz ~/.openclaw
Consider creating a Git repository for ~/.openclaw/workspace to track changes. If you do that, also give your agent a hard rule about always doing a git commit/push when it changes its workspace.
Common Pitfalls
⛔ Test your backups by restoring to a test environment. Untested backups aren't backups.
Additional Considerations
Disable mDNS Broadcasting
Your network doesn't need to know you're running OpenClaw:
echo 'export OPENCLAW_DISABLE_BONJOUR=1' >> ~/.bashrc
source ~/.bashrc
Automatic Security Updates
You don't want to manually apply security patches. Let Ubuntu handle critical updates automatically:
sudo apt install unattended-upgrades -y
sudo dpkg-reconfigure -plow unattended-upgrades
Verify it's enabled:
cat /etc/apt/apt.conf.d/20auto-upgrades
You should see:
APT::Periodic::Update-Package-Lists "1";
APT::Periodic::Unattended-Upgrade "1";
This ensures your VPS stays patched against known vulnerabilities, even when you're not paying attention.
Time Synchronization (NTP)
Accurate time is critical for security (TLS certificates, logs, Tailscale). Use chrony for reliable time sync:
sudo apt install chrony -y
sudo systemctl enable --now chrony
Verify it's working:
chronyc tracking
You should see a reference server and low offset values. If time drifts too far, things break in subtle and annoying ways.
Discord Bot Setup
If you want your agent reachable via Discord:
- Go to https://discord.com/developers/applications
- Click "New Application" and name it
- Go to the Bot section → "Add Bot"
- Copy the Bot Token (keep it secret!)
- Enable required intents in Bot settings:
- Message Content Intent
- Server Members Intent (optional)
- Go to OAuth2 → URL Generator
- Select scopes:
bot - Select permissions: Send Messages, Read Message History, Add Reactions (or Administrator if needed)
- Open the generated URL to add the bot to your server
- Select scopes:
- Give the bot token to your assistant and let it handle the configuration
- Send a Discord DM to your bot. It will reply with a pairing code
- Run
openclaw pairing list discordand copy the code - Run
openclaw pairing approve discord <code>
Security: Lock down access to your server only:
- Set
groupPolicytoallowlist - Add your server ID to
guilds
The Heartbeat Feature
Once you're comfortable with your setup, explore the heartbeat feature. This is what makes your agent truly autonomous.
When you configure the heartbeat, make sure to adapt HEARTBEAT.md in the workspace (~/.openclaw/workspace/HEARTBEAT.md). That's where you configure the instructions and prompt that drive the heartbeat: https://docs.openclaw.ai/gateway/heartbeat#what-the-heartbeat-prompt-is-for
Play with your agent manually first. Understand what it can do before letting it act more autonomously.
Staying Up to Date
Check for updates regularly: https://docs.openclaw.ai/install/updating
Going Further
- OpenClaw Documentation
- Agentic Knowledge Management: The Next Evolution of PKM
- My Obsidian Starter Kit for building the knowledge base your agent can work with
- Join the Knowii Community to discuss AI agents with other creators
Additional Recommendations
Although this setup is secure from an infrastructure point of view, consider these additional recommendations to remain on the safe side:
- Don't install this on your own computer. Use a dedicated VPS. If the agent is compromised, the blast radius stays contained
- Apply the least privilege principle. Only give your agent the permissions it truly needs
- Don't give it all the keys to your kingdom. Be selective about which API keys and credentials you provide
- Be careful about web browsing. Don't let your agent consume untrusted sources; prompt injection risks are real
- Use short-lived API keys whenever possible. Rotate them regularly
- Be cautious with skills installation.
openclaw skills install <foo>is a potential vector for prompt injection. Only install skills from people you really trust - Don't let your bot participate in Moltbook. Probably not a great idea from a security point of view
- Use the "CRITICAL" keyword in SOUL.MD to enforce important behavioral boundaries for your agent
Conclusion
You now have a secure, self-hosted AI agent running on your own infrastructure. The key principles:
- Isolation: Dedicated VPS, dedicated user account
- No public exposure: Everything through Tailscale
- Defense in depth: SSH hardening + fail2ban + UFW + Tailscale + auto-updates + NTP
- Monitoring: Know when something goes wrong
- Security mindset: Your agent is powerful. Treat it with respect.
This setup gives you the benefits of AI agents while minimizing the risks. Start slow, monitor closely, and expand capabilities gradually.
That's it for today! ✨
Go Further


Want to go deeper?

About Sébastien
I'm Sébastien Dubois, and I'm on a mission to help knowledge workers escape information overload. After 20+ years in IT and seeing too many brilliant minds drowning in digital chaos, I've decided to help people build systems that actually work. Through the Knowii Community, my courses, products & services and my Website/Newsletter, I share practical and battle-tested systems.
I write about Knowledge Work, Personal Knowledge Management, Note-taking, Lifelong Learning, Personal Organization, Productivity, and more. I also craft lovely digital products and tools.
If you want to follow my work, then become a member and join our community.
Ready to get to the next level?
Want to use AI as a real thinking partner?
- 🤖 AI Ghostwriter Guide — Make AI write like you
- 🧠 AI Master Prompt Workshop — Craft prompts that actually work
- 🎙️ Knowii Voice AI — Privacy-first voice-to-text powered by AI
- 🎯 Join Knowii — AI workshops + community + all courses
Found this valuable? Share it with someone who needs it.